When you set up a server on the internet, it becomes an instant target for various attacks by internet bots.
Cloudflare Tunnel is a simpler and more secure solution to protect your apps and web servers from direct attacks.
What is a Cloudflare Tunnel?
A Cloudflare tunnel means “a private connection between your web resources(webserver) and Cloudflare”.
Only traffic that goes through Cloudflare can reach your server through the tunnel.
To put it another way, it’s a secure connection. Only Cloudflare can view and communicate with the server; it is unroutable for the rest of the internet as if the server does not exist.
Users can use Tunnel to make a private connection from their origin server to Cloudflare without using a publicly routable IP address.
Instead, this secure connection is built by running cloudflared, a lightweight daemon on your origin that generates a secure, outbound-only connection.
Only traffic that passes through Cloudflare will be able to reach your origin.
GRE Tunnel
GRE tunnels were utilized in the past for this type of private deployment. It is a data-transfer protocol that simulates a physical connection between two servers.
Network administrators on both sides of the link must work together to configure a GRE tunnel. It’s an expensive service that’s usually only available to big businesses with big expenditures.
They wanted to figure out a way to get the same level of security as a GRE tunnel without the cost or effort. And with that instruction, their team began construction on the Tunnel.
Zero trust Security – Trust No one!
Traditional IT network security assumes that everyone and everything on the network is trustworthy. Nothing and no one is trusted in a Zero Trust architecture.
It is an IT security approach that involves tight identity verification for everyone who wants to access resources on a private network, whether inside or outside the network perimeter.
Benefits of using Cloudflare Tunnel
Here we have the following benefits of using the Cloudflare tunnel –
- To protect your web applications from attacks, Tunnel integrates with DDoS Protection and Web Application Firewall (WAF).
- It allows you to easily secure and encrypt application traffic to any sort of infrastructure, allowing you to hide your web server IP addresses, block direct attacks, and get back to providing fantastic services.
- Tunnel enables you to easily deploy infrastructure in a Zero Trust environment, ensuring that all requests to your resources are routed through Cloudflare’s advanced security filters.
- Through Cloudflare’s network, applications that were previously accessible to anybody via the origin IP are now only accessible to authenticated users.
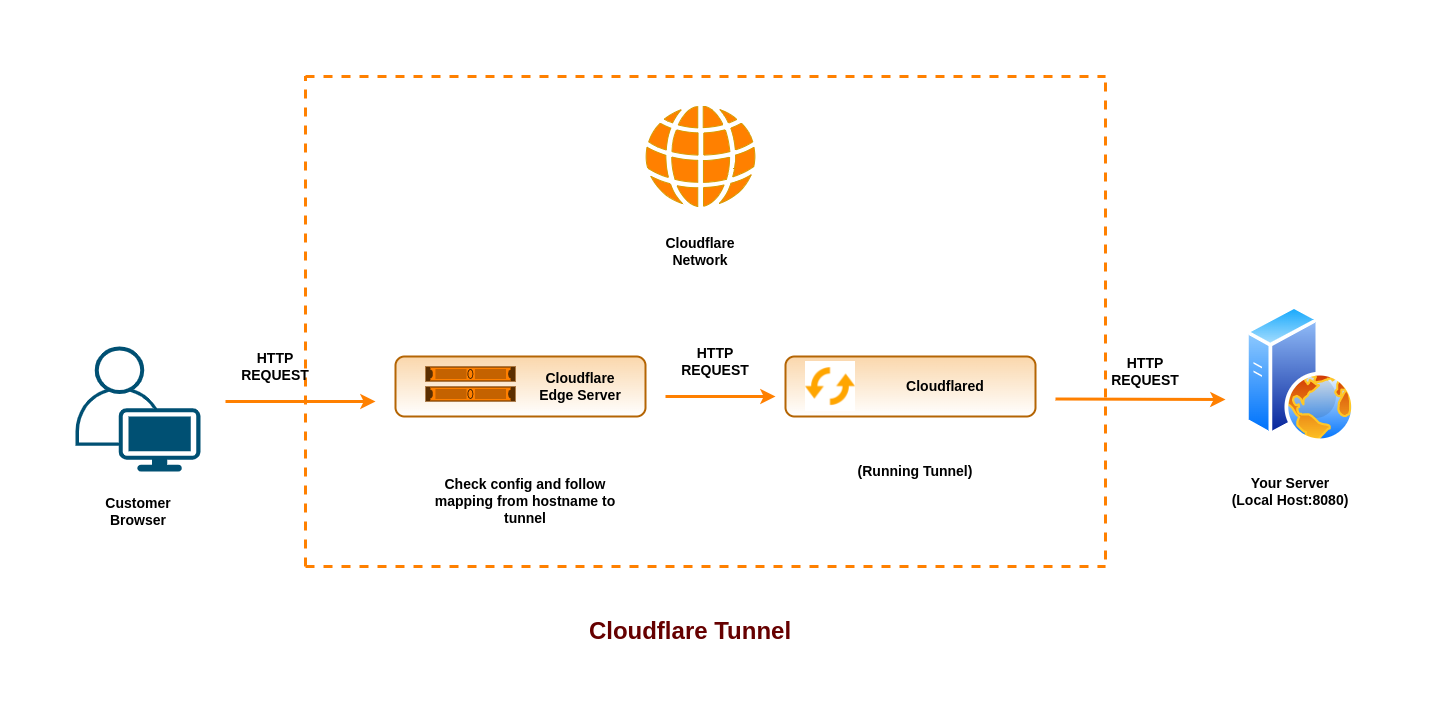
How Cloudflare Tunnel Works
Cloudflare Tunnel establishes a connection between your infrastructure and Cloudflare.
Cloudflared, a lightweight connector your team operates, enables services to reach Cloudflare and customers through an outbound-only connection, eliminating the need to open firewall holes.
Cloudflared establishes outbound connections (tunnels) between your resources and the Cloudflare edge. Tunnels are persistent objects that use DNS records to redirect traffic.
You can run as many cloudflared processes (connectors) as you need within the same tunnel.
These processes will connect to the Cloudflare edge and send traffic to the Cloudflare data center closest to you.
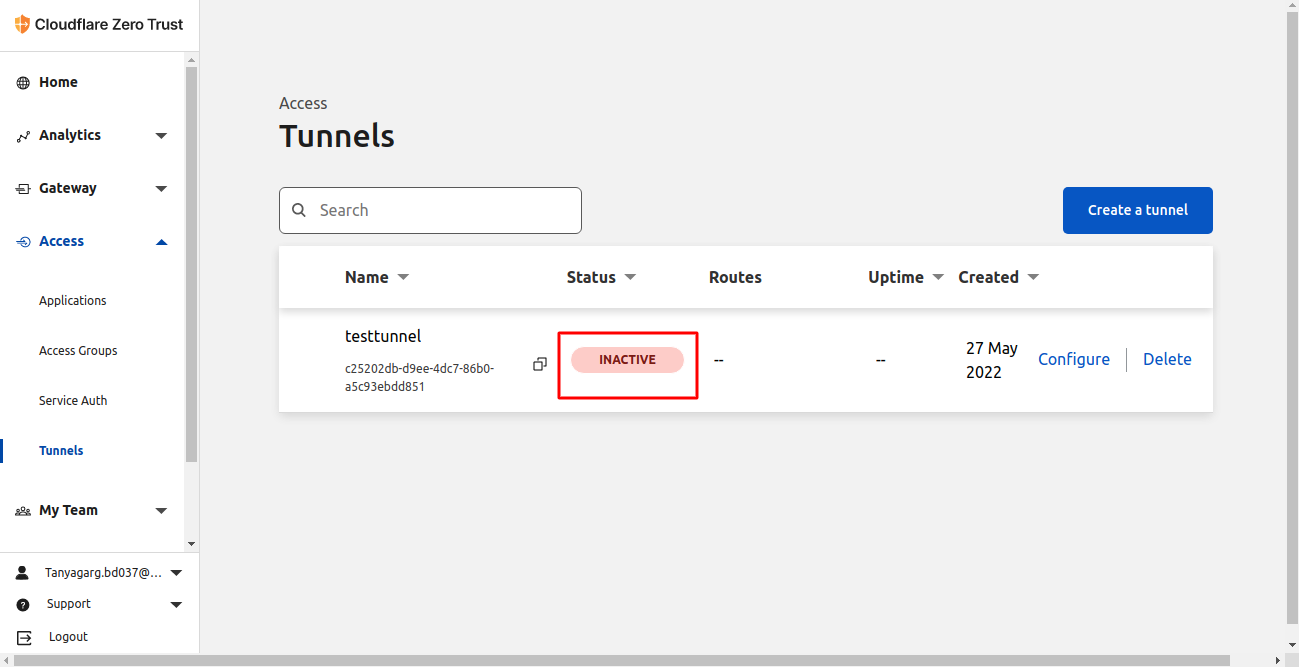
You can check the status of your tunnels and get a comprehensive list of active and inactive tunnels once your first tunnel is connected to Cloudflare.
You can also filter tunnels by name, status, uptime, or creation date, and search for tunnels by name using the search bar.
Tunnel Status
The status of the tunnel depends on the health of its connections –
- Active – This indicates that your tunnel is running and connected to the Cloudflare network.
- Inactive – This indicates that your tunnel is not running and as a result, is not connected to the Cloudflare network.
How to create your First Tunnel?
You can follow the below steps to create your first Tunnel –
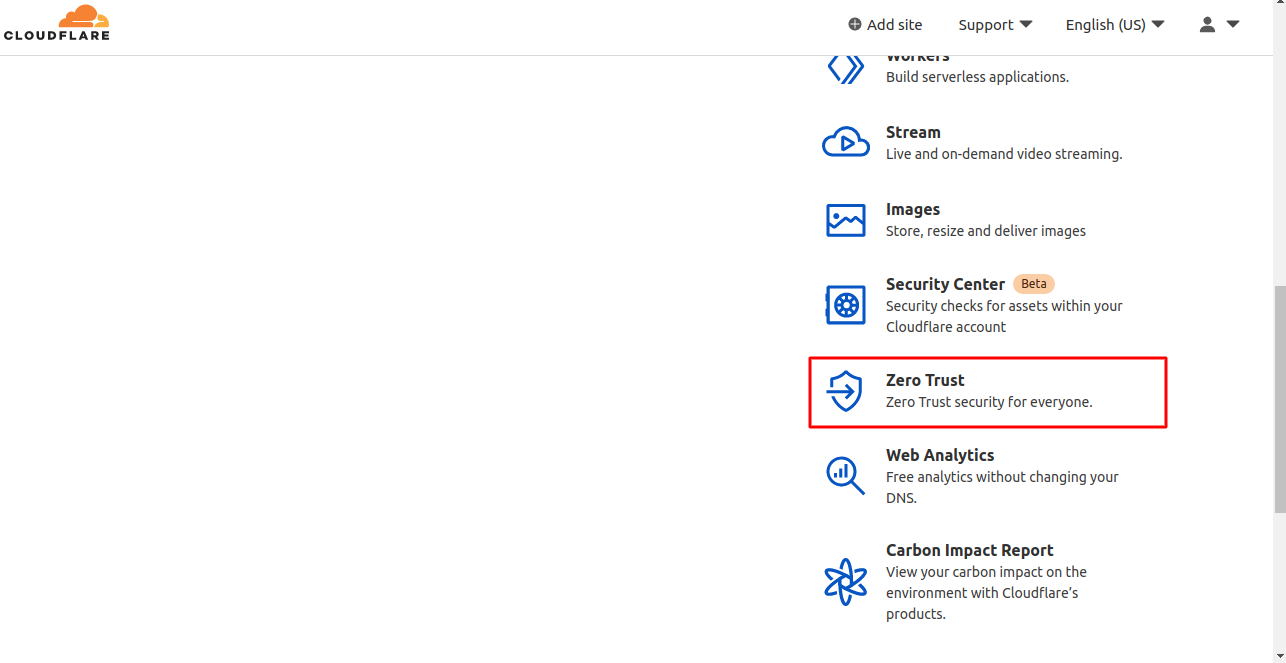
Step 1 – Log in to Cloudflare and then navigate to ‘Zero Trust’.
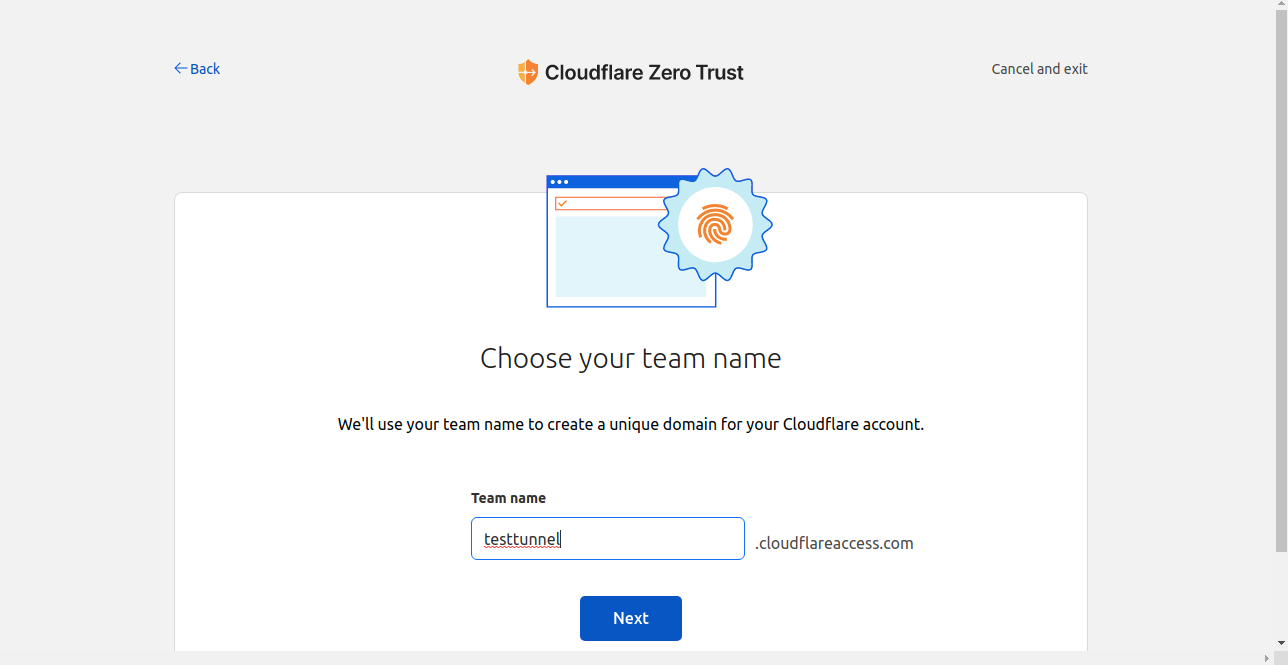
Step 2 – Assign a ‘unique team name’ to create a unique name for your Cloudflare account.
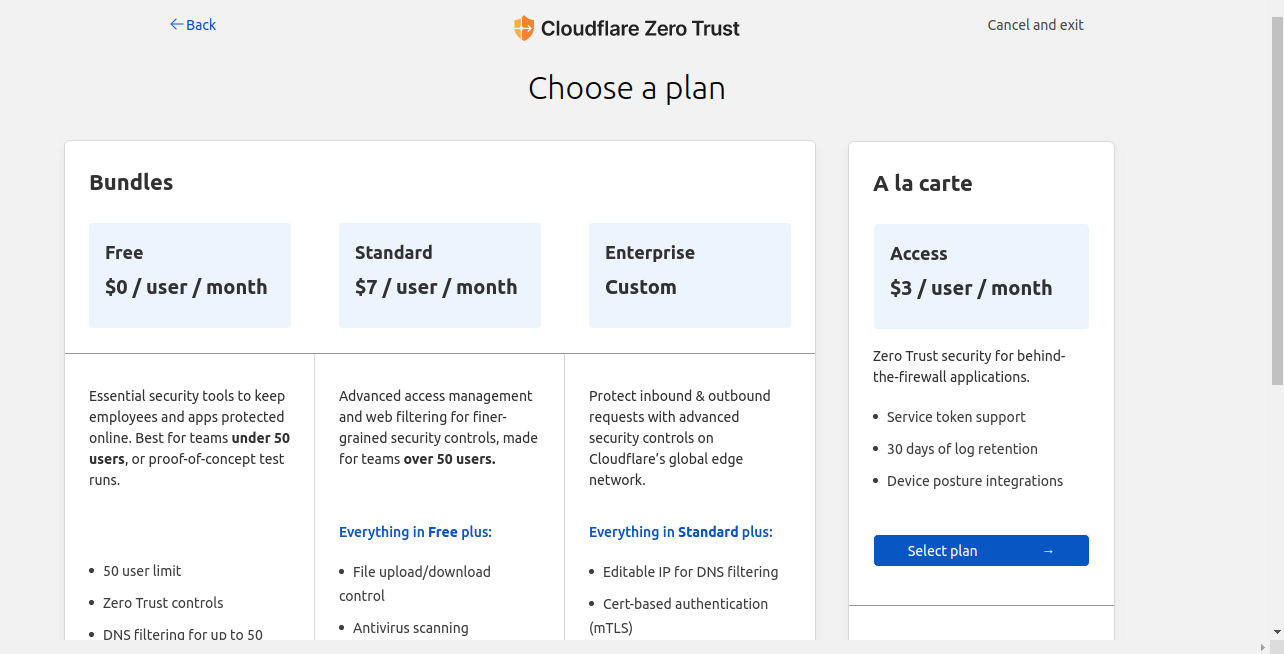
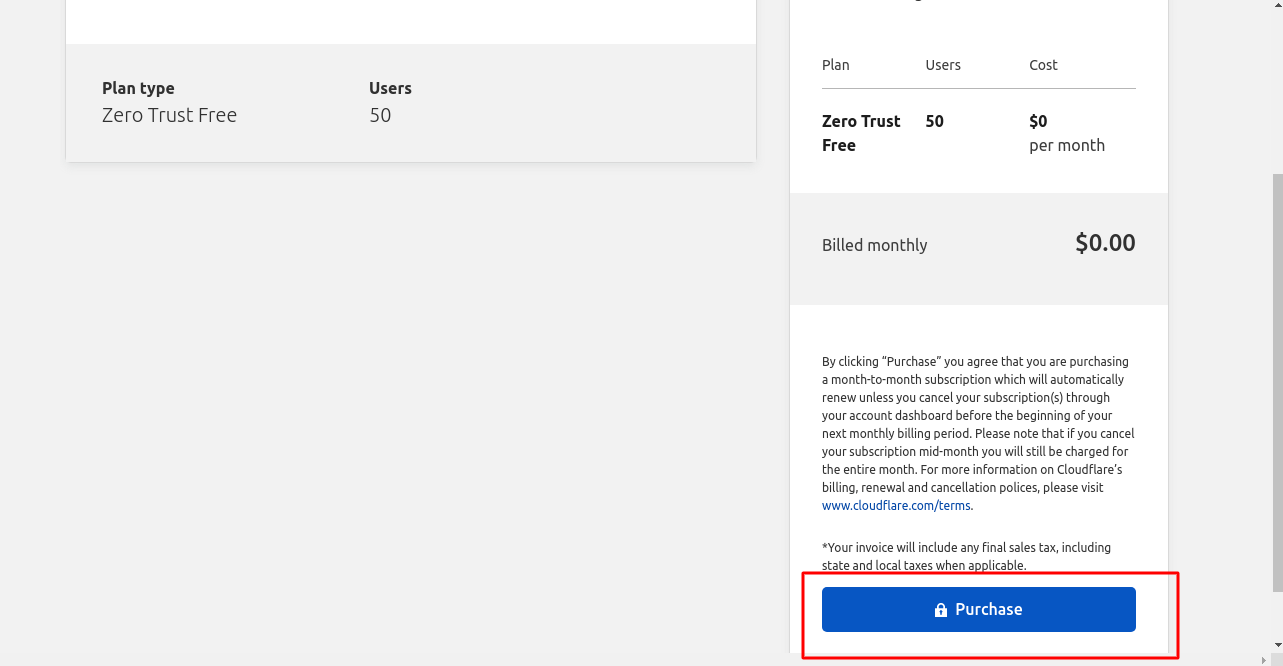
Step 3 – Now, you have to choose a plan for your Cloudflare account, here we are choosing a free Plan.
Step 4 – After choosing a plan, proceed further.

Step 5 – Before proceeding further, Please ‘Accept all terms and conditions.
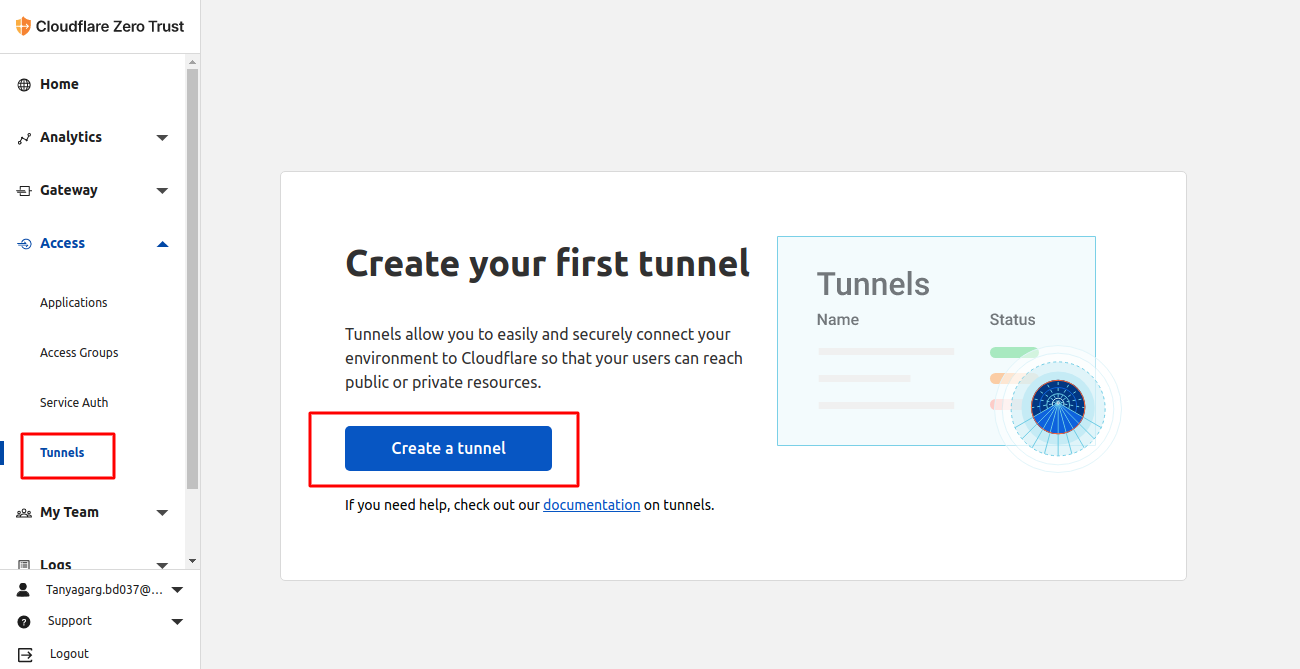
Step 6 – Then, Under Cloudflare Zero trust, scroll down to Access and then go to Tunnels.
Here, you will create your first tunnel by clicking on ‘Create a Tunnel’.
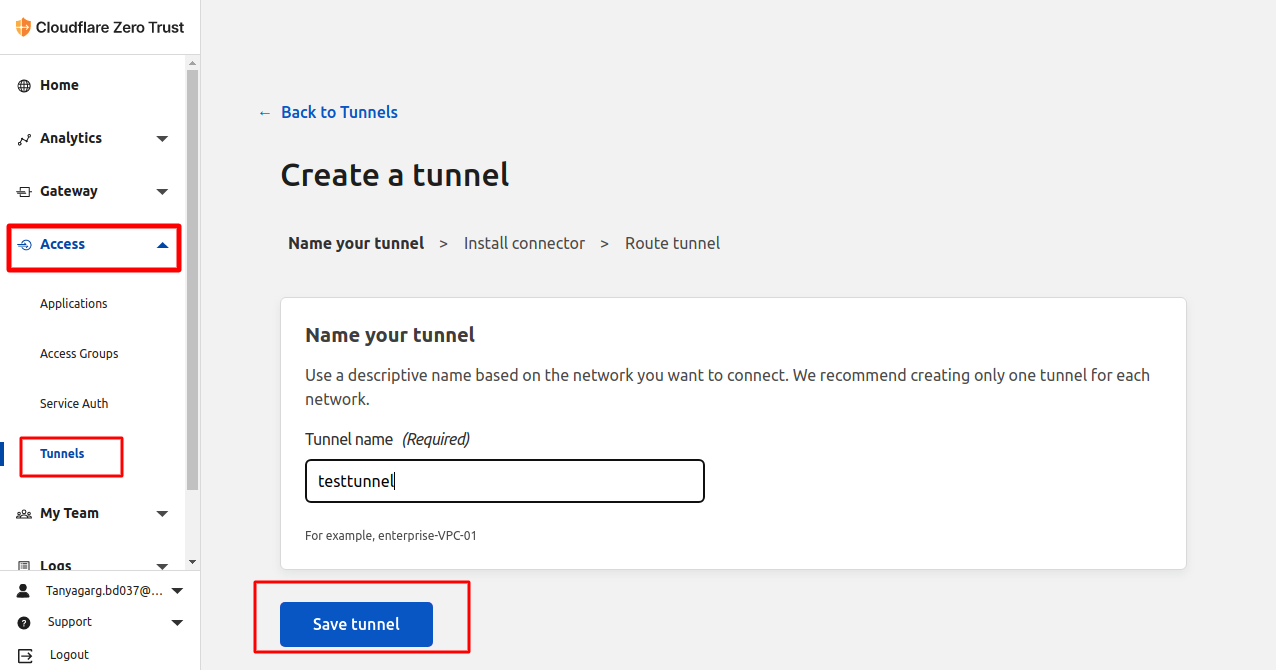
Step 7 – In order to create a tunnel, you need to use a name for your tunnel. And then click on ‘Save tunnel’.
However, we suggest you, choose a name that will show you the type of resources that you want to connect through this tunnel.
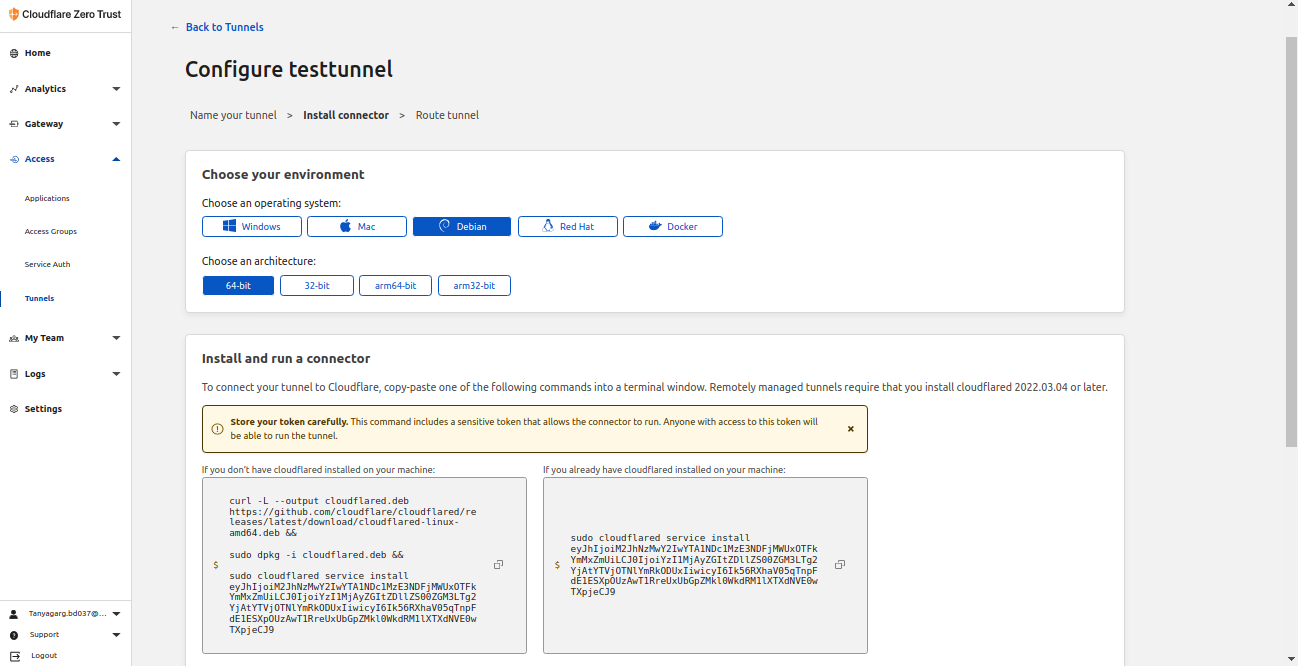
Step 8 – Next, you need to install Cloudflared
To do so you need to ‘choose your environment’ which means you need to choose the Operating system on your machine.
Then after running the command, choose Next to proceed further.
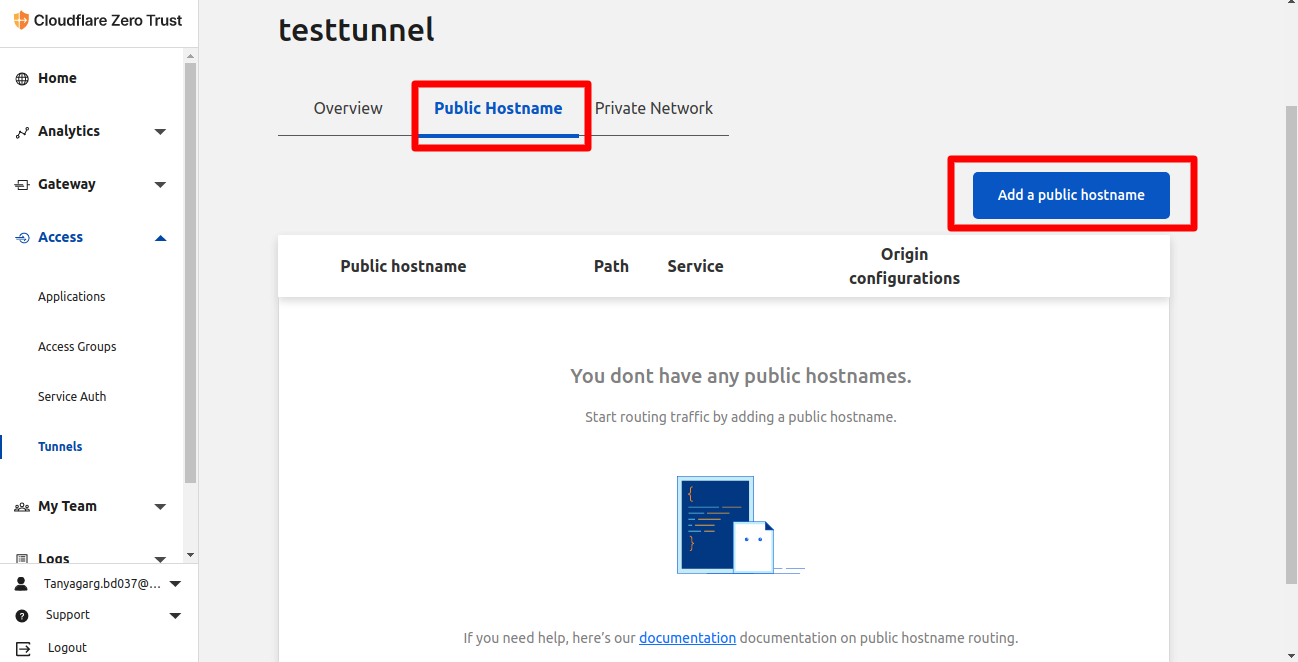
Step 9: Connect Your Application
However, to connect your application, you need to add a public hostname under the Public Hostname section.
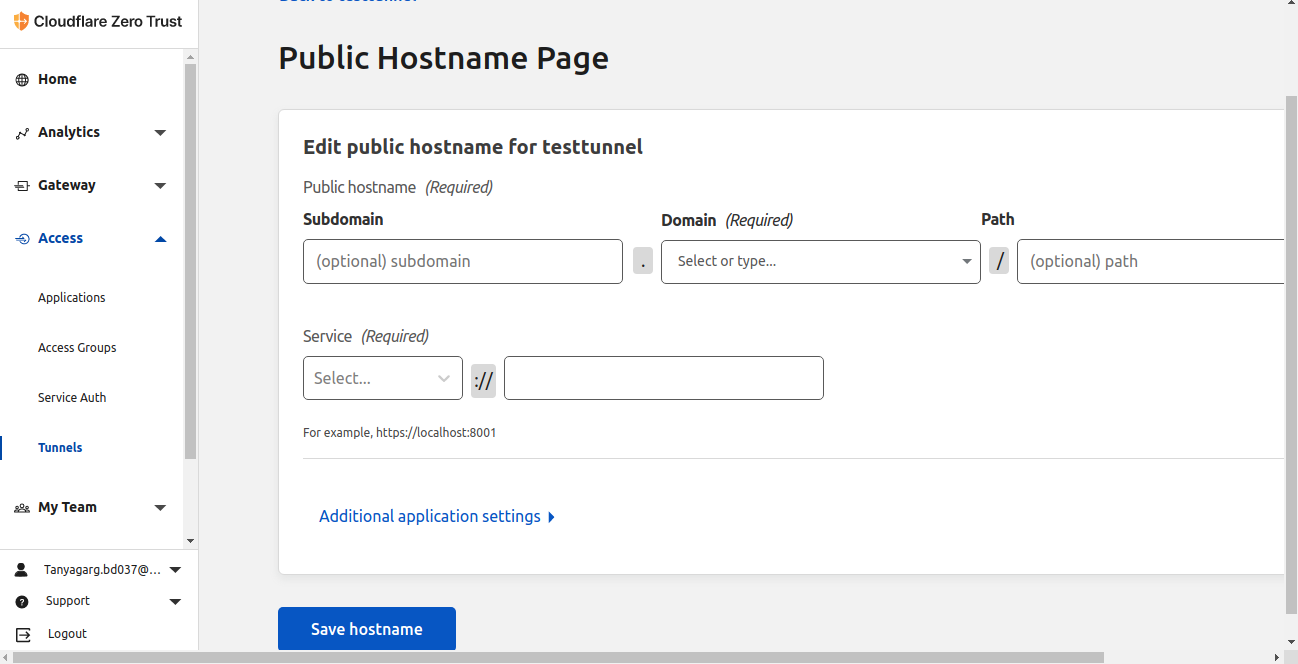
Step 10 – Here you need to add your subdomain or domain and path details.
Other than these, you need to specify Service details also like – https://localhost:8000.
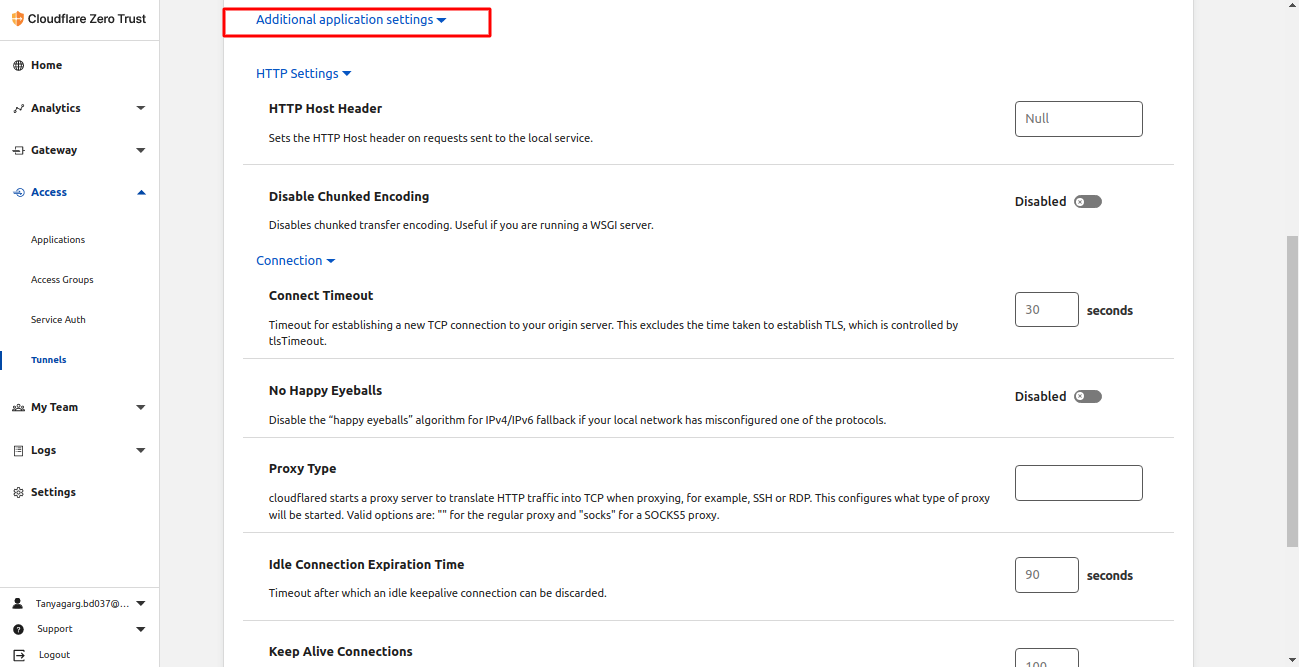
Step 11 – Under its Additional settings, you can set certain parameters like HTTP and connection settings that you want to add to your tunnel configurations.
Then you can save your settings.
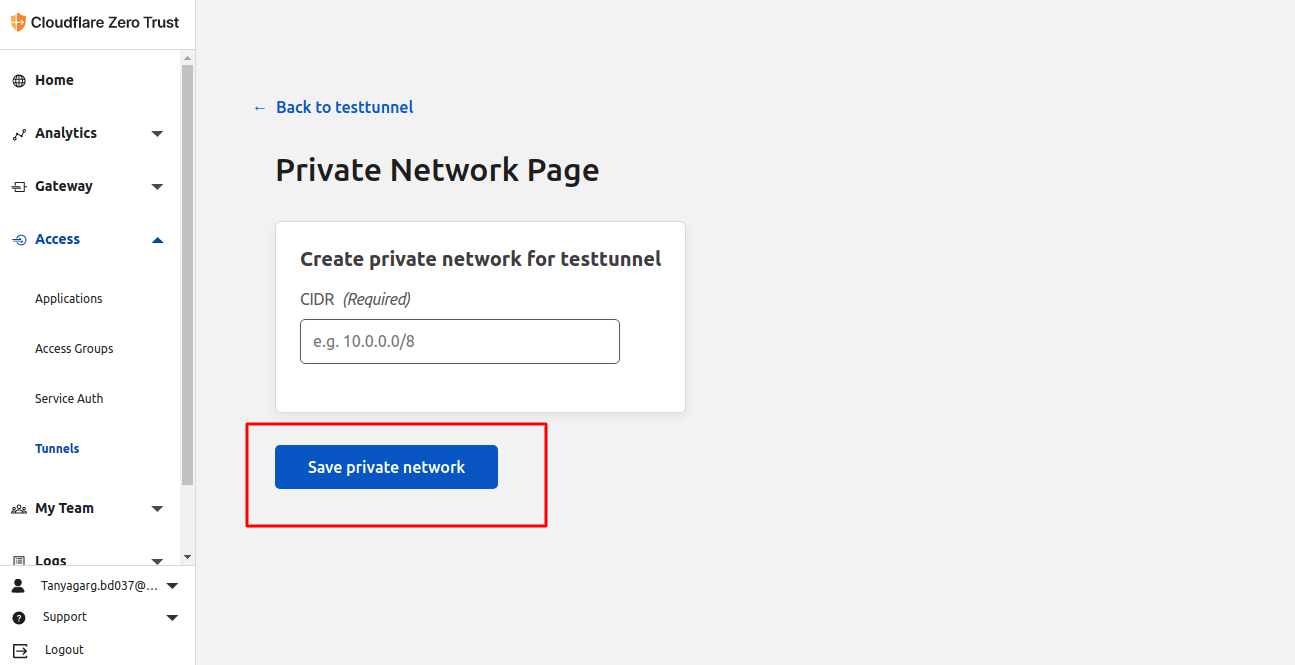
Step 12: Connect Network – To connect a network, add your private network here.
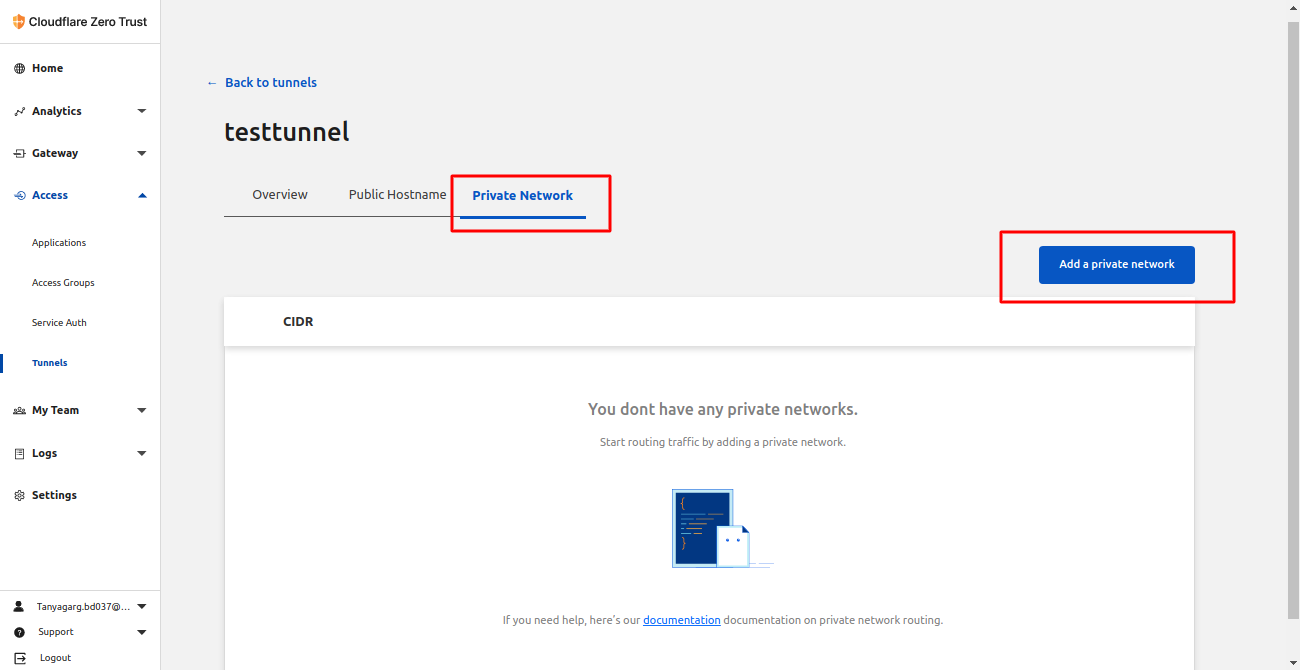
Step 13 – Now, you need to Add either an IP address or CIRD(Classless Inter-Domain Routing) to add a private network then Save your details.
Step 14 – Once you add all the required configurations, here you may check for tunnel status.
If you have added all the required details then your tunnel status will be Active.
In this way, you can also create Your Cloudflare tunnel.
Conclusion
Cloudflare began as a simple way to handle DNS and obtain SSL, and then they gradually expanded their services. In this blog, we have discussed the Cloudflare tunnel.
You may also visit our Magento development services and quality Magento 2 Extensions.
For further help or queries, please contact us or raise a ticket.

Be the first to comment.