In this tutorial, we will learn how to install Bagisto on Ubuntu 20.04 LTS.
Bagisto is an E-Commerce framework built on top of the hottest open-source technologies such as Laravel, PHP framework, and Vue.js, a progressive Javascript framework.
It is suitable for all small or large E-Commerce business demands using a simple set-up procedure. Built on top of Laravel and equipped with easy product information management.
Requirements to install Bagisto :
- Ubuntu 20.04 or 18.04 server
- Webserver: Apache2 or Nginx
- Recommended RAM 3GB+
- PHP: 8.1 with extensions:
- MYSQL 8.0+ or MariaDB 10.2+
Step 1: Install Apache2, MY SQL, PHP 8.1, and its modules
Before starting, the LAMP stack must be installed on your server. If not installed, you can install it using the following command:
|
1 2 3 4 5 6 7 8 9 10 11 12 13 14 15 |
sudo apt update sudo apt install apache2 sudo systemctl start apache2.service sudo systemctl enable apache2.service sudo apt-get install -y software-properties-common sudo add-apt-repository ppa:ondrej/php sudo apt-get update sudo apt install php8.1 libapache2-mod-php8.1 php8.1-common php8.1-gmp php8.1-curl php8.1-soap php8.1-bcmath php8.1-intl php8.1-mbstring php8.1-xmlrpc php8.1-mysql php8.1-gd php8.1-xml php8.1-cli php8.1-zip |
STEP 2: Edit the php.ini file and modify some default settings:
|
1 |
sudo vi /etc/php/8.1/apache2/php.ini |
Change as like below config.
|
1 2 3 4 5 6 7 8 |
memory_limit = 256M upload_max_filesize = 100M max_execution_time = 360 date.timezone = America/Chicago |
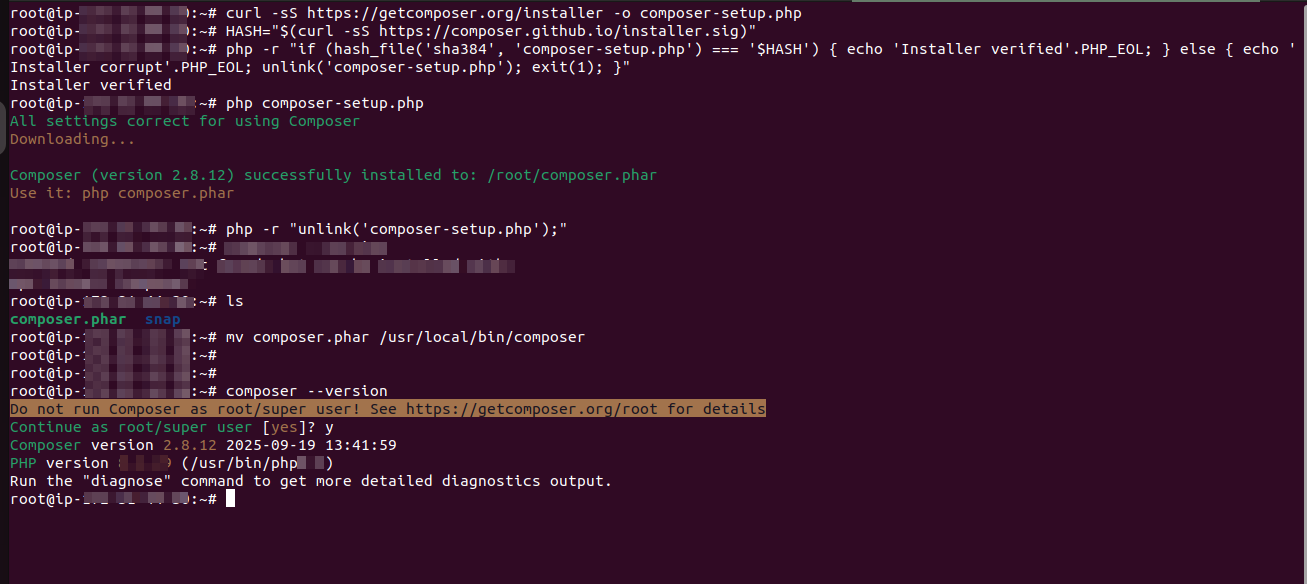
STEP 3: Install the Composer
|
1 2 3 4 5 6 7 8 9 10 |
curl -sS https://getcomposer.org/installer -o composer-setup.php HASH="$(curl -sS https://composer.github.io/installer.sig)" php -r "if (hash_file('sha384', 'composer-setup.php') === '$HASH') { echo 'Installer verified'.PHP_EOL; } else { echo 'Installer corrupt'.PHP_EOL; unlink('composer-setup.php'); exit(1); }" php composer-setup.php php -r "unlink('composer-setup.php');" |
Most likely, you want to put the composer.phar into a directory on your PATH, so for that you can simply call composer from any directory (Global install), using for example:
|
1 |
mv composer.phar /usr/local/bin/composer |
STEP 4: SSH User Creation
Presently, we were in our server’s root user, but due to security issues, we do not keep our application code in the directories of the root user. So, we have to create another SSH user for this.
Create an SSH user who will be the owner of the application code. We created an SSH user with the name “bagisto” You can pick any name you want.
|
1 |
sudo adduser bagisto |
Eventually, this prompts a password window where you can set the password. also, the remaining fields can be left empty using simply pressing the enter key
Additionally, after creating a user, we will switch to a new user.
STEP 5: Download Bagisto using the command below:
|
1 |
composer create-project bagisto/bagisto |
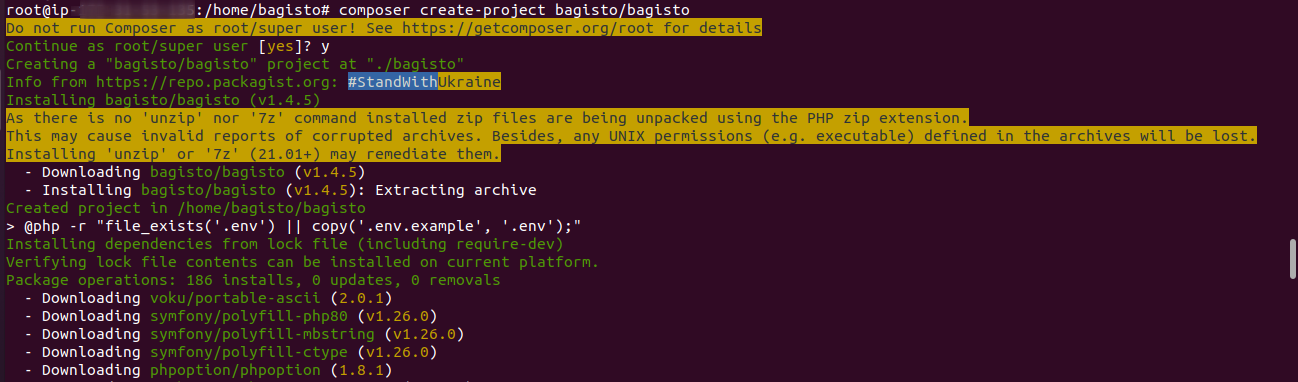
After downloading, a directory name “bagisto” will be created inside the public HTML directory, then go to the public directory /bagisto. It is the directory that loads index.php.
STEP 6: Apache configuration for Bagisto
However, to support the web pages we will configure Apache and we need to switch again to the root user to configure Apache.
|
1 |
sudo nano /etc/apache2/sites-enabled/000-default.conf |
You have to define your Domain name and your DocumentRoot Path, after executing the above command.

Save it, and exit after this.
Furthermore, configure the envvars file using executing the below command:
|
1 |
sudo nano /etc/apache2/envvars |
And find these lines :

Modify the apache SSH username in this way :

configure apache2.conf file using the following command:
|
1 |
sudo nano /etc/apache2/apache2.conf |
Now, you will find the block code shown below:

Modify it to the following code:

STEP 7: Install MYSQL Server For Database
Case 1. If you are using a Local Database Server
Creation using executing the following commands when a password Is asked after The below two commands, simply Press ENTER
|
1 |
sudo apt-get install mysql-server |
|
1 2 3 4 5 6 7 8 |
sudo mysql -u root -p CREATE DATABASE bagistodb; CREATE USER 'bagistouser'@'localhost' IDENTIFIED BY 'bagisto'; GRANT ALL ON bagistodb.* TO 'bagistouser'@'localhost' WITH GRANT OPTION; SET GLOBAL log_bin_trust_function_creators = 1; flush privileges; exit; |
Case 2: If you are using AWS RDS
Amazon RDS handles routine database tasks, such as provisioning, patching, backup, recovery, failure detection, and repair.
You do not need to worry about anything, everything is managed at the AWS end.
Firstly you have to launch an RDS and then configure it with your AWS EC2 instance.
Follow the instructions below if you are using an AWS RDS:
|
1 2 3 4 5 6 7 8 |
sudo apt install mysql-client sudo mysql -h yourrdsendpoint -u username -p CREATE DATABASE bagistodb; CREATE USER 'bagistouser'@'%' IDENTIFIED BY 'bagisto'; GRANT ALL ON bagistodb.* TO 'bagistouser'@'%' WITH GRANT OPTION; SET GLOBAL log_bin_trust_function_creators = 1; FLUSH PRIVILEGES; EXIT; |
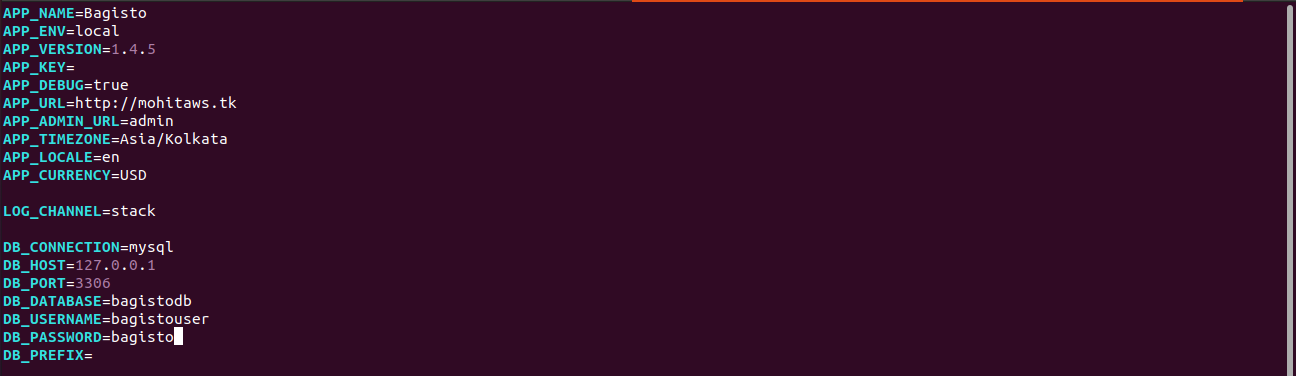
STEP 8: Bagisto configuration
Now, go to your Bagisto root directory, run the mentioned commands below, and put the MySQL database in the .env filename.
Then enter the details and use the same credentials you get while creating a database.
|
1 2 |
sudo cp .env.example .env sudo nano .env |
Define your domain name and MySQL details in the .env file
STEP 9: Run the following command in the root directory of bagisto
|
1 2 |
sudo php artisan bagisto:install |
STEP 10: Set the permission on the Bagisto root directory
|
1 2 3 |
sudo chmod -R 755 /home/bagisto/bagisto sudo chown -R bagisto:bagisto /home/bagisto/bagisto sudo service apache2 restart |
Now, Go to the browser and hit your domain

Need Support?
Thank You for reading this Blog!
For further more interesting blogs, keep in touch with us. If you need any kind of support, simply raise a ticket at https://webkul.uvdesk.com/en/.
You may also visit our Bagisto development services and quality Bagisto Extensions.
For further help or queries, please contact us or raise a ticket.

Be the first to comment.