In this article, we will learn how to protect your website using a password authentication feature, so that only authorized users can access the website.
Prerequisites
To complete this tutorial, you will need:
CASE 1: If you are using an Apache webserver
Step 1 – Install the Apache server and the required packages.
|
1 2 3 |
apt-get update -y apt-get install apache2 apache2-utils |
Step 2. Creating the Password File
The htpasswd command will allow us to create a password file that Apache can use to authenticate users.
We will create a hidden file for this purpose called .htpasswd within our /etc/apache2 configuration directory.
The first time we use this utility, we need to add the -c option to create the specified passwdfile.
We specify a username (webkul in this example) at the end of the command to create a new entry within the file:
|
1 |
sudo htpasswd -c /etc/apache2/.htpasswd webkul |

it will ask you to set the New Password and just press enter and retype your Password
Step 3. Add another user
Leave out the -c argument for any additional users you wish to add so you don’t overwrite the file:
|
1 |
sudo htpasswd /etc/apache2/.htpasswd test |

Now, We can see the username and encrypted password for each record:
Using below command
|
1 2 3 |
cat /etc/apache2/.htpasswd htpascat /etc/apache2/.htpasswd |

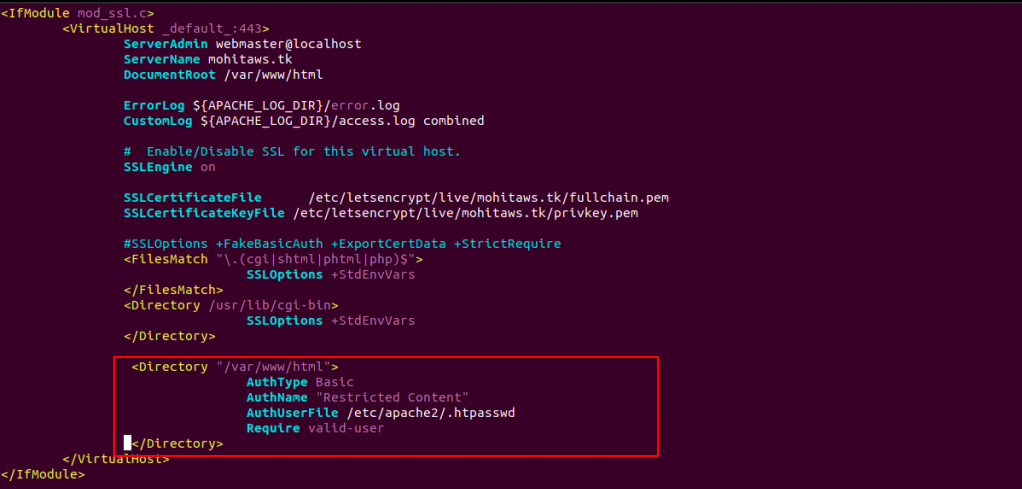
Step 4. Configuring Apache Password Authentication
Edit the Apache configuration and add password protection to the virtual host file
|
1 |
vi /etc/apache2/sites-enabled/default-ssl.conf |
Copy the below lines and paste your vhost file
|
1 2 3 4 5 6 7 |
<Directory "/var/www/html"> AuthType Basic AuthName "Restricted Content" AuthUserFile /etc/apache2/.htpasswd Require valid-user </Directory> |
Just Like this
Save and close the file using Press “Esc” and :wq
Before restarting the web server, you can check the configuration with the following command:
|
1 |
apachectl -t |
If everything checks out and you get Syntax OK as output, you can restart the server
|
1 |
service apache2 restart |
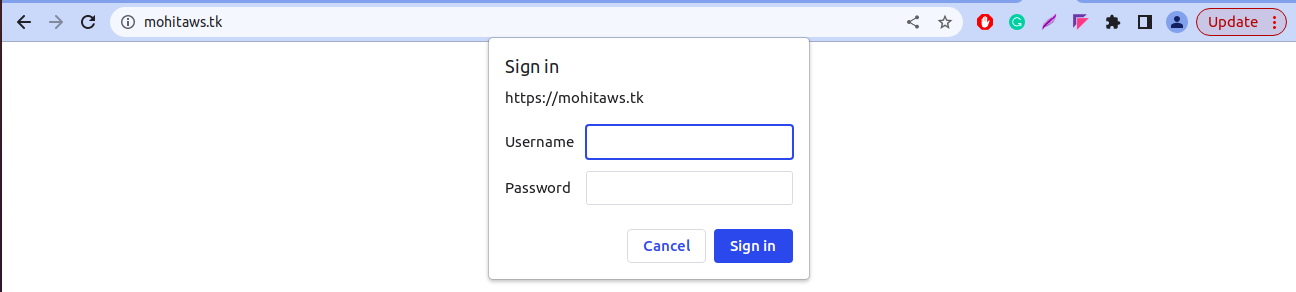
Now, Go to the browser and hit your domain, your page will be protected with a username and password.

CASE 2: If you are using Nginx
You need to follow Steps 2 and Step 3 as mentioned above and then follow the below-mentioned steps –
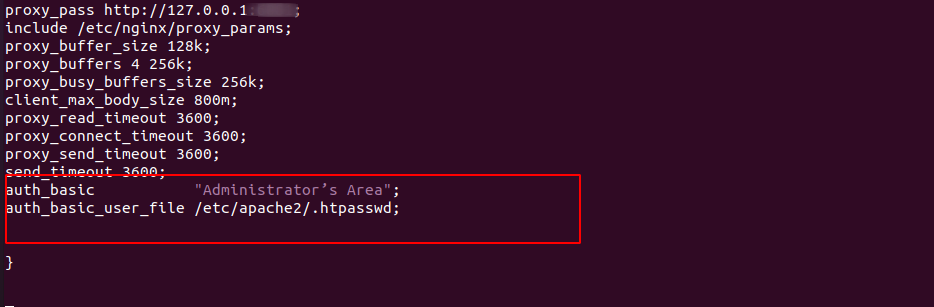
Step 3 – Just copy the below content and paste it into your nginx vhost file
|
1 2 3 4 |
auth_basic "Administrator’s Area"; auth_basic_user_file /etc/apache2/.htpasswd; |
Step 4 – Open your nginx vhost file using the command –
|
1 |
/etc/nginx/sites-enabled/default |
Save and close the file using Press “Esc” and :wq
Before restarting the web server, you can check the configuration with the following command:
|
1 |
nginx -t |
If everything checks out and you get Syntax OK as output, you can restart the server
|
1 |
service nginx restart |
Now, Go to the browser and hit your domain
Conclusion
In this way, you can either project your site or you can provide limited access to the site when you are in the development phase.
Need Support?
Thank You for reading this Blog!
For further more interesting blogs, keep in touch with us. If you need any kind of support, simply raise a ticket at https://webkul.uvdesk.com/en/.
For further help or queries, please contact us or raise a ticket.

Be the first to comment.