When it comes to high availability server architectures, couple of things that come in mind are giant servers with huge RAM and multi-core CPUs, Load Balancer, an Auto scaling manager, a shared file system, Cache mechanism etc. For deploying this architecture we can either build all of its components from scratch or we can lookup to someone who can provide these features with flexibility and ease so that we can focus on our application.
These high-level server architectures can be deployed for Magento 2 Multi Vendor marketplace as well. Magento 2 being one the fastest growing e-commerce platform, faces the challenges to handle its giant clients’ base. For any vendor, store high availability and data consistency is primal concern. So we need to build our Magento store to face any considerable amount of traffic.
Best way to ensure this is to keep redundancies and ability to scale it up and down as per need. AWS Autoscaling provides features to scale your AWS resources as per pre-defined scaling policies. Also, a lot of other AWS services are needed to be integrated as well in order to set up a full fledged Auto scaling Architecture.
What is Magento 2 Multi-Vendor Marketplace
Magento 2 Multi Vendor Marketplace Extension converts your Magento 2 Store into a complete online marketplace shop. Using Magento2 Marketplace Module, the seller can manage the inventory, shipment, Seller Profile page, and the Seller Collection page and much more.The seller can add multiple products like Simple, Configurable, Virtual & Downloadable.
For more detailed information, please visit https://webkul.com/blog/magento2-multi-vendor-marketplace/ .
A Brief to AWS Auto Scaling
Amazon Web Services provides Auto Scaling that monitors your applications and automatically adjusts capacity to maintain steady, predictable performance at the lowest possible cost. It ensures that your auto scaling group retains predefined minimum instance counts when scaling in occurs and stops the launching of further instances during scaling out process when maximum instance limit is achieved.
Benefits of Auto Scaling:
- Better fault tolerance
- High availability
- Better cost management
AWS Auto Scaling with Magento 2 Multi Vendor Marketplace
In this blog, we will discuss the architecture layout for building a highly available Magento 2 Multi Vendor Marketplace store.
Standalone AWS autoscaling service would not be enough due to the need of other AWS service as well to complete architecture setup. Since scope of the architecture shouldn’t be for one time setup only, we have to devise a way so that our application faces zero or minimum downtime during an update, be it code or server dependencies.
In addition to this, code build (or update) process should be automated to an extent that concerning developers could focus on their application, not bothering about underlying architecture.
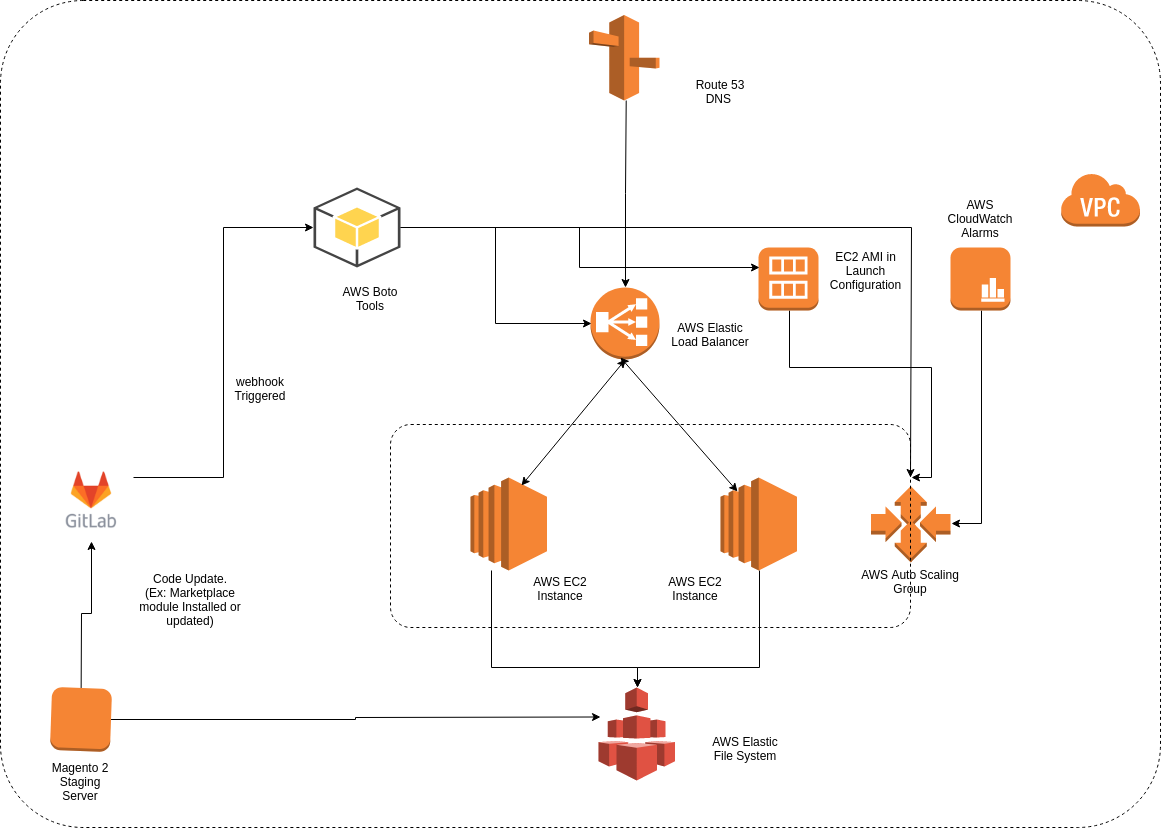
Architecture Components:
- Source Code Management System (GIT)
- Elastic Load Balancer
- Elastic File System
- Auto Scaling Group
- Cloudwatch
- AWS SDK for python (BOTO)
- Magento 2 Multi-Vendor Marketplace Staging Server
Our Application code (Magento 2 Multi Vendor Marketplace files) would be managed by a Source Code Management System like GitLab or Github. A webhook will be configured that will trigger when development branch is merged with Master. We will discuss about webhook integration later in this blog.
As to ensure load balancing among various identical servers, we would be using Elastic Load Balancer to distribute incoming traffic evenly among all the instances. Here we are using Classic Load Balancer.
Since, we would be having multiple EC instances, there should be a centralised files system where we could put our media files. For ensuring this, we would be using AWS Elastic File System. Magento 2 pub/media folder will reside in this and it would be mounted on all the instances.
We would be using Auto scaling to launch and terminate instances as per scaling policies. These instances would be added under elastic load balancer by themselves and would fetch media files from EFS.
We would need to setup Cloudwatch Alarms to trigger Scaling policies. Here we are using alarms for CPU utilisation monitoring.
AWS SDK for python (BOTO) would be needed to automate the process of updating ec2 AMI, Load balancer, Autoscaling group etc whenever a webhook is triggered from GitLab.
And Ofcourse we would need an Staging server of Magento 2 for initial server setup before automating the whole build process.
An illustration for proposed architecture is shown below:
Initial Server Setup
So we have drawn the layout of our architecture, next step would be setting it up and connecting all the components of architecture.
(a) GITLAB Setup:
- Set up a GitLab server on an EC2 Instance.
- Create users and grant them proper privileges.
- Create a Project from Magento 2. (let us say: Magento2-Marketplace)
- Add your ssh public keys on GitLab.
(b) Magento 2 Staging Server Setup:
- Install LAMP and other server dependencies for Magento 2 on a freshly launched EC2 Instance.
- Create a user and its public ssh keys on GitLab.
- Download and install required version of Magento 2 with Multi Vendor Marketplace module.
- Hit your Domain name and check if Magento 2 is running okay and note all the server credentials.
(c) Linking Magento 2 with GITLAB:
- Login to GitLab server via ssh and Copy ssh id to Magento 2 staging server. (ssh-copy-id user@ip_address)
- Upload Magento 2 Marketplace files on GitLab project.
- Create a Development branch from Master branch. Later we will configure webhooks for development to master branch merge requests.
- Create a user (let’s say: deploy_user) and share its ssh id as well on Magento staging (This step will be explained later).
(d) Setup AWS EFS to store media Files:
- Create an AWS Elastic File System in the same VPC as your Magento 2 staging Instance with required availability zones.
- Manage security groups to allow traffic from EC2 instance to EFS and vice-versa.
- Login to your Magento 2 staging server and Install NFS client.
- Mount Magento 2 media directory: pub/media on EFS.
- Create entry in either /etc/fstab or /etc/rc.local to remount media directory at boot time.
(e) Setup AWS Elastic Load Balancer:
- Create an Internet facing Classic Load Balancer (let’s say: magento-elb) for all the availability zones within the region.
- Configure ports, health checks, and assign security group same as that of Magento 2 staging server.
- Add Magento 2 staging server instance in the load balancer.
- Create a CNAME (or A) entry for load balancer DNS name mapped with your domain name in your DNS panel.
(f) Create EC2 Instance AMI and configure Launch Configuration:
- Create AMI of Magento 2 Staging Server and note AMI id (let’s say: ami-staging).
- Using this AMI (ami-staging), setup a launch configuration by defining its name, EC2 instance type, storage, security groups (same as that of magento 2 staging server), ssh key etc.
(g) Setup Auto Scaling Group and Cloudwatch Alarms:
- Create Cloudwatch alarms for High CPU and low CPU monitoring. (Let’s say an Alarm for high CPU will trigger when CPU load average will be above 5 and an Alarm from low CPU will trigger when CPU load average will be below 5).
- Set up an Auto scaling group (let’s say: magento-asg) with group size of desired number of instances and link this autoscaling group with your elastic load balancer (magento-elb).
- Define Scaling Policies. Create simple scaling policies by using cloudwatch alarms as scale up Auto scaling group by launching one instance whenever High CPU load alarm is triggered and scale down Auto scaling group by terminating one instance whenever Low CPU load alarm is triggered.
- Depending upon the group size, minimum instance value, maximum instance value and desired value set in auto scaling group, autoscaling group (magento-asg) will launch an EC2 instance using AMI (ami-staging) from the launch configuration and will add it under Elastic load balancer (magento-elb).
- As soon as Instance within Autoscaling group comes inservice under Elastic load balancer, we can detach our Magento 2 staging server and stop (optional) it.
(h) Setup Python SDK scripts for EC2 AMI update:
- Set up an environment to run AWS SDK tool for python which is Boto. We can either setup new server or we can install these tools on the same server where our GitLab has been installed. GitLab will run on port 80 and a apache2 server will be installed where these tools will be triggered on port other than 80. Install python and boto packages.
- To use AWS SDK tool from command line, create an IAM user and grant it Full EC2 Access. Download Access key Id and Secret Access key. Using these credentials Client will communicate with AWS servers to deploy scripts.
- Create a .boto file and store IAM credentials in it. Then place this file in the root of the ssh user (deploy_user) which will run python scripts. Before running these scripts, store the name of AMI ( ami-staging, which is stored in launch configuration) in file or database. This image id will be retrieved by Python scripts for processing.
- Create a file, say trigger.php which will be hit whenever a webhook is triggered from GitLab. This file will check if it has headers for open merge request or merged and will run the python sdk scripts for merged request.
- Go to your GitLab panel and configure webhooks in Settings > Integration Section. Webhook will be triggered whenever a merge request is opened or merged. Mention the URL in the webhook and test it (let’s say url is X.X.X.X:8020/merge.php).
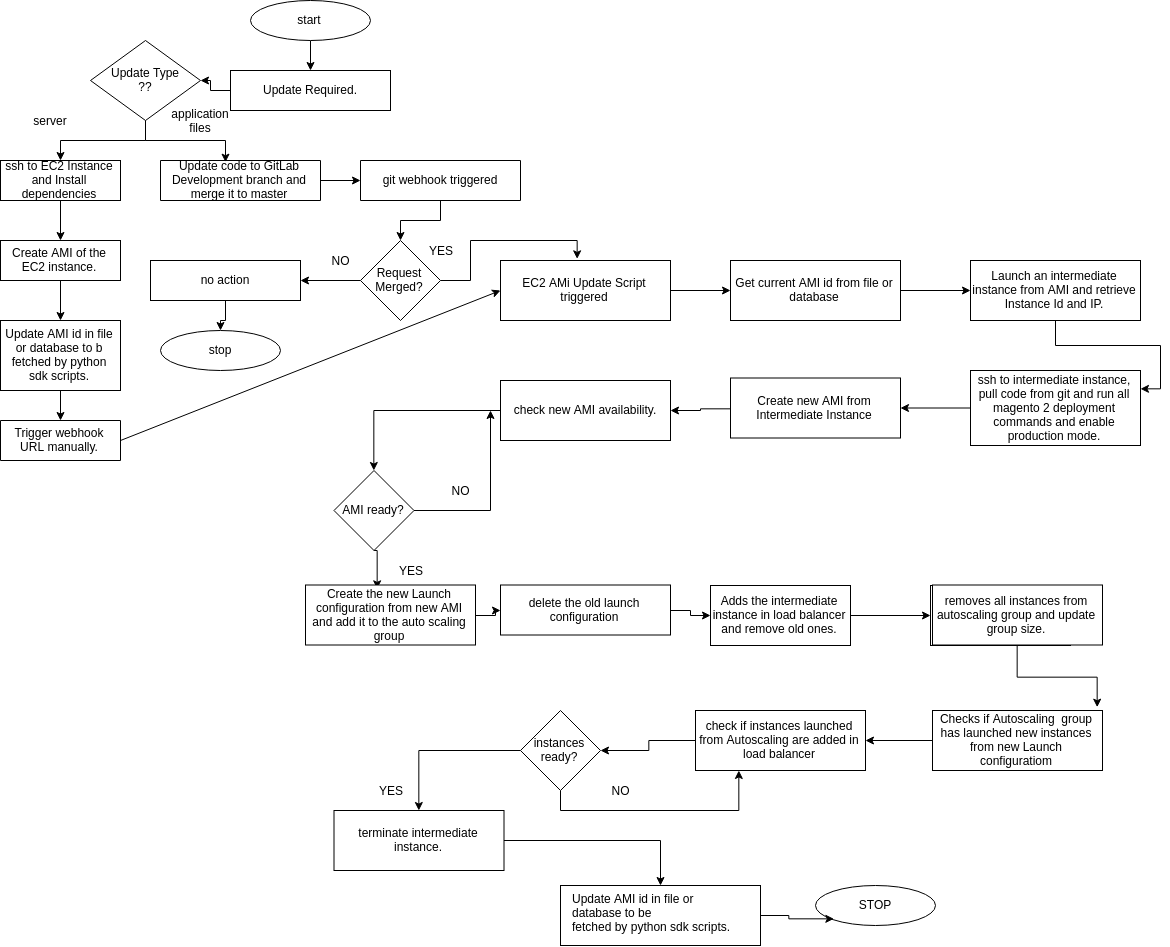
EC2 AMI Update Workflow
So far, all the servers have been set and our Magento 2 server is running as a Staging server with Marketplace module. Next step is to deploy our server as a production environment.
Pull the development branch from the repository and make some changes in files.
Push the code back to the development branch in repository and create a merge request. When development branch is merged to Master branch, webhook will get triggered. This webhook in return will trigger python sdk scripts.
On triggering Webhook for a request merged, scripts will do the following jobs:-
- Gets current AMI id from file or database and launches an Intermediate Instance.
- Pulls the updated code from GitLab in the instance and compile it, deploy it and set it in production mode. Creates a new AMI of this instance (ami-prod).
- Creates a new Launch Configuration using new AMI (ami-prod), adds it to Autoscaling group (magento-asg) and deletes the old one.
- Adds the intermediate instance to the load balancer (magento-elb) and removes & terminates the old instances.
- Removes & terminates Instances from Autoscaling group (magento-asg) and waits for the instances get launched from Launch Configuration having new AMI (ami-prod).
- As soon as Instances get launched from new AMI (ami-prod) and get Inservice under Elastic load balancer (magento-elb), it removes the intermediate instance from the load balancer and terminates it.
- Updates AMI id (ami-prod) in the file or database to be fetched next time the webhook is triggered.
However if there’s is any requirements to install server dependencies and other packages, login to existing Magent 2 server, do the needful and create AMI of the instance.
Then updates AMI id in the file or database to be fetched next time the webhook is triggered.
The complete flowchart for the whole workflow:
Testing Auto Scaling and Elastic Load Balancing
To check if auto scaling is working or not, we can use siege tool for benchmarking. Siege tool will generate huge amount of requests within a short period of time which in turn will raise CPU load average.
|
1 |
siege -c 500 -t 30s https://yourdomainname.com/ |
Then as CPU load average will go beyond 5, it triggers high CPU Cloudwatch alarm which in turn notify autoscaling group to launch an EC2 instance and add it in load balancer.
As soon as load average will come below 5, it triggers Low CPU cloudwatch alarm, and autoscaling group will terminate one instance and will retain Auto scaling group size.
Try configuring Cloudwatch alarms as for request counts, bandwidth, instance counts etc and benchmark with siege and other tools as well to ensure your application has high availability. Also please ensure that theload balancer is maintaining redundancy, distributing the traffic among instances under the load balancer.

Can you confirm here your EFS file system are given best performance?
I have used it in Auto Scaling and Elastic Load Balancing environment but it’s very slow, As per my current server architecture I think NFS server is better then EFS you can share your var pub media folder through NFS,