In our last blog, after being introduced to docker-compose, we had discussed the deployment of multi-container architecture in Docker. Using this tool we had setup Magento 2 running with apache2 server and mysql-server on separate containers interlinked with each other. We had also discussed the volume mapping, ports allocation, containers linking etc techniques for docker-compose.yml file.
As we are now familiar with docker and docker-compose, their working and their integration with applications (Magento 2 in our case), we will now take a further step ahead. In our previous blogs, we have installed Magento 2 with default configurations. We were focused on infrastructure performance rather than application optmisation. Moving further, in this blog we will discuss integration of Varnish cache with Magento 2 on the architecture of Docker and of course we will be using docker-compose to setup this architecture as we did earlier.
Introduction To Varnish Cache
If you are familiar with Magento 2 and own your store then you might have heard of Varnish cache once in a while. If not all of you, then those who are struggling with high traffic on their Magento 2 store, they must have considered using some cache server at some point. Those who are not familiar with Varnish cache, following lines are for you,
Quoting from Varnish docs, Varnish cache is a web application accelerator also known as a caching HTTP reverse proxy. It is a powerful open source HTTP engine/reverse HTTP proxy that can speed up a website by up to 1000 percent by doing exactly what its name implies: caching (or storing) a copy of a webpage the first time a user visits. Varnish cache visits your server once to cache the page, then all future requests for the same page will be served by Varnish cache.
Unlike other web-accelerators, Varnish cache deals only with HTTP traffic. The key element in Varnish cache setup is its Varnish Configuration Language (VCL) file. VCL files are needed to be customised for specific frameworks or applications. Default VCL file does not work directly with all the applications. If you consider Varnish Cache as a radio, then you have it tune it according your server needs. Luckily for us, Magento 2 works out of box with Varnish Cache and provides its own VCL file for its setup. Also from Magento 2 docs,
“We strongly recommend you use Varnish in production. The built-in full-page caching (to either the file system or database) is much slower than Varnish, and Varnish is designed to accelerate HTTP traffic.”
Magento 2 And Varnish Cache Setup With Docker-Compose
As we are still on our multi-container docker architecture, we will be using separate containers for apache2 server, mysql-server and varnish cache server for its integration with Magento 2 on Ubuntu 16.04. As separate containers will require inter-linking with each other, we will be using docker-compose tool to achieve this architecture.
The parent directory holding all the files/directories will be considered as the project name. Custom project name can also be in set docker-compose.yml file. Here we are creating separate directories for apache2, mysql server and varnish cache server setup that hold their Dockerfile(s) and their associated volumes.
Take a note that: following the same approach, Magento 2 files will be placed on our host. As it is a good practice to keep application files on host so that it will not be lost if containers or images get accidentally removed. These magento files will be mapped from host to running docker container.
We are also using supervisor to control all three of our servers in their respective containers. Apart from controlling these servers, supervisor is also running various commands and scripts that will be mentioned later in this blog.
To begin with create a directory on your Ubuntu 16.04 server for this project. Our directory architecture will be something like:
- docker-compose.yml
- web_server
Dockerfile
supervisord.conf
- database_server
Dockerfile
mysql.sh
supervisord.conf
- cache_server
Dockerfile
default.vcl
supervisord.conf
varnish
- magento2
Unarchived Magento 2 files and directories.
The docker-compose.yml file is shown below:
|
1 2 3 4 5 6 7 8 9 10 11 12 13 14 15 16 17 18 19 20 21 22 23 24 25 26 27 28 29 30 31 32 33 34 35 36 37 38 39 40 41 42 |
version: '3' services: cache_server: build: context: ./cache_server/ container_name: varnish depends_on: - web_server volumes: - ./cache_server/default.vcl:/etc/varnish/default.vcl - ./cache_server/varnish:/etc/default/varnish - ./cache_server/supervisord.conf:/etc/supervisor/conf.d/supervisord.conf ports: - "80:80" - "6082:6082" links: - web_server web_server: build: context: ./web_server/ container_name: apache2 volumes: - ./magento2:/var/www/html - ./web_server/supervisord.conf:/etc/supervisor/conf.d/supervisord.conf ports: - "8080:8080" links: - database_server database_server: build: context: ./database_server/ args: - mysql_password=mention_your_mysql_root_password - mysql_database=mention_your_database_name container_name: mysql volumes: - ./database_server/supervisord.conf:/etc/supervisor/conf.d/supervisord.conf - ./database_server/mysql.sh:/etc/mysql.sh ports: - "3306:3306" |
Here in YAML file above, we are defining three services: cache_server, web_server and database_server.
- The cache_server is associated with our Varnish cache server configuration. Container name defined is varnish, linked to web_server and port 80 & 6082 is allocated to it. There are three files that are being mapped from host to docker container and “context” points to its Dockerfile installing Varnish version 4.1.
- The web_server is associated with our apache server configuration. Container name defined for this service is apache2, linked to database_server and port 8080 is allocated to it. There are four volumes or files are being mapped from host to docker container and “context” under “build” points to location of its Dockerfile.
- Also, the service database_server is associated with mysql-server. Container name is defined as mysql and port 3306 is allocated to it. Mysql root password will be passed as build argument and their are two volumes/files mapped from host to docker container. Same as web_server, “context” points to location of its Dockerfile installing mysql-server-5.7.
Lets take a look in our web_server directory. It contains 2 files. Dockerfile is shown below:
|
1 2 3 4 5 6 7 8 9 10 11 12 13 14 15 16 17 18 19 20 21 22 23 24 25 26 27 28 29 30 31 32 33 34 |
FROM ubuntu:16.04 RUN apt-get update \ && apt-get -y install apache2 nano mysql-client \ && a2enmod rewrite \ && a2enmod headers \ && export LANG=en_US.UTF-8 \ && apt-get update \ && apt-get install -y software-properties-common \ && apt-get install -y language-pack-en-base \ && LC_ALL=en_US.UTF-8 add-apt-repository ppa:ondrej/php \ && apt-get update \ && apt-get -y install php7.1 php7.1-curl php7.1-intl php7.1-gd php7.1-dom php7.1-mcrypt php7.1-iconv php7.1-xsl php7.1-mbstring php7.1-ctype php7.1-zip php7.1-pdo php7.1-xml php7.1-bz2 php7.1-calendar php7.1-exif php7.1-fileinfo php7.1-json php7.1-mysqli php7.1-mysql php7.1-posix php7.1-tokenizer php7.1-xmlwriter php7.1-xmlreader php7.1-phar php7.1-soap php7.1-mysql php7.1-fpm php7.1-bcmath libapache2-mod-php7.1 \ && sed -i -e"s/^memory_limit\s*=\s*128M/memory_limit = 512M/" /etc/php/7.1/apache2/php.ini \ && rm /var/www/html/* \ && sed -i "s/None/all/g" /etc/apache2/apache2.conf \ && sed -i "s/80/8080/g" /etc/apache2/ports.conf /etc/apache2/sites-enabled/000-default.conf \ ##install supervisor and setup supervisord.conf file && apt-get install -y supervisor \ && mkdir -p /var/log/supervisor env APACHE_RUN_USER www-data env APACHE_RUN_GROUP www-data env APACHE_PID_FILE /var/run/apache2.pid env APACHE_RUN_DIR /var/run/apache2 env APACHE_LOCK_DIR /var/lock/apache2 env APACHE_LOG_DIR /var/log/apache2 env LANG C WORKDIR /var/www/html CMD ["/usr/bin/supervisord"] |
And at last we have supervisord.conf file that supervisor use to run apache2 server and ownership commands. Its contents are shown below:
|
1 2 3 4 5 6 7 8 |
[supervisord] nodaemon=true [program:apache2] command=/bin/bash -c "source /etc/apache2/envvars && exec /usr/sbin/apache2 -DFOREGROUND" [program:user_permission] command=/bin/bash -c "chown -R www-data: /var/www/" |
Moving on to our database_server directory, it contains 3 files. Dockerfile is shown below:
|
1 2 3 4 5 6 7 8 9 10 11 12 13 14 15 16 17 18 19 20 21 22 23 24 25 26 27 |
FROM ubuntu:16.04 ARG mysql_password ARG mysql_database env MYSQL_ROOT_PASSWORD {mysql_password} env MYSQL_DATABASE ${mysql_database} RUN apt-get update \ && echo "mysql-server-5.7 mysql-server/root_password password ${mysql_password}" | debconf-set-selections \ && echo "mysql-server-5.7 mysql-server/root_password_again password ${mysql_password}" | debconf-set-selections \ && DEBIAN_FRONTEND=noninteractive apt-get -y install mysql-server-5.7 && \ mkdir -p /var/lib/mysql && \ mkdir -p /var/run/mysqld && \ mkdir -p /var/log/mysql && \ touch /var/run/mysqld/mysqld.sock && \ touch /var/run/mysqld/mysqld.pid && \ chown -R mysql:mysql /var/lib/mysql && \ chown -R mysql:mysql /var/run/mysqld && \ chown -R mysql:mysql /var/log/mysql &&\ chmod -R 777 /var/run/mysqld/ \ && sed -i -e"s/^bind-address\s*=\s*127.0.0.1/bind-address = 0.0.0.0/" /etc/mysql/mysql.conf.d/mysqld.cnf \ ##install supervisor and setup supervisord.conf file && apt-get install -y supervisor nano \ && mkdir -p /var/log/supervisor CMD ["/usr/bin/supervisord"] |
So as we have seen in our last blog as well that Dockerfile just install packages as it is instructed to do by the commands.
As we have mentioned earlier consider image as rest package where no services or processes are running. That is why we cannot perform any operation from Dockerfile that requires a particular service to be running. As with case of database, we cannot create database from Dockerfile as mysql service is not running. For database and its user creation, we will create a bash script that will run whenever a container will launch, hence creating mentioned database and its user.
We are using “mysql.sh” as the bash script as mentioned in Dockerfile. Bash script “msyql.sh” resides on our host parallel to Dockerfile.
Contents of mysql.sh is shown below:
|
1 2 3 4 5 6 7 8 9 10 11 12 13 14 15 16 17 18 19 20 21 22 23 24 25 26 27 28 |
#!/bin/bash set -u sleep 4 database_connectivity_check=no var=1 while [ "$database_connectivity_check" != "mysql" ]; do /etc/init.d/mysql start sleep 2 database_connectivity_check=`mysqlshow --user=root --password=$MYSQL_ROOT_PASSWORD | grep -o mysql` if [ $var -ge 4 ]; then exit 1 fi var=$((var+1)) done database_availability_check=`mysqlshow --user=root --password=$MYSQL_ROOT_PASSWORD | grep -ow "$MYSQL_DATABASE"` if [ "$database_availability_check" == "$MYSQL_DATABASE" ]; then exit 1 else mysql -u root -p$MYSQL_ROOT_PASSWORD -e "grant all on *.* to 'root'@'%' identified by '$MYSQL_ROOT_PASSWORD';" mysql -u root -p$MYSQL_ROOT_PASSWORD -e "create database $MYSQL_DATABASE;" mysql -u root -p$MYSQL_ROOT_PASSWORD -e "grant all on $MYSQL_DATABASE.* to 'root'@'%' identified by '$MYSQL_ROOT_PASSWORD';" supervisorctl stop database_creation && supervisorctl remove database_creation echo "Database $MYSQL_DATABASE created" fi |
Apart from mysql.sh and Dockerfile, we are also mapping supervisord.conf file. Its contents are shown below:
|
1 2 3 4 5 6 7 8 |
[supervisord] nodaemon=true [program:mysql] command=/bin/bash -c "touch /var/run/mysqld/mysqld.sock;touch /var/run/mysqld/mysqld.pid;chown -R mysql:mysql /var/lib/mysql;chown -R mysql:mysql /var/run/mysqld;chown -R mysql:mysql /var/log/mysql;chmod -R 777 /var/run/mysqld/;/etc/init.d/mysql restart" [program:database_creation] command=/bin/bash -c "chmod a+x /etc/mysql.sh; /etc/mysql.sh" |
Moving on and taking a look on our cache_server directory, It contains 4 files. Dockerfile contents are shown below:
|
1 2 3 4 5 6 7 8 9 10 11 12 13 14 15 16 17 |
From ubuntu:16.04 MAINTAINER Alankrit Srivastava alankrit.srivastava256@webkul.com ##update server RUN apt-get update \ ##install supervisor and setup supervisord.conf file && apt-get install -y supervisor \ && mkdir -p /var/log/supervisor \ ##install varnish && apt-get -y install varnish \ && rm /etc/varnish/default.vcl \ && rm /etc/default/varnish EXPOSE 6082 80 CMD ["/usr/bin/supervisord"] |
We also have server configuration file named varnish whose contents are shown below.
|
1 2 3 4 5 6 7 8 9 10 11 12 13 14 15 16 17 18 19 20 21 22 23 24 25 26 27 28 29 30 31 32 33 34 35 36 37 38 39 40 41 42 43 44 45 46 47 48 49 50 51 52 53 54 55 56 57 58 59 60 61 62 63 64 65 66 67 68 69 70 71 72 73 74 75 76 77 78 79 80 81 82 83 84 85 86 87 88 89 90 91 92 93 94 95 96 97 98 99 100 101 102 |
# Configuration file for varnish # # /etc/init.d/varnish expects the variables $DAEMON_OPTS, $NFILES and $MEMLOCK # to be set from this shell script fragment. # # Note: If systemd is installed, this file is obsolete and ignored. Please see # /usr/share/doc/varnish/examples/varnish.systemd-drop-in.conf # Should we start varnishd at boot? Set to "no" to disable. START=yes # Maximum number of open files (for ulimit -n) NFILES=131072 # Maximum locked memory size (for ulimit -l) # Used for locking the shared memory log in memory. If you increase log size, # you need to increase this number as well MEMLOCK=82000 # Default varnish instance name is the local nodename. Can be overridden with # the -n switch, to have more instances on a single server. # You may need to uncomment this variable for alternatives 1 and 3 below. # INSTANCE=$(uname -n) # This file contains 4 alternatives, please use only one. ## Alternative 1, Minimal configuration, no VCL # # Listen on port 6081, administration on localhost:6082, and forward to # content server on localhost:8080. Use a 1GB fixed-size cache file. # # This example uses the INSTANCE variable above, which you need to uncomment. # # DAEMON_OPTS="-a :6081 \ # -T localhost:6082 \ # -b localhost:8080 \ # -u varnish -g varnish \ # -S /etc/varnish/secret \ # -s file,/var/lib/varnish/$INSTANCE/varnish_storage.bin,1G" ## Alternative 2, Configuration with VCL # # Listen on port 6081, administration on localhost:6082, and forward to # one content server selected by the vcl file, based on the request. # DAEMON_OPTS="-a :80 \ -T localhost:6082 \ -f /etc/varnish/default.vcl \ -S /etc/varnish/secret \ -s malloc,256m" ## Alternative 3, Advanced configuration # # This example uses the INSTANCE variable above, which you need to uncomment. # # See varnishd(1) for more information. # # # Main configuration file. You probably want to change it :) # VARNISH_VCL_CONF=/etc/varnish/default.vcl # # # Default address and port to bind to # # Blank address means all IPv4 and IPv6 interfaces, otherwise specify # # a host name, an IPv4 dotted quad, or an IPv6 address in brackets. # VARNISH_LISTEN_ADDRESS= # VARNISH_LISTEN_PORT=6081 # # # Telnet admin interface listen address and port # VARNISH_ADMIN_LISTEN_ADDRESS=127.0.0.1 # VARNISH_ADMIN_LISTEN_PORT=6082 # # # Cache file location # VARNISH_STORAGE_FILE=/var/lib/varnish/$INSTANCE/varnish_storage.bin # # # Cache file size: in bytes, optionally using k / M / G / T suffix, # # or in percentage of available disk space using the % suffix. # VARNISH_STORAGE_SIZE=1G # # # File containing administration secret # VARNISH_SECRET_FILE=/etc/varnish/secret # # # Backend storage specification # VARNISH_STORAGE="file,${VARNISH_STORAGE_FILE},${VARNISH_STORAGE_SIZE}" # # # Default TTL used when the backend does not specify one # VARNISH_TTL=120 # # # DAEMON_OPTS is used by the init script. If you add or remove options, make # # sure you update this section, too. # DAEMON_OPTS="-a ${VARNISH_LISTEN_ADDRESS}:${VARNISH_LISTEN_PORT} \ # -f ${VARNISH_VCL_CONF} \ # -T ${VARNISH_ADMIN_LISTEN_ADDRESS}:${VARNISH_ADMIN_LISTEN_PORT} \ # -t ${VARNISH_TTL} \ # -S ${VARNISH_SECRET_FILE} \ # -s ${VARNISH_STORAGE}" # ## Alternative 4, Do It Yourself # # DAEMON_OPTS="" |
And most importantly, our Varnish configuration language file. This VCL file is provided by Magento 2 itself and it works perfectly. Its contents are shown below.
|
1 2 3 4 5 6 7 8 9 10 11 12 13 14 15 16 17 18 19 20 21 22 23 24 25 26 27 28 29 30 31 32 33 34 35 36 37 38 39 40 41 42 43 44 45 46 47 48 49 50 51 52 53 54 55 56 57 58 59 60 61 62 63 64 65 66 67 68 69 70 71 72 73 74 75 76 77 78 79 80 81 82 83 84 85 86 87 88 89 90 91 92 93 94 95 96 97 98 99 100 101 102 103 104 105 106 107 108 109 110 111 112 113 114 115 116 117 118 119 120 121 122 123 124 125 126 127 128 129 130 131 132 133 134 135 136 137 138 139 140 141 142 143 144 145 146 147 148 149 150 151 152 153 154 155 156 157 158 159 160 161 162 163 164 165 166 167 168 169 170 171 172 173 174 175 176 177 178 179 180 181 182 183 184 185 186 187 188 189 190 191 192 193 194 195 196 197 198 199 200 201 202 203 204 205 206 207 208 209 |
vcl 4.0; import std; # The minimal Varnish version is 5.0 # For SSL offloading, pass the following header in your proxy server or load balancer: 'X-Forwarded-Proto: https' backend default { .host = "apache2"; .port = "8080"; .first_byte_timeout = 600s; } acl purge { "localhost"; } sub vcl_recv { if (req.method == "PURGE") { if (client.ip !~ purge) { return (synth(405, "Method not allowed")); } # To use the X-Pool header for purging varnish during automated deployments, make sure the X-Pool header # has been added to the response in your backend server config. This is used, for example, by the # capistrano-magento2 gem for purging old content from varnish during it's deploy routine. if (!req.http.X-Magento-Tags-Pattern && !req.http.X-Pool) { return (synth(400, "X-Magento-Tags-Pattern or X-Pool header required")); } if (req.http.X-Magento-Tags-Pattern) { ban("obj.http.X-Magento-Tags ~ " + req.http.X-Magento-Tags-Pattern); } if (req.http.X-Pool) { ban("obj.http.X-Pool ~ " + req.http.X-Pool); } return (synth(200, "Purged")); } if (req.method != "GET" && req.method != "HEAD" && req.method != "PUT" && req.method != "POST" && req.method != "TRACE" && req.method != "OPTIONS" && req.method != "DELETE") { /* Non-RFC2616 or CONNECT which is weird. */ return (pipe); } # We only deal with GET and HEAD by default if (req.method != "GET" && req.method != "HEAD") { return (pass); } # Bypass shopping cart, checkout and search requests if (req.url ~ "/checkout" || req.url ~ "/catalogsearch") { return (pass); } # Bypass health check requests if (req.url ~ "/pub/health_check.php") { return (pass); } # Set initial grace period usage status set req.http.grace = "none"; # normalize url in case of leading HTTP scheme and domain set req.url = regsub(req.url, "^http[s]?://", ""); # collect all cookies std.collect(req.http.Cookie); # Compression filter. See https://www.varnish-cache.org/trac/wiki/FAQ/Compression if (req.http.Accept-Encoding) { if (req.url ~ "\.(jpg|jpeg|png|gif|gz|tgz|bz2|tbz|mp3|ogg|swf|flv)$") { # No point in compressing these unset req.http.Accept-Encoding; } elsif (req.http.Accept-Encoding ~ "gzip") { set req.http.Accept-Encoding = "gzip"; } elsif (req.http.Accept-Encoding ~ "deflate" && req.http.user-agent !~ "MSIE") { set req.http.Accept-Encoding = "deflate"; } else { # unkown algorithm unset req.http.Accept-Encoding; } } # Remove Google gclid parameters to minimize the cache objects set req.url = regsuball(req.url,"\?gclid=[^&]+$",""); # strips when QS = "?gclid=AAA" set req.url = regsuball(req.url,"\?gclid=[^&]+&","?"); # strips when QS = "?gclid=AAA&foo=bar" set req.url = regsuball(req.url,"&gclid=[^&]+",""); # strips when QS = "?foo=bar&gclid=AAA" or QS = "?foo=bar&gclid=AAA&bar=baz" # Static files caching if (req.url ~ "^/(pub/)?(media|static)/") { # Static files should not be cached by default return (pass); # But if you use a few locales and don't use CDN you can enable caching static files by commenting previous line (#return (pass);) and uncommenting next 3 lines #unset req.http.Https; #unset req.http.X-Forwarded-Proto; #unset req.http.Cookie; } return (hash); } sub vcl_hash { if (req.http.cookie ~ "X-Magento-Vary=") { hash_data(regsub(req.http.cookie, "^.*?X-Magento-Vary=([^;]+);*.*$", "\1")); } # For multi site configurations to not cache each other's content if (req.http.host) { hash_data(req.http.host); } else { hash_data(server.ip); } # To make sure http users don't see ssl warning if (req.http.X-Forwarded-Proto) { hash_data(req.http.X-Forwarded-Proto); } } sub vcl_backend_response { set beresp.grace = 3d; if (beresp.http.content-type ~ "text") { set beresp.do_esi = true; } if (bereq.url ~ "\.js$" || beresp.http.content-type ~ "text") { set beresp.do_gzip = true; } # cache only successfully responses and 404s if (beresp.status != 200 && beresp.status != 404) { set beresp.ttl = 0s; set beresp.uncacheable = true; return (deliver); } elsif (beresp.http.Cache-Control ~ "private") { set beresp.uncacheable = true; set beresp.ttl = 86400s; return (deliver); } if (beresp.http.X-Magento-Debug) { set beresp.http.X-Magento-Cache-Control = beresp.http.Cache-Control; } # validate if we need to cache it and prevent from setting cookie if (beresp.ttl > 0s && (bereq.method == "GET" || bereq.method == "HEAD")) { unset beresp.http.set-cookie; } # If page is not cacheable then bypass varnish for 2 minutes as Hit-For-Pass if (beresp.ttl <= 0s || beresp.http.Surrogate-control ~ "no-store" || (!beresp.http.Surrogate-Control && beresp.http.Vary == "*")) { # Mark as Hit-For-Pass for the next 2 minutes set beresp.ttl = 120s; set beresp.uncacheable = true; } return (deliver); } sub vcl_deliver { if (resp.http.X-Magento-Debug) { if (resp.http.x-varnish ~ " ") { set resp.http.X-Magento-Cache-Debug = "HIT"; set resp.http.Grace = req.http.grace; } else { set resp.http.X-Magento-Cache-Debug = "MISS"; } } else { unset resp.http.Age; } unset resp.http.X-Magento-Debug; unset resp.http.X-Magento-Tags; unset resp.http.X-Powered-By; unset resp.http.Server; unset resp.http.X-Varnish; unset resp.http.Via; unset resp.http.Link; } sub vcl_hit { if (obj.ttl >= 0s) { # Hit within TTL period return (deliver); } if (std.healthy(req.backend_hint)) { if (obj.ttl + 300s > 0s) { # Hit after TTL expiration, but within grace period set req.http.grace = "normal (healthy server)"; return (deliver); } else { # Hit after TTL and grace expiration return (miss); } } else { # server is not healthy, retrieve from cache set req.http.grace = "unlimited (unhealthy server)"; return (deliver); } } |
Take a note that we have mentioned apache2 (apache container name) for backend host in our default.vcl file as our magento code will be mapped to apache container. Also, we also have supervisor for controlling varnish server. Its contents are shown below:
|
1 2 3 4 5 6 7 |
[supervisord] nodaemon=true [program:varnish3.0] command=/bin/bash -c "/usr/sbin/varnishd -P /run/varnishd.pid -a :80 -F -T localhost:6082 -f /etc/varnish/default.vcl -S /etc/varnish/secret -s malloc,256m" |
And our last directory is magento2 directory. In our case, we have download Magento 2.1.6 from https://magento.com/tech-resources/download and unarchived it in magento2 directory. This directory will be mapped with /var/www/html directory in apache2 docker container.
After extracting Magento 2 files in the desired directory, our project directory setup will be completed. Now in order to build the images with docker-compose.yml file, go to project parent directory and run command,
|
1 |
docker-compose build |
This command will build up all three images for apache2, mysql and varnish server. To check the built images, run command,
|
1 |
docker images |

Now to run the containers as a part of single project being as mentioned in docker-compose.yml file, run the command:
|
1 |
docker-compose up -d |

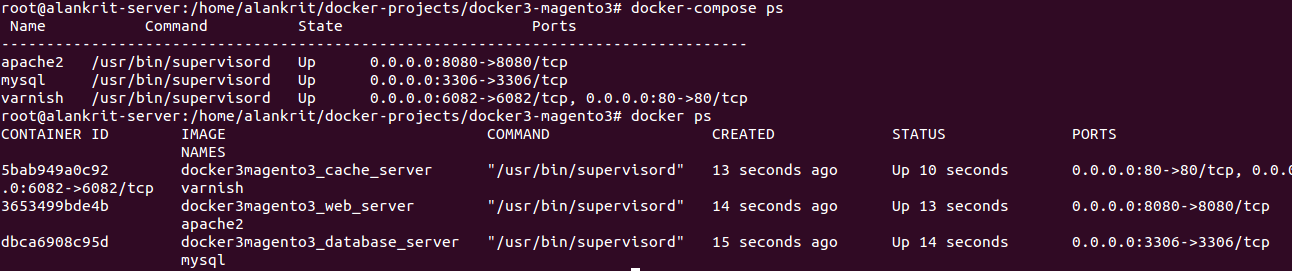
Your containers will get running. To list running containers under docker-compose, run command:
|
1 2 3 |
docker-compose ps docker ps |
|
1 |
Now, your server setup is all ready, now hit your domain name or IP to install Magento 2. Skipping readiness check, moving forward to database configuration and admin panel configuration. If localhost doesn't work as database server host, mention your IP address. |

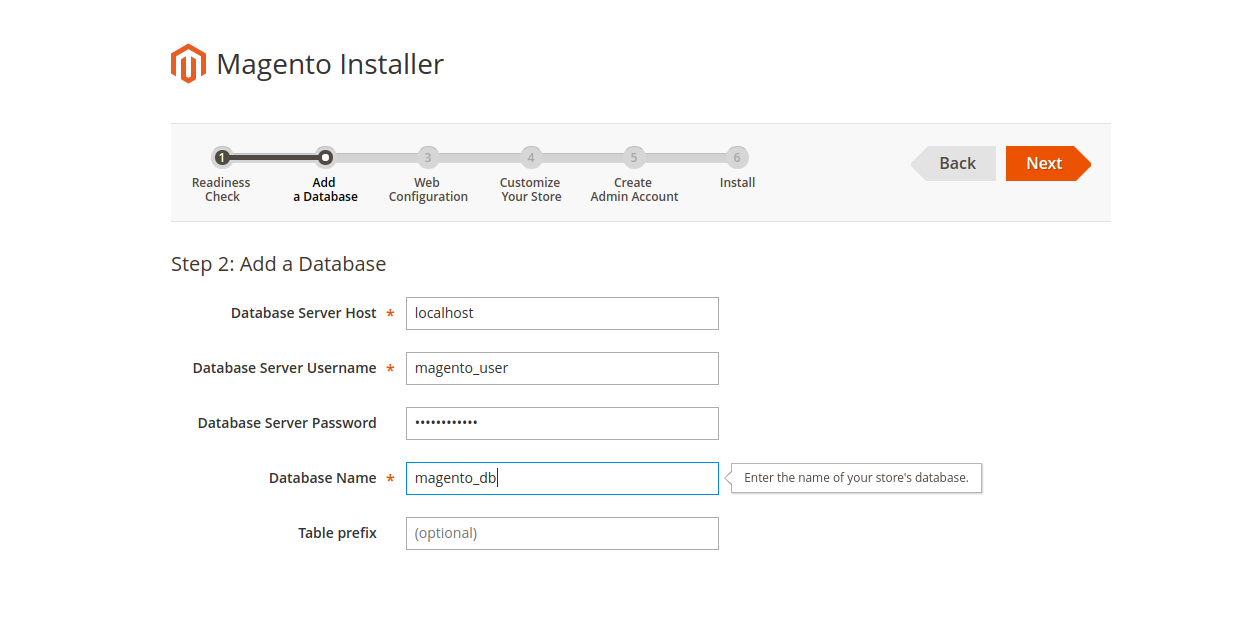

Then proceed further and install the Magento 2.
After successful installation, we need to configure Magento 2 from admin panel to use Varnish Cache instead of its built-in cache. So, login to your admin panel. Go to STORES –> Configuration –> ADVANCED –> System –> Full Page Cache as,
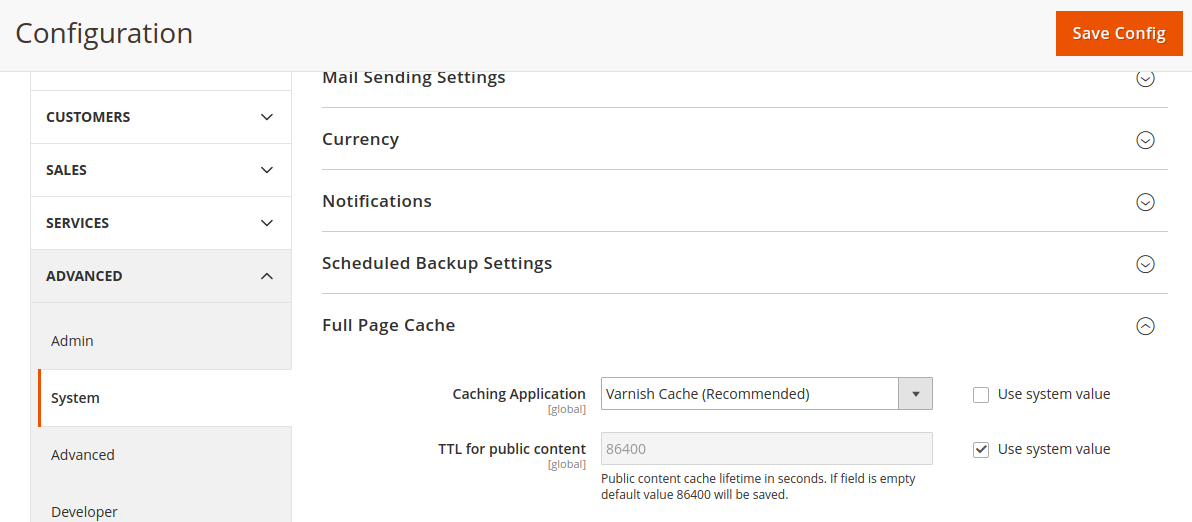
Select Varnish Cache in Caching Application and scroll down,
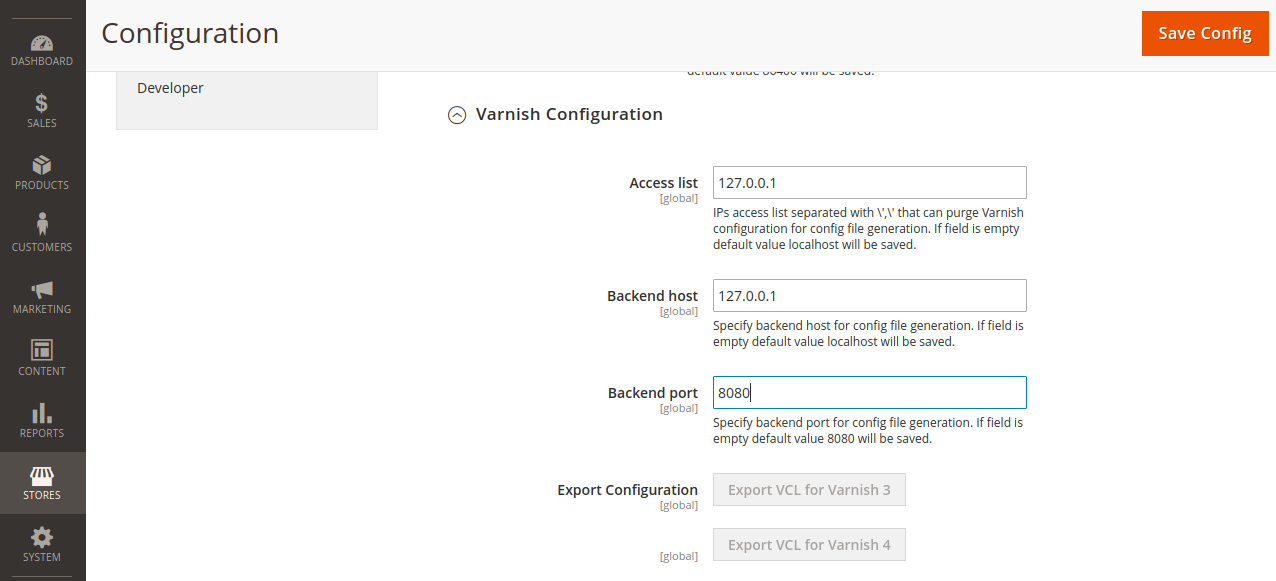
Mention the backend host, backend port and Access list. As we already have our VCL file “default.vcl”, we don’t need to export it. Now, clear all the cache from Magento admin. Now, Varnish Server has been integrated with our Magento 2 store.
As you might have noticed that we are running apache2 server (our backend server) on port 8080 and Varnish cache server on port 80. So here’s how Varnish is working: Varnish acts a reverse proxy server typically sits at port 80 and directs client requests to the back-end apache2 server at port 8080. Whenever a client makes a request, Varnish server checks the content within the cache and incase data not found it send the request to backend server and fetch the content to client and keep a copy of the data as cache. When the same request is made, Varnish does not bother apache2 server, it just fetch the data from the cache. It provides an additional level of abstraction and control to ensure the smooth flow of network traffic between clients and servers.
To check if varnish is working or not, go to your varnish container,
|
1 |
docker exec -ti varnish bash |
Now, run command:
|
1 |
varnishhist |
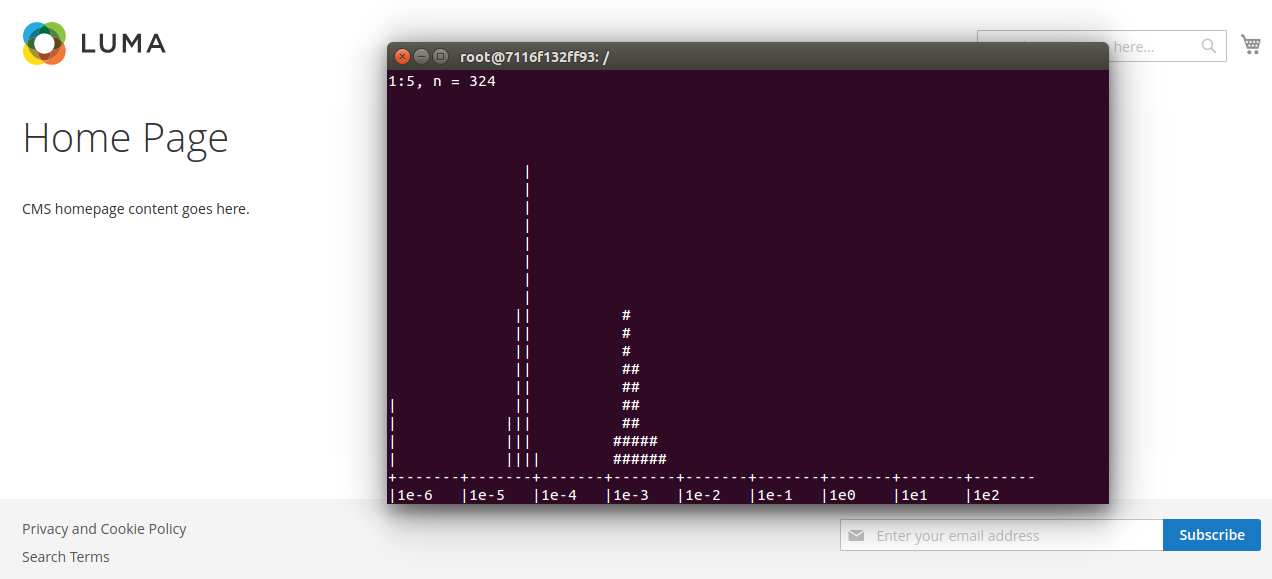
And hit your domain URL, when first time you hit it you will see ‘#’ on the terminal representing cache miss as first request is forwarded to main server. Next time as you hit the browser, you will see ‘|’ increasing and ‘#’ decreasing representing cache hits.
So far we have discussed how to setup Magento 2 and integrate it with Varnish Cache server using docker-compose on multiple docker container architecture. Please refer to repository https://github.com/webkul/magento2-varnish-docker-compose to deploy same architecture.
In our next blog we will add an extra layer in our current architecture by integrating redis-server with Magento 2.

Be the first to comment.