Magento is one of the most popular content management system for e-commerce websites. There are also a large numbers of extensions and themes available online for further enhancement as per requirements. Magento has released its new version Magento2 with a variety of improvements and optimizations over the previous version Magento-1. This blog will help you to install Magento2 on Ubuntu and Debian systems. You can also follow my blogs for Magento2 installation on Windows and Mac OS.
Prerequisites:
Operating systems:- Various Linux (x86-64) distributions can be used such as Ubuntu, RedHat Enterprise Linux (RHEL), CentOS, Debian, etc. Here I will be using Ubuntu LAMP server to install Magento 2.x for this demo.
Memory requirement:- Minimum 2GB of RAM is recommended for a smooth functioning and performance of Magento. If less than 2GB of RAM is present, it is recommended to create a swap file.
Web servers:-
- Apache 2.2 or 2.4 : In addition, the Apache mod_rewrite module must be enabled. mod_rewrite enables the server to perform URL rewriting.
- nginix 1.8 or later.
In my demo, i will be using Apache or 2.4
Database:-
- MySQL 5.6 is compatible with all Magento2 versions.
- Magento application version 2.1.2 and later are compatible with MySQL 5.7.
- MariaDB and Percona are compatible with Magento.
In my demo, i will be using MySQL 5.7
PHP:- Magento2 supports php versions 7.0.13–7.0.x and 7.1.x. We will use here the latest version of php 7.0 for this demo.
Required PHP extensions:-
bc-math, curl, gd, imagemagick 6.3.7 or later, intl, mbstring, mcrypt, mhash, openssl, pdo/mysql, mysqli, simplexml, soap, xml, xsl, zip, and json, iconv (for php 7 only).
Composer (Optional):- Composer is a dependency manager for PHP. Composer will manage the dependencies you require on a project by project basis. This means that Composer will pull in all the required libraries, dependencies and manage them all in one place.
Installation:
Now that we have the prerequisites installed, let’s get started with Magento 2.x Installation on our Ubuntu LAMP server. To begin first prepare your LAMP Server with required prerequisites.
Step-1 : Install Apache2
|
1 2 |
sudo apt-get update sudo apt-get -y install apache2 |
Enable apache rewrite and headers module.
|
1 2 3 |
sudo a2enmod rewrite sudo a2enmod headers sudo service apache2 restart |
Step-2: Install php7 and its extensions:
Install php7 and all the required extensions with their dependencies.
|
1 2 3 4 5 6 |
locale-gen en_US.UTF-8 && export LANG=en_US.UTF-8 sudo apt-get update sudo apt-get install -y software-properties-common sudo apt-get install -y python-software-properties sudo apt-get install -y language-pack-en-base sudo LC_ALL=en_US.UTF-8 add-apt-repository ppa:ondrej/php |
Press enter if prompt for confirmation.
|
1 |
sudo apt-get update |
|
1 2 |
sudo apt-get -y install php7.0 libapache2-mod-php7.0 \ php7.0-{bcmath,curl,intl,gd,mcrypt,iconv,xsl,mbstring,zip,pdo,xml,json,mysqli,mysql,xmlwriter,xmlreader,soap} |
Step-3: Download MySQL 5.7 Database
We will install MySQL 5.7 on our Ubuntu server. Magento uses a MySQL database to manage site data, like product and order information.
Now install the mysql server. Enter the root password when prompt. Finally check the mysql version to verify its installation.
|
1 |
sudo apt-get install -y mysql-server |
|
1 |
mysql -V |
Now since our LAMP server is ready, we can now verify the settings and further download the Magento2 source code for installation.
Step-4: PHP Settings
Magento uses PHP for various complex operations and needs sufficient amount of memory to run the Magento scripts without crash. By default, the memory allocated by PHP for each script is 128 MB which must be increased to 512 MB better performance.
Edit the below file. Find the line “memory_limit = 128M” and change the value to 512M. Then save and exit.
|
1 |
sudo vim /etc/php/7.0/apache2/php.ini |
Step-5: Prerequisite check:
Before you begin, you can quickly check all the prerequisites on your Ubuntu server by running below commands.
Check the version of apache and php:
|
1 |
apache2 -v |
|
1 |
php -v |
Check the version of MySQL and verify its connectivity :
mysql -u <DB user> -p
for example:-
|
1 |
mysql -u root -p |
If database server is on remote host, use the below command.
mysql -h <remote_host_IP> -u <DB user> -p
Step-6: Download Magento2 source code.
You can download the latest source code from Magento official website or from github.
NOTE: If you download from github, we need to download and use composer for Magento installation. In case you download from official website through your browser, you can directly use the source code as it provides the required dependencies.
a) Without Composer:
Download the latest source code from Magento official website, i.e. https://magento.com/tech-resources/download/. If you need to install magento2 on a remote server, copy the downloaded source code to the server through scp or rsync, etc.
|
1 2 3 |
sudo mkdir /var/www/magento2 sudo tar xzvf Magento-CE-2.2.6-2017-03-29-01-08-05.tar.gz -C /var/www/magento2 rm Magento-CE-2.2.6-2017-03-29-01-08-05.tar.gz |
|
1 |
sudo chown -R www-data:www-data /var/www/ |
The source code downloaded from the official website contains all the required dependencies. So there is no need for composer here.
b) With Composer:
Now let us download and install the latest source code from github. At the time of this blog, the latest version is 2.2.6.
To install magento2 with composer, first create the Access keys of magento marketplace. If you have an account on Magento Marketplace, simply signin and generate the access keys. If you don’t have an account, create an account by registering yourself on marketplace.magento.com
For generating Access keys, login in to magento marketplace and from the top right corner of the page where your user name is displayed, navigate to My profile > Marketplace > My products > Access Keys
Now create a new pair of Access keys. You need to provide the public Key as username and Private Key as password when prompt.
First install composer on the server.
|
1 2 |
sudo wget -O /usr/local/bin/composer http://getcomposer.org/composer.phar sudo chmod +x /usr/local/bin/composer |
The syntax for installing magento2 through composer is as follows.
composer create-project –repository=https://repo.magento.com/ magento/project-community-edition <install-directory-name>
You can use the below command for installing magento2 latest version through composer.
|
1 |
composer create-project --repository=https://repo.magento.com/ magento/project-community-edition magento2 |
For installing a specific version of magento2, mention the magento version at the end of the command as follows.
|
1 |
composer create-project --repository=https://repo.magento.com/ magento/project-community-edition magento2 v2.2.6 |
During this process, you will be asked to provide the username and password. Provide the generated Access Keys where the public Key is the username and Private Key is the password. Also, you will be asked whether you want to store the credentials in auth.json. You can select “n” if you don’t wish to save your credentials on the server.
Then copy the magento2 files to the Document root of the webserver.
|
1 |
sudo mv magento2 /var/www/ |
Give the proper web-server permissions.
|
1 |
sudo chown -R www-data:www-data /var/www/ |
Step-7: Configuring Apache
Configure the Apache with the below configuration. If you want to run magento on a domain, uncomment and provide the server name as per your requirement in the below configuration. Else you can leave it commented and access it later with IP or localhost.
|
1 |
sudo vim /etc/apache2/sites-enabled/000-default.conf |
|
1 2 3 4 5 6 7 8 9 10 11 12 13 14 15 16 17 |
<VirtualHost *:80> #ServerName mymagento2.com #ServerAlias www.mymagento2.com DocumentRoot /var/www/magento2 <Directory /var/www/magento2> Options FollowSymLinks MultiViews Require all granted AllowOverride all </Directory> ErrorLog /var/log/apache2/error.log CustomLog /var/log/apache2/access.log combined </VirtualHost> |
Save and quit the file and restart the apache2 server.
|
1 |
sudo service apache2 restart |
Step-8: Create a MySQL Database and User
Login to your MySQL server and create a user and database for your Magento application. Change the database name, database user and password as per your need.
|
1 |
mysql -u root -p |
|
1 2 3 4 5 |
> CREATE DATABASE magento2; > CREATE USER 'magento_user'@'localhost' IDENTIFIED BY 'user_pwd'; > GRANT ALL PRIVILEGES ON magento2.* TO 'magento_user'@'localhost' IDENTIFIED BY 'user_pwd'; > FLUSH PRIVILEGES; > exit |
Now create the below database with the relevant information as follows or alternatively you can do it later through the web interface by hitting the Magento url you provided in apache configuration.
|
1 2 3 4 5 6 7 8 9 10 11 12 13 14 15 16 17 |
$ sudo php /var/www/magento2/bin/magento setup:install \ --db-host=127.0.0.1 \ --db-name=magento2 \ --db-user=magento_user \ --db-password=user_pwd \ --admin-email=your_mail_id@xyz.com \ --admin-firstname=abc \ --admin-lastname=xyz \ --admin-password=admin_pwd@123 \ --admin-user=admin --backend-frontname=admin \ --base-url=http://mymagento2.com \ --base-url-secure=https://mymagento2.com \ --currency=EUR --language=en_US \ --session-save=files \ --timezone=Europe/Berlin \ --use-rewrites=1 |
|
1 |
$ sudo chown -R www-data:www-data /var/www/ |
Step-9: Accessing Magento2 web interface.
Make entry in /etc/hosts if don’t have a DNS entry of the domain on your DNS server.
|
1 |
sudo vim /etc/hosts |
|
1 |
192.168.x.x mymagento2.com www.mymagento2.com |
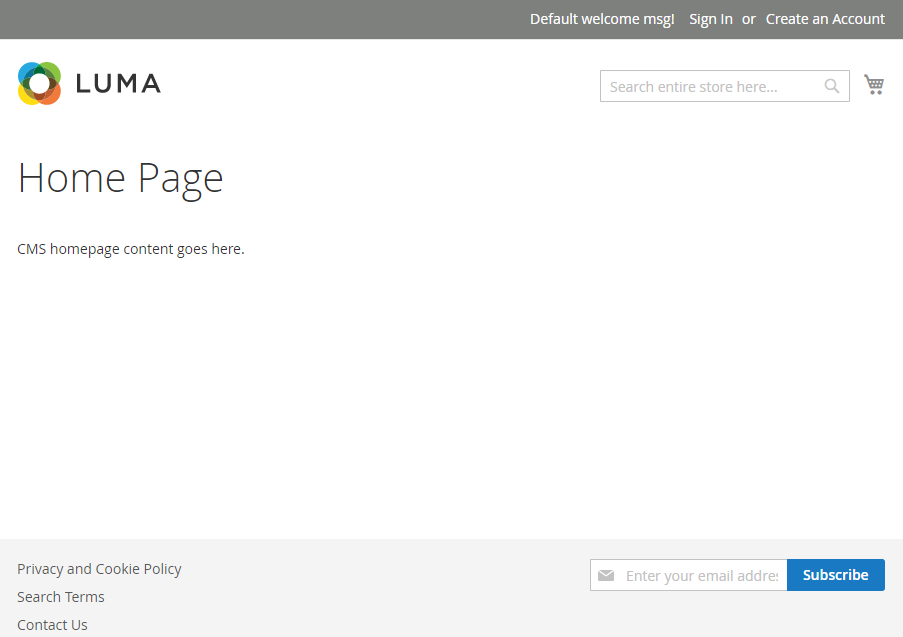
To Access your Magento2, you can enter your URL in browser.
http://mymagento2.com -> for home page
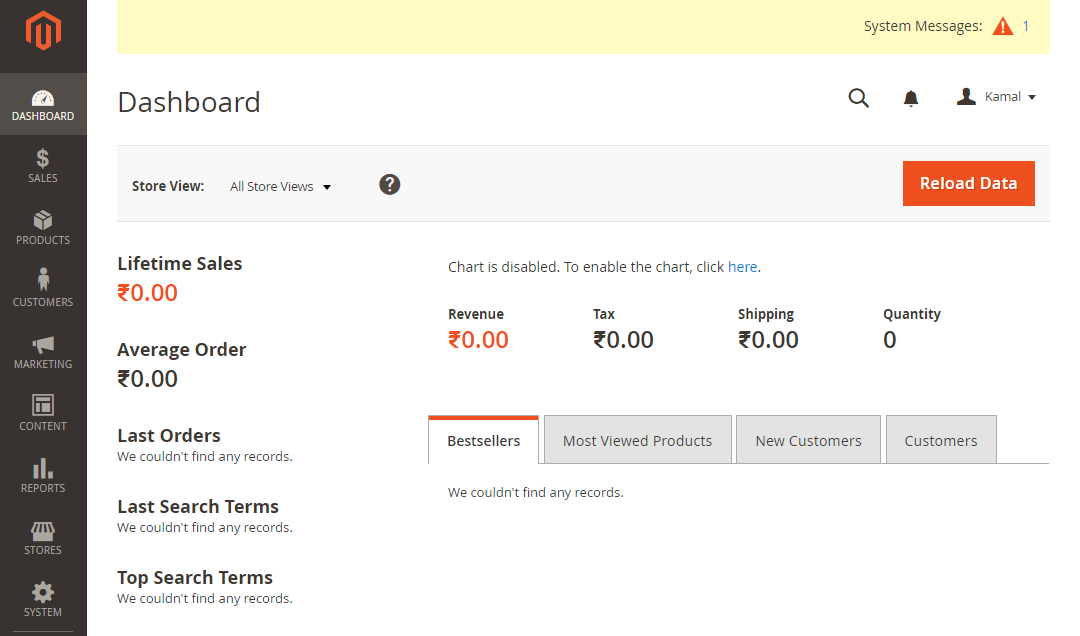
http://mymagento2.com/admin -> for admin pannel
If you have not configured the database through the install command in step-8, you can do the same through the GUI web interface. Just follow the instructions and provide the required database and admin user information and install Magento2.
So by now, you have successfully installed and configured Magento2 on your Ubuntu LAMP server.
In case of any query, please feel free to Contact us.

Thanks for this doc first of all. I followed it completely and managed to get Magento2 installed on my Ubuntu server.
But for some unknown reasons the am not getting the Web page after Magento installed successfully..
Need help can you..
[Progress: 423 / 425]
Post installation file permissions check…
For security, remove write permissions from these directories: ‘/var/www/magento2/magento2-2.1.6/app/etc’
[Progress: 424 / 425]
Write installation date…
[Progress: 425 / 425]
[SUCCESS]: Magento installation complete.
[SUCCESS]: Magento Admin URI: /admin
ubuntu@mojento-v1:/var/www/magento2/magento2-2.1.6/bin$
Thank you!!