Introduction
Here, in this blog, we will discuss about installing WordPress with LAMP on Ubuntu 18.04
LAMP is an open source Web development platform that uses Linux as the operating system, Apache as the Web server, MySQL as the relational database management system and PHP as the object-oriented scripting language.
WordPress is a content management system based on PHP and MySQL usually used with the MySQL or MariaDB database servers but can also use the SQLite database engine.
Setup LAMP Server:
The following configurations is used to setup LAMP server on ubuntu for installing wordpress:
- OS: Ubuntu 18.04
- Web Server: Apache2
- Database: MySQL 5.6
- PHP: php7.3
- WordPress 5.2.4
Step 1: Installing Apache
Install Apache using Ubuntu’s package manager, apt:
|
1 |
sudo apt install -y apache2 |
Visit your system’s IP address in your web browser
|
1 |
http://your_system_ip |
Step 2: Installing MySQL
|
1 2 |
sudo apt install -y mysql-server sudo mysql_secure_installation |
This will ask if you want to configure the validate password plugin. Answer Y for yes, or anything else to continue without enabling. If you answer “yes”, you’ll be asked to select a level of password validation. Select level 1 for the mediun level. You’ll be shown the password strength for the root password you just entered and your server will ask if you want to change that password. If you don’t want to change your current password then enter N for ‘no’ at the prompt.
i) Login to mysql and follow the below steps
|
1 2 3 4 5 6 |
mysql -u root -p CREATE DATABASE wordpress CREATE USER 'user_name'@'%' IDENTIFIED BY 'password'; GRANT ALL ON wordpress.* to 'user_name'@'%' IDENTIFIED BY 'password'; FLUSH PRIVILEGES; EXIT; |
Step 3: Installing PHP
i) Install PHP
PHP is the component of your setup that will process code to display dynamic content. It can run scripts, connect to your MySQL databases to get information, and hand the processed content over to your web server to display.
|
1 2 3 4 5 |
sudo apt install -y php7.3 sudo apt install php libapache2-mod-php php-mysql sudo apt install php-curl php-gd php-mbstring php-xml php-xmlrpc php-soap php-intl php-zip sudo systemctl restart apache2 sudo systemctl status apache2 |
ii) Create a PHP script
In order to test that your system has correct php version and is configured properly for PHP, create a very basic PHP script called phpversion.php. In order for Apache to find this file and serve it correctly, it must be saved to your apache document root directory.
|
1 |
nano phpversion.php |
|
1 2 3 |
<?php phpinfo(); |
save and close the file.
iii) Navigate to your system ip on web browser
Now you can test whether your web server is able to correctly display content generated by this PHP script. To try this out, visit the page in your web browser.
|
1 |
http://your_system_ip/phpversion.php |
Step 4: Adjusting Apache’s Configuration
i) Environment Variables
The Apache2 environment variables are set in the /etc/apache2/envvars file. The /etc/apache2/envvars file holds variable definitions such as Apache_Log_Dir (the location of Apache log files), Apache_Pid_File (the Apache process ID), Apache_Run_Users (the user that run Apache, by default www-data), etc.
ii) Currently, the use of .htaccess files is disabled. WordPress and many WordPress plugins use these files extensively for in-directory tweaks to the web server’s behavior.
Open the Apache configuration file for your website:
|
1 |
sudo nano /etc/apache2/sites-enabled/wordpress.conf |
iii) Allowoverride ALL in apache’s configuration file
To allow .htaccess files, we need to set the Allowoverride directive within a Directory block pointing to our document root. Add the following block of text inside the VirtualHost block in your configuration file, being sure to use the correct web root directory:
|
1 2 3 4 5 6 |
<Directory /var/www/wordpress/> AllowOverride All </Directory> a2enmod rewrite service apache2 restart |
save and close the file.
Steps 5: Downloading WordPress and adjusting the ownership
|
1 2 3 |
cd /var/www/wordpress curl -O https://wordpress.org/latest.tar.gz tar xzvf latest.tar.gz |
One of the most important things we need to accomplish is setting up reasonable file permissions and ownership.
We’ll start by giving ownership of all the files to the www-data user and group. This is the user that the Apache webserver runs as, and Apache will need to be able to read and write WordPress files in order to serve the website and perform automatic updates.
|
1 2 |
sudo chown -R www-data:www-data /var/www/wordpress cp /var/www/wordpress/wp-config-sample.php /var/www/wordpress/wp-config.php |
Step 6: Setting up the wordpress configuration file
Now, we need to make some changes to the main WordPress configuration file. We need to modify some of the database connection settings at the beginning of the file. Therefore, you need to adjust the database name, the database user, and the associated password that we configured within MySQL.
|
1 2 3 4 5 6 7 8 9 |
sudo nano /var/www/wordpress/wp-config.php define('DB_NAME', 'wordpress'); /** MySQL database username */ define('DB_USER', 'wordpressuser'); /** MySQL database password */ define('DB_PASSWORD', 'password'); |
Step 7: Completing the Installation Through the Web Interface
In your web browser, navigate to your system domain name or IP address:
|
1 |
https://system_domain_or_IP |
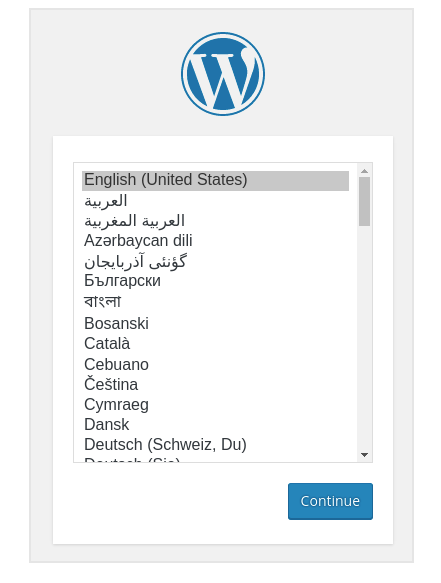
i) Select the language you would like to use:
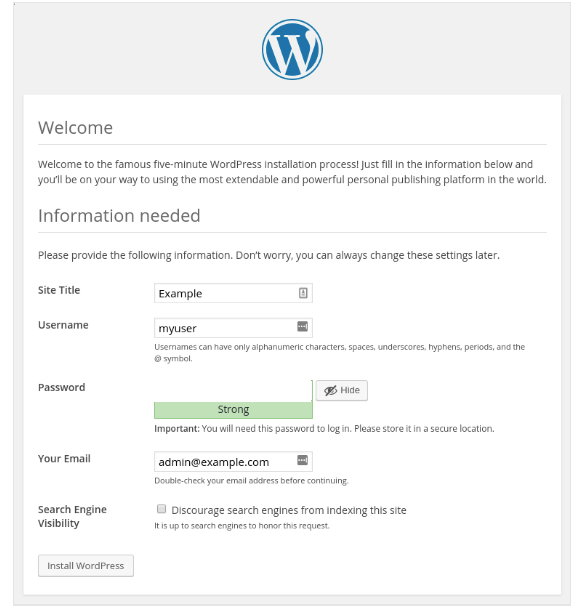
ii) Next, you will come to the main setup page
Select a name for your WordPress site and choose a username. Either generate a strong password and save or select an alternative strong password. Enter your email address and select whether you want to discourage search engines from indexing your site:
iii) When you click on Install WordPress, it will open the page that prompts you to log in:

iv) When you click on log in, it will open the WordPress administration dashboard:

In case of any help or query, please contact us or raise a ticket.

Be the first to comment.