What is Varnish?
Varnish is a software that helps websites load faster by storing a copy of the website’s content in a special place called a cache.
Varnish Cache is a web application accelerator also known as a caching HTTP reverse proxy. However, You can install it in front of your web server.
When someone visits the website, instead of fetching all the information from scratch, varnish quickly retrieves the stored copy, making the website load much faster.
In this blog, we will learn how to implement Varnish and Apache.
Benefits of using varnish
Speed: Websites load faster because varnish serves up cached copies of web pages instead of generating them from scratch every time someone visits.
Reduced Server Load: Since varnish reduces the number of requests to the main server, it helps to lower the burden on the server, which can handle more visitors without slowing down.
Better User Experience: Faster loading times mean visitors spend less time waiting for pages to load, leading to a better overall experience and higher satisfaction.
Scalability: Varnish can handle a large number of simultaneous requests, making it suitable for high-traffic websites.
Cost Savings: By reducing server load and increasing efficiency, varnish can help save on hosting costs.
In simple terms, varnish is like a turbocharger for websites, making them faster and more efficient, which benefits both website owners and visitors.
How to set up/install Varnish?
It completely depends on the OS of the server. Based on the server OS you will run the command to install.
Note – Here we are using the Ubuntu 20.04 server.
Please run the below commands:
This command updates the package list to get information on the latest available packages.
|
1 |
sudo apt-get update |
This command will install the further dependencies to configure the package repository.
|
1 |
sudo apt-get install debian-archive-keyring curl gnupg apt-transport-https |
Here’s a breakdown of what each of these packages does and why they might be required:
> Debian-archive-keyring: This package contains the GnuPG archive keys of the Debian archive. These keys are used to verify the authenticity of Debian packages during installation.
Installing this package ensures that your system can authenticate packages from the Debian repository.
> Curl: Curl is a command-line tool and library for transferring data with URLs. However, it supports various protocols, including HTTP, HTTPS, FTP, and more.
It’s commonly used for downloading files or interacting with web services from the command line.
> gnupg: GnuPG (GNU Privacy Guard) is a complete and free implementation of the OpenPGP standard. It’s used for encryption and signing of data and communication.
It’s likely included here because it’s a dependency for other packages or because it’s commonly used for secure communication or package verification.
> apt-transport-https: This package allows apt-get to retrieve and download packages over HTTPS.
It’s essential for fetching packages from repositories that use HTTPS, which is increasingly becoming the standard for package repositories to ensure data integrity and security during transmission.
Further, the next command will import the GPG key into the package manager configuration:
|
1 |
curl -s -L https://packagecloud.io/varnishcache/varnish60lts/gpgkey | sudo apt-key add - |
This command retrieves a GNU Privacy Guard key from the specified URL (https://packagecloud.io/varnishcache/varnish60lts/gpgkey).
And then adds it to the list of trusted keys used by the APT package manager on a Debian-based Linux system.
Here’s a breakdown of the components:
> curl: This is the command-line tool used for transferring data with URLs. In this command, it’s fetching the GPG key from the specified URL.
> -s: This flag makes the curl operate in silent mode, meaning it doesn’t show progress or error messages.
> -L: This flag tells the curl to follow any HTTP redirects, so it will automatically go to the final destination URL if there are any redirections.
You can retrieve the GPG key from the URL – https://packagecloud.io/varnishcache/varnish60lts/gpgkey
> |: This is the pipe operator, which redirects the output of the curl command (the GPG key) to the next command (sudo apt-key add -).
> sudo apt-key add -: This command adds the GPG key received from curl to the list of trusted keys used by APT. sudo is used to run the command with administrative privileges.
And finally, we have to update the package list once again. This will ensure the Package-cloud repository is included:
|
1 |
sudo apt-get update |
Now that the repositories are added and the right repository preferences are configured, you can install Varnish by running the following command:
|
1 |
sudo apt-get install varnish |
How to configure Varnish?
Varnish usually listens for requests on port 6081, but we’re configuring Varnish to listen on port 80, We are also adjusting how much Varnish can store in memory by making changes to its unit file.
|
1 |
vim /lib/systemd/system/varnish.service |
Default block:
|
1 2 3 4 5 6 |
ExecStart=/usr/sbin/varnishd \ -a :6081 \ -a localhost:6082,PROXY \ -p feature=+http2 \ -f /etc/varnish/default.vcl \ -s malloc,256m |
After doing the required changes our block will look like this:
|
1 2 3 4 5 6 7 8 9 |
ExecStart=/usr/sbin/varnishd \ -j unix,user=vcache \ -F \ -a :80 \ -T localhost:6082 \ -p feature=+http2 \ -f /etc/varnish/default.vcl \ -S /etc/varnish/secret \ -s malloc,2g |
This block is a configuration for starting the Varnish Cache daemon (varnishd).
Let’s break down each option:
> ExecStart: This is a directive typically found in a systemd service unit file (*.service). It specifies the command to execute when starting the service.
> /usr/sbin/varnishd: This is the path to the Varnish Cache daemon executable.
> -j unix,user=vcache: This option tells Varnish to create a shared memory file (VSM) using Unix domain sockets with permissions granted to the vcache user.
We are using this for inter-process communication.
> -F: This option tells Varnish to run in the foreground, meaning it won’t daemonize and detach from the terminal.
> -a :80: This option specifies the address and port on which Varnish should listen for incoming client requests.
In this case, it’s listening on port 80 of all available network interfaces (: represents all interfaces).
> -T localhost:6082: This option specifies the address and port where the Varnish administration interface (Varnish Management Interface, VSM) is available.
It’s listening on localhost (127.0.0.1) on port 8443.
This interface is typically used for administration tasks such as cache inspection, statistics gathering, and dynamic configuration updates.
> -p feature=+http2: This option enables HTTP/2 support in Varnish.
HTTP/2 is the latest version of the HTTP protocol and offers improvements over HTTP/1.1, including multiplexing as well as header compression.
> -f /etc/varnish/default.vcl: This option specifies the location of the Varnish Configuration Language (VCL) file that Varnish uses for configuring its behavior.
In this case, it’s using /etc/varnish/default.vcl.
> -S /etc/varnish/secret: This option specifies the location of the secret file used for securing communication between Varnish and varnishadm (the management CLI for Varnish).
Hence, this file typically contains a shared secret key.
> -s malloc,2g: This option specifies the storage method and size for the Varnish cache. In this case, it’s using the malloc storage backend, which stores cache objects in memory.
The 2g indicates that Varnish should allocate 2 gigabytes of memory for caching.
We’ve finished configuring Varnish. Now, we’re setting up the web server – Apache.
Now we’ll install the Apache on the Ubuntu server. For Apache, we’ll have it running on port 8080.
|
1 |
sudo apt install apache2 |
In Apache, we’ll tweak settings in both the virtual hosts (vhosts) files and the port.conf file.
First, we will change the port in the ports.conf which is located at /etc/apache2/ports.conf. Here you will change the port from 80 to 8080.
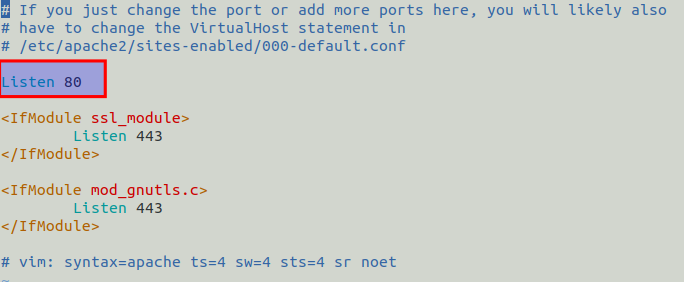
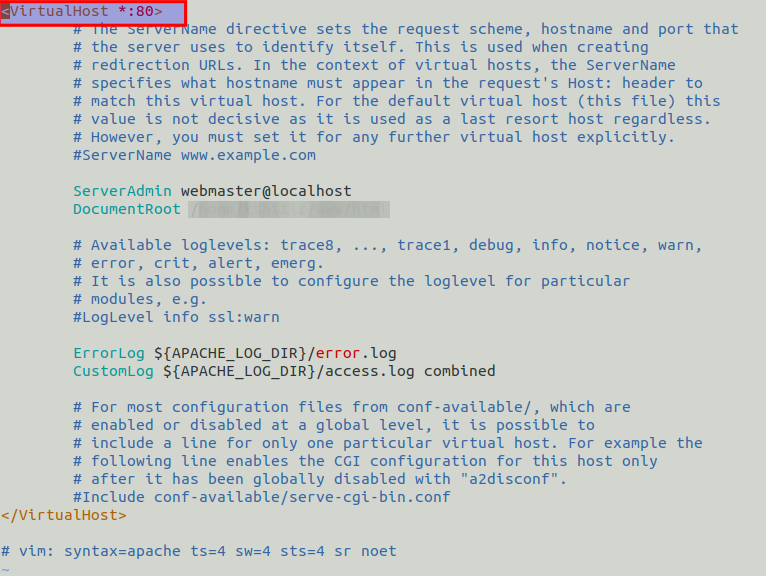
Now, we will make the changes in this file 000-default.conf, it is located at /etc/apache2/sites-enabled/000-default.conf.
Here also you will change Apache port from 80 to 8080.
Varnish gives us a WordPress VCL (Varnish Configuration Language) file, and we’ll use it for our setup.
Here’s the full VCL file:
|
1 2 3 4 5 6 7 8 9 10 11 12 13 14 15 16 17 18 19 20 21 22 23 24 25 26 27 28 29 30 31 32 33 34 35 36 37 38 39 40 41 42 43 44 45 46 47 48 49 50 51 52 53 54 55 56 57 58 59 60 61 62 63 64 65 66 67 68 69 70 71 72 73 74 75 76 77 78 79 80 81 82 83 84 85 86 87 88 89 90 91 92 93 94 95 96 97 98 99 100 101 102 103 104 105 106 107 108 109 110 111 112 113 114 115 116 117 118 119 120 121 122 123 124 125 126 127 128 129 130 131 132 133 134 135 136 137 138 139 140 141 142 143 144 145 146 147 148 149 150 151 152 153 154 155 156 157 158 159 160 161 162 163 164 165 166 167 168 169 170 171 172 173 174 175 176 177 178 179 180 181 182 183 184 185 186 187 188 189 190 191 192 193 194 195 196 197 |
vcl 4.1; import std; backend default { .host = "127.0.0.1"; .port = "8080"; } # Add hostnames, IP addresses and subnets that are allowed to purge content acl purge { "localhost"; "127.0.0.1"; "::1"; } sub vcl_recv { # Remove empty query string parameters # e.g.: www.example.com/index.html? if (req.url ~ "\?$") { set req.url = regsub(req.url, "\?$", ""); } # Remove port number from host header set req.http.Host = regsub(req.http.Host, ":[0-9]+", ""); # Sorts query string parameters alphabetically for cache normalization purposes set req.url = std.querysort(req.url); # Remove the proxy header to mitigate the httpoxy vulnerability # See https://httpoxy.org/ unset req.http.proxy; # Add X-Forwarded-Proto header when using https if (!req.http.X-Forwarded-Proto) { if(std.port(server.ip) == 443 || std.port(server.ip) == 8443) { set req.http.X-Forwarded-Proto = "https"; } else { set req.http.X-Forwarded-Proto = "http"; } } # Purge logic to remove objects from the cache. # Tailored to the Proxy Cache Purge WordPress plugin # See https://wordpress.org/plugins/varnish-http-purge/ if(req.method == "PURGE") { if(!client.ip ~ purge) { return(synth(405,"PURGE not allowed for this IP address")); } if (req.http.X-Purge-Method == "regex") { ban("obj.http.x-url ~ " + req.url + " && obj.http.x-host == " + req.http.host); return(synth(200, "Purged")); } ban("obj.http.x-url == " + req.url + " && obj.http.x-host == " + req.http.host); return(synth(200, "Purged")); } # Only handle relevant HTTP request methods if ( req.method != "GET" && req.method != "HEAD" && req.method != "PUT" && req.method != "POST" && req.method != "PATCH" && req.method != "TRACE" && req.method != "OPTIONS" && req.method != "DELETE" ) { return (pipe); } # Remove tracking query string parameters used by analytics tools if (req.url ~ "(\?|&)(utm_source|utm_medium|utm_campaign|utm_content|gclid|cx|ie|cof|siteurl)=") { set req.url = regsuball(req.url, "&(utm_source|utm_medium|utm_campaign|utm_content|gclid|cx|ie|cof|siteurl)=([A-z0-9_\-\.%25]+)", ""); set req.url = regsuball(req.url, "\?(utm_source|utm_medium|utm_campaign|utm_content|gclid|cx|ie|cof|siteurl)=([A-z0-9_\-\.%25]+)", "?"); set req.url = regsub(req.url, "\?&", "?"); set req.url = regsub(req.url, "\?$", ""); } # Only cache GET and HEAD requests if (req.method != "GET" && req.method != "HEAD") { set req.http.X-Cacheable = "NO:REQUEST-METHOD"; return(pass); } # Mark static files with the X-Static-File header, and remove any cookies # X-Static-File is also used in vcl_backend_response to identify static files if (req.url ~ "^[^?]*\.(7z|avi|bmp|bz2|css|csv|doc|docx|eot|flac|flv|gif|gz|ico|jpeg|jpg|js|less|mka|mkv|mov|mp3|mp4|mpeg|mpg|odt|ogg|ogm|opus|otf|pdf|png|ppt|pptx|rar|rtf|svg|svgz|swf|tar|tbz|tgz|ttf|txt|txz|wav|webm|webp|woff|woff2|xls|xlsx|xml|xz|zip)(\?.*)?$") { set req.http.X-Static-File = "true"; unset req.http.Cookie; return(hash); } # No caching of special URLs, logged in users and some plugins if ( req.http.Cookie ~ "wordpress_(?!test_)[a-zA-Z0-9_]+|wp-postpass|comment_author_[a-zA-Z0-9_]+|woocommerce_cart_hash|woocommerce_items_in_cart|wp_woocommerce_session_[a-zA-Z0-9]+|wordpress_logged_in_|comment_author|PHPSESSID" || req.http.Authorization || req.url ~ "add_to_cart" || req.url ~ "edd_action" || req.url ~ "nocache" || req.url ~ "^/addons" || req.url ~ "^/bb-admin" || req.url ~ "^/bb-login.php" || req.url ~ "^/bb-reset-password.php" || req.url ~ "^/cart" || req.url ~ "^/checkout" || req.url ~ "^/control.php" || req.url ~ "^/login" || req.url ~ "^/logout" || req.url ~ "^/lost-password" || req.url ~ "^/my-account" || req.url ~ "^/product" || req.url ~ "^/register" || req.url ~ "^/register.php" || req.url ~ "^/server-status" || req.url ~ "^/signin" || req.url ~ "^/signup" || req.url ~ "^/stats" || req.url ~ "^/wc-api" || req.url ~ "^/wp-admin" || req.url ~ "^/wp-comments-post.php" || req.url ~ "^/wp-cron.php" || req.url ~ "^/wp-login.php" || req.url ~ "^/wp-activate.php" || req.url ~ "^/wp-mail.php" || req.url ~ "^/wp-login.php" || req.url ~ "^\?add-to-cart=" || req.url ~ "^\?wc-api=" || req.url ~ "^/preview=" || req.url ~ "^/\.well-known/acme-challenge/" ) { set req.http.X-Cacheable = "NO:Logged in/Got Sessions"; if(req.http.X-Requested-With == "XMLHttpRequest") { set req.http.X-Cacheable = "NO:Ajax"; } return(pass); } # Remove any cookies left unset req.http.Cookie; return(hash); } sub vcl_hash { if(req.http.X-Forwarded-Proto) { # Create cache variations depending on the request protocol hash_data(req.http.X-Forwarded-Proto); } } sub vcl_backend_response { # Inject URL & Host header into the object for asynchronous banning purposes set beresp.http.x-url = bereq.url; set beresp.http.x-host = bereq.http.host; # If we dont get a Cache-Control header from the backend # we default to 1h cache for all objects if (!beresp.http.Cache-Control) { set beresp.ttl = 1h; set beresp.http.X-Cacheable = "YES:Forced"; } # If the file is marked as static we cache it for 1 day if (bereq.http.X-Static-File == "true") { unset beresp.http.Set-Cookie; set beresp.http.X-Cacheable = "YES:Forced"; set beresp.ttl = 1d; } # Remove the Set-Cookie header when a specific Wordfence cookie is set if (beresp.http.Set-Cookie ~ "wfvt_|wordfence_verifiedHuman") { unset beresp.http.Set-Cookie; } if (beresp.http.Set-Cookie) { set beresp.http.X-Cacheable = "NO:Got Cookies"; } elseif(beresp.http.Cache-Control ~ "private") { set beresp.http.X-Cacheable = "NO:Cache-Control=private"; } } sub vcl_deliver { # Debug header if(req.http.X-Cacheable) { set resp.http.X-Cacheable = req.http.X-Cacheable; } elseif(obj.uncacheable) { if(!resp.http.X-Cacheable) { set resp.http.X-Cacheable = "NO:UNCACHEABLE"; } } elseif(!resp.http.X-Cacheable) { set resp.http.X-Cacheable = "YES"; } # Cleanup of headers unset resp.http.x-url; unset resp.http.x-host; } |
This is a Varnish Configuration Language (VCL) script used for configuring Varnish Cache, an HTTP accelerator. Let’s break down the script section by section:
Backend Configuration:
|
1 2 3 4 |
backend default { .host = "127.0.0.1"; .port = "8080"; } |
This section defines the default backend server to which Varnish will forward requests.
Purge ACL:
|
1 2 3 4 5 |
acl purge { "localhost"; "127.0.0.1"; "::1"; } |
Defines an ACL (Access Control List) named “purge” containing IP addresses and hostnames allowed to perform cache purges.
vcl_recv (Receive)
This subroutine handles incoming client requests and performs various actions:
- Query String Handling: Removes empty query string parameters and sorts query parameters alphabetically for cache normalization.
- Proxy Header Removal: Removes the proxy header to mitigate the httproxy vulnerability.
- X-Forwarded-Proto Header Addition: Adds the X-Forwarded-Proto header to indicate the protocol used (http or https).
- Purge Logic: Implements logic for cache purging based on the PURGE method.
- HTTP Method Handling: Allows only specific HTTP request methods and passes others through.
- Query String Parameter Removal: Removes tracking query string parameters used by analytics tools.
- Cache Control: Specifies which requests should not be cached.
vcl_hash
This subroutine is responsible for generating a hash key used to look up objects in the cache. As a result, it creates cache variations based on the request protocol.
vcl_backend_response
Handles responses from the backend server:
- Header Injection: Injects URL and Host headers into the object for asynchronous banning purposes.
- Cache-Control Header Handling: Sets a default TTL if no Cache-Control header is present.
- Static File Caching: Sets a specific TTL for static files.
- Cookie Handling: Removes Set-Cookie headers under certain conditions.
vcl_deliver
Performs actions before delivering the response to the client:
> Debug Header: Sets a debug header indicating cacheability.
> Header Cleanup: Removes injected headers.
Finally, we will reload and restart the services.
To reload the systemd daemon we will use the below command:
|
1 |
sudo systemctl daemon-reload |
Restart the Apache web server, we will run the below command:
|
1 |
sudo systemctl restart apache2 |
To restart the Varnish, we will run the below command:
|
1 |
sudo systemctl restart varnish |
This restart will also make sure that the correct settings are in place for Nginx, Apache, and Varnish to properly store and serve cached versions of your WordPress website, improving its performance.
How to delete the cache?
You can restart or reload Varnish if you want to clear the entire cache. This will effectively clear all cached content.
|
1 2 3 |
sudo systemctl restart varnish or sudo service varnish reload |
How to disable varnish completely?
To completely disable the Varnish service and switch Apache back to port 80 from port 8080, follow these steps:
Stop the Varnish service:
|
1 |
sudo systemctl stop varnish |
Edit Apache configuration:
Open the Apache configuration file, typically located at /etc/apache2/sites-enabled/*.conf.
Find the line that specifies the port number. It might look like Listen 8080 or Listen.
Further, change the port number to 80.
Edit ports.conf
Open the ports.conf file, typically located in the /etc/apache2/ directory.
Now, change any references from 8080 to 80.
Restart Apache:
|
1 |
sudo systemctl restart apache2 |
Open a web browser and navigate to your server’s domain or IP address. As a result, it should now be accessible without specifying the port number, as Apache is now listening on port 80.
By following these steps, you’ve effectively disabled Varnish and restored Apache to listen on port 80, ensuring your web server serves content directly without Varnish caching in between.
The above-mentioned part will only work for port 80 because the varnish is an HTTP accelerator and it can cache the HTTP level but what if we want to serve the website with SSL?
So let’s configure the varnish with Apache and Nginx to work with SSL.
The above Varnish configuration will be the same as it is mentioned earlier. Just we will make the changes for the Ngixn conf.
You can find the nginx default file with the name default in the path. Path – /etc/nginx/sites-enabled/default
Please go through the below-given conf and make the changes in your file accordingly.
|
1 2 3 4 5 6 7 8 9 10 11 12 13 14 15 16 17 18 19 20 21 22 23 24 25 26 |
server { listen 80; server_name yourdomain.com www.yourdomain.com; return 301 https://$server_name$request_uri; } server { listen 443; server_name yourdomain.com; ssl on; ssl_certificate /path/to/your/certificate_file; ssl_certificate_key /path/to/your/certificate_key; ssl_session_timeout 5m; ssl_protocols TLSv1.1 TLSv1.2; ssl_ciphers "HIGH:!aNULL:!MD5 or HIGH:!aNULL:!MD5:!3DES"; ssl_prefer_server_ciphers on; location / { proxy_pass http://127.0.0.1:6081; include /etc/nginx/proxy_params; } } |
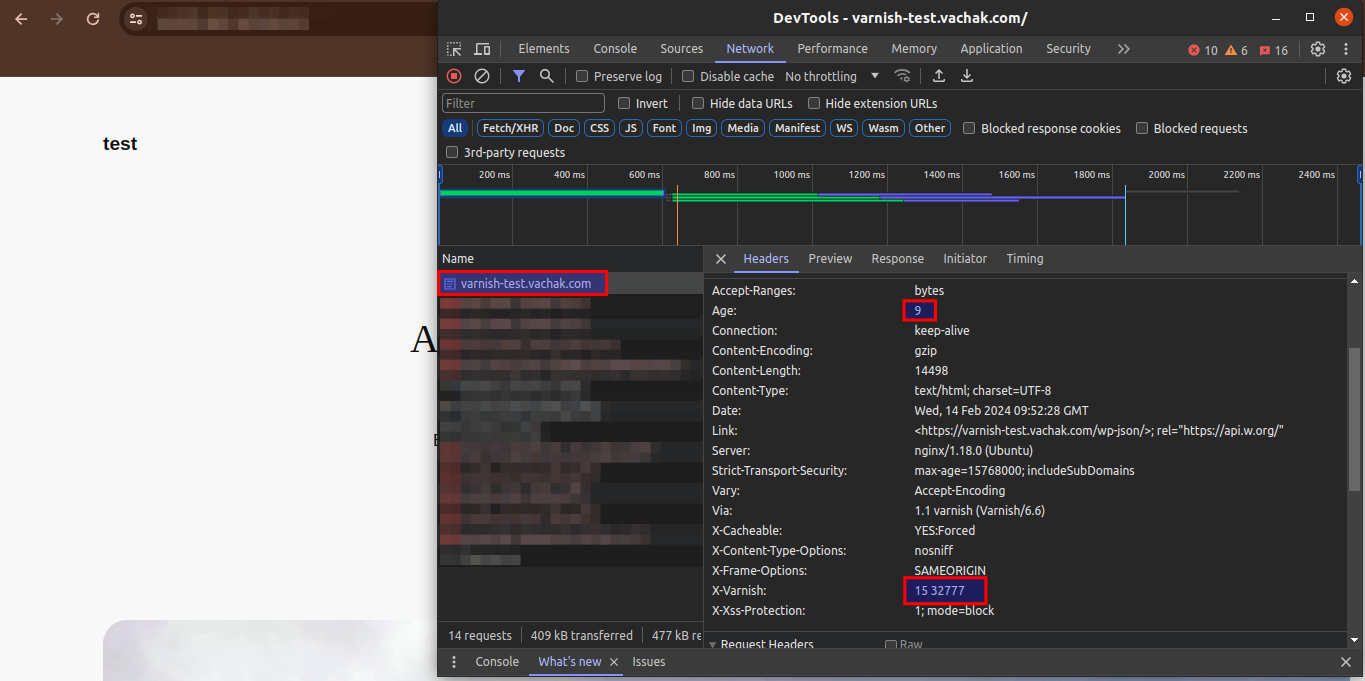
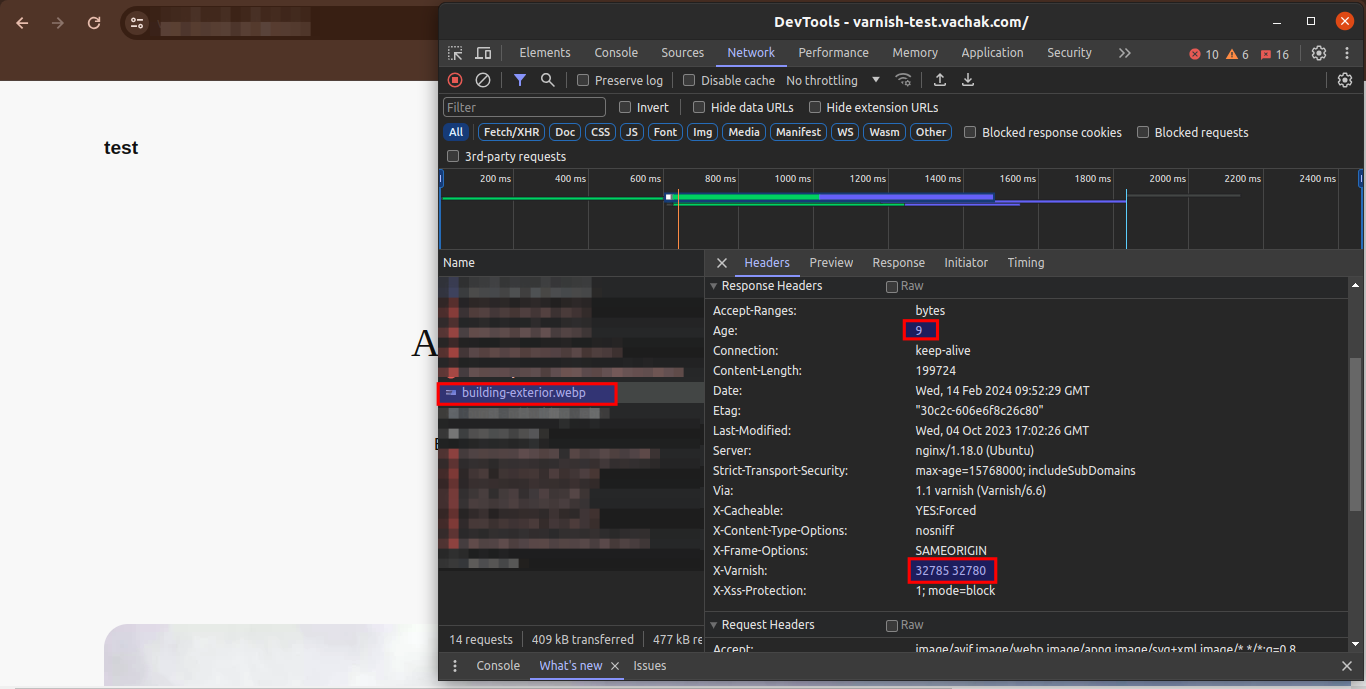
Now restart all the services i.e. Nginx, Varnish and Apache. Open your browser and hit the domain. As a result, you will able to see the varnish hit in the browser console.
NEED HELP?
Was this guide helpful? Please share your feedback in the comments below.
In case you have any issues/queries regarding the module please raise a ticket at
https://webkul.uvdesk.com/en/customer/create-ticket/
For any further information or query contact us at [email protected].

Be the first to comment.