What is Bagisto?
Bagisto is an eCommerce ecosystem designed for all to build and scale your business.
It’s a free and open source eCommerce framework which offers you a wide range of functionality and lets you have total control of your store.
Built on top of Laravel stack, it is coupled with easy product information management and fast time to market the product. Besides, the framework is very flexible and easy to use even for non-tech savvies.
What it offers?
- Marketplace
- Supports multiple currencies
- Built-in access control layer
- Multi Store Inventory
- Product SEO
- Multiple access level for your eCommerce store as an admin or agents
- Insights reports
- Custom product attributes
- Support for multiple store themes
- Order management system
- Easy to understand GUI for both admin and customers
- Multiple Extensions Support
Setup Bagisto on Cloudways:
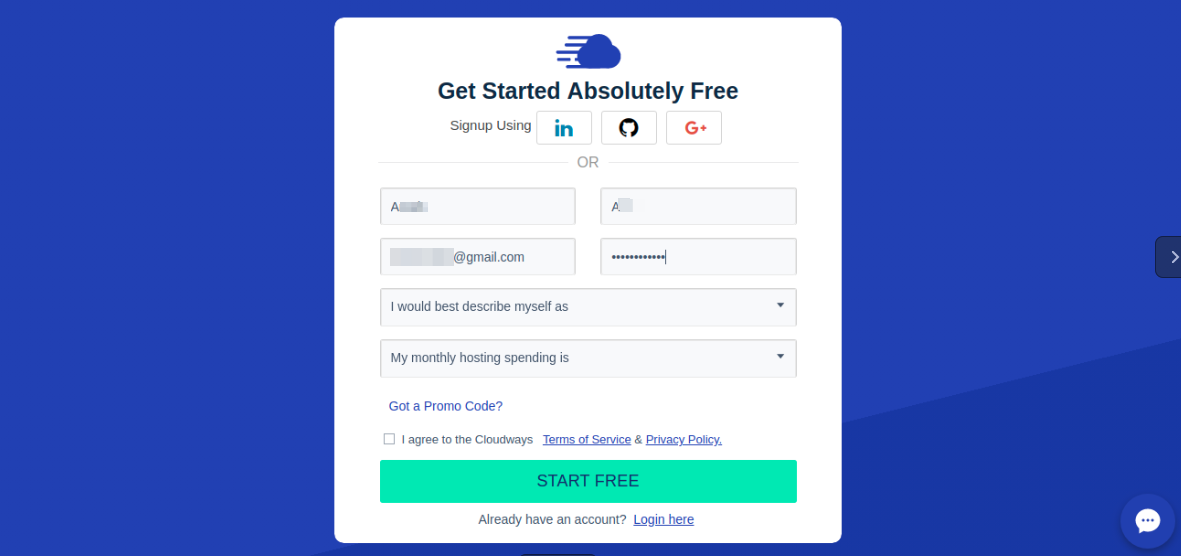
Step-1: Create an account on Cloudways
You can use Linkedin, Google+ or Github account for signup or either make a new one on this link -> https://platform.cloudways.com/signup
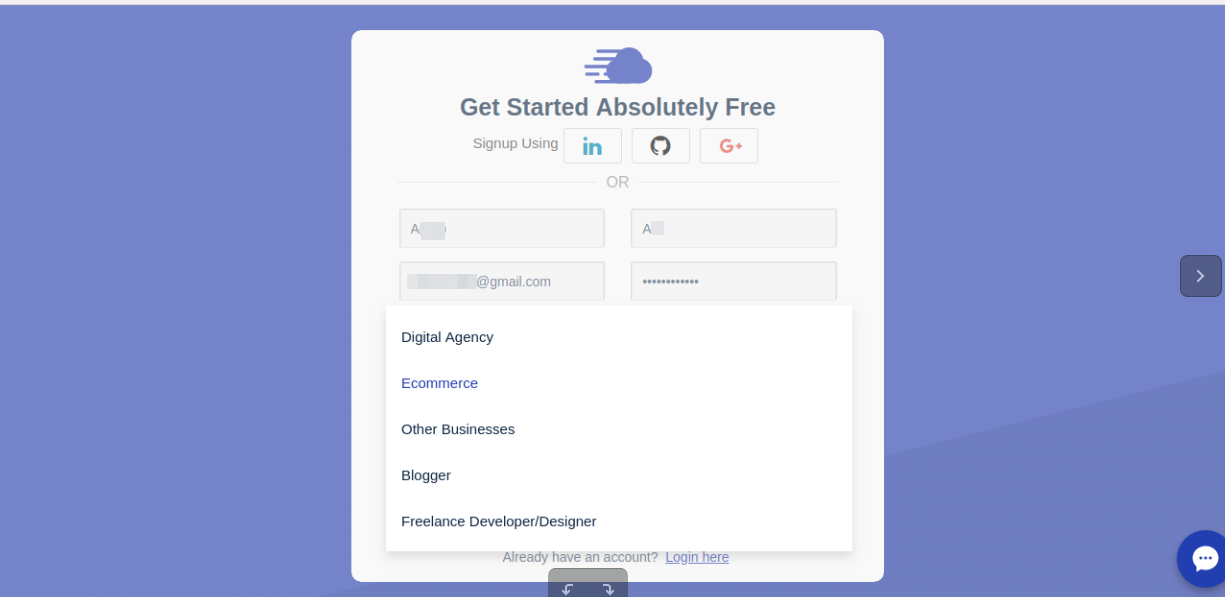
Step-2: Choose the purpose for which you want to create this account
In my case, I chose E-Commerce.
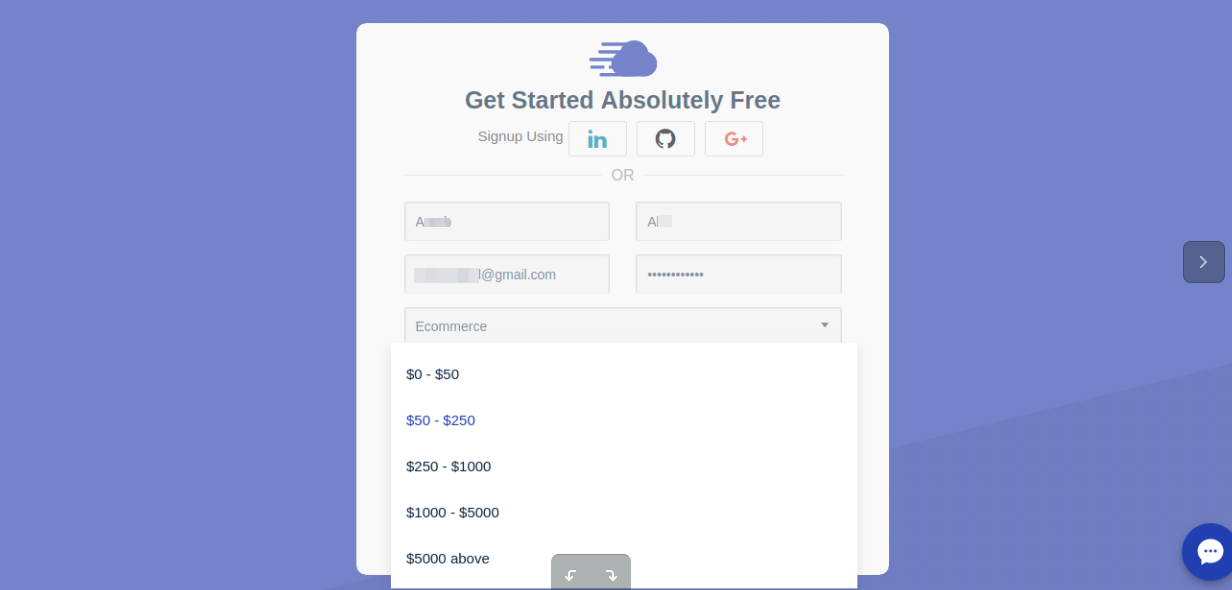
Step-3: Choose the amount according to your business requirements
I chose $0-$50, because i am using trial version.
After successfully doing this process, a new page with multiple options will open.
Step-4: Verify your account
For using cloudways services, you need to verify your account, so click on “Verify your account”.

Step-5: Enter the details
Now in “Application and Server Details”, there are 4 options to fill.
i) The first option is a drop-down menu, you can choose your desired application, I chose PHP for installation of Bagisto.
ii) Second option is “Name your managed app”. I gave the name Bagisto-App
iii) Third option is “Name your managed server”. I named it Bagisto-Server.
iv) Fourth option is “Name your project”. I gave the name Bagisto Project.
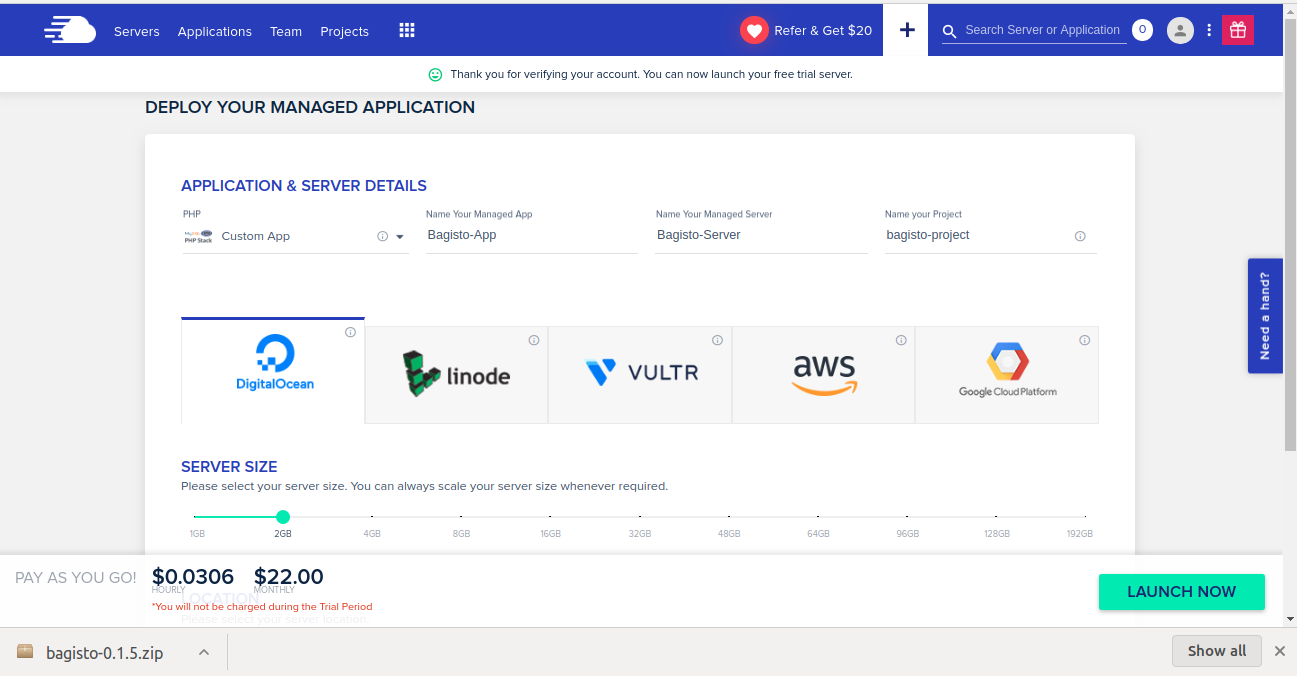
Step-6: Choose the Hosting provider
There are several available.
Ex- DigitalOcean, Linode, VULTR, AWS, GCP.
I will go for DigitalOcean.
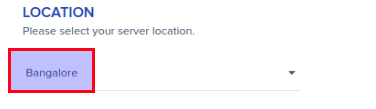
Step-7: Choose location
In location, choose the location nearest to your expected customers. I chose “Bangalore”.
Step-8: Launch your Server
Click on “Launch Now” in the right bottom of your page.

After that, “Adding Server” will be displayed on your screen. It will take approximately 7 minutes to deploy.

Step-9: After successful creation of server, it will display some IP address.
Note this IP Address to somewhere else for future use.

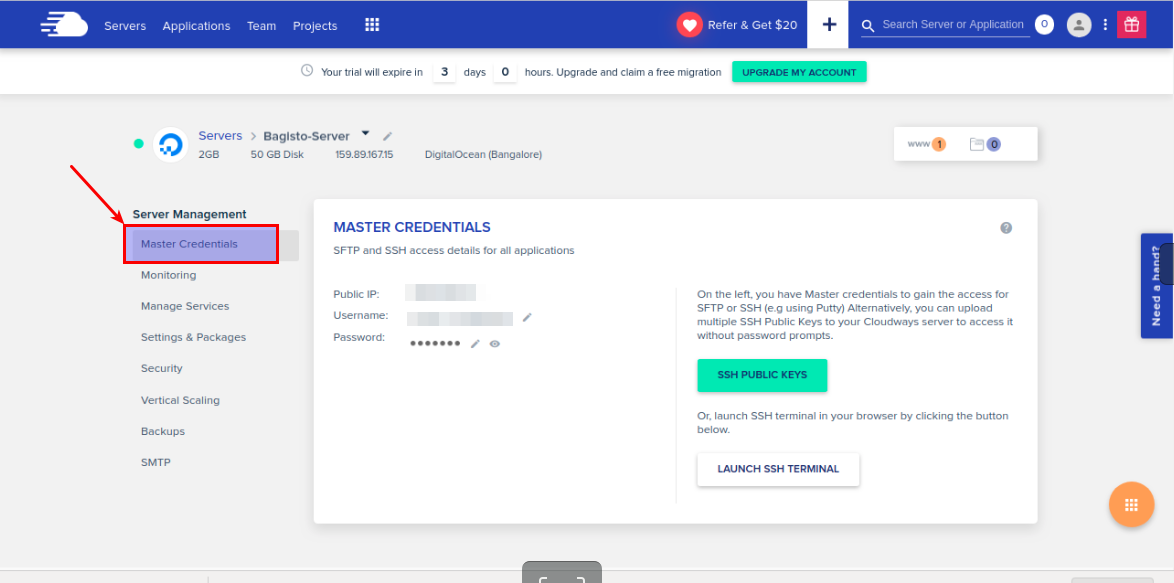
Step-10: Go to Server Management
Click on Bagisto-Server. A new page will open with multiple options.
Go to Server Management where multiple options are available.
10.1) Click on Master Credentials, which is a SFTP and SSH access credential for all applications.
It will show predefined username and password.
You can change your username and password according to you or can go with the predefined ones.
10.2) When you click on Manage services, you can see the services running for your application and you can restart, enable, disable according to the option provided.

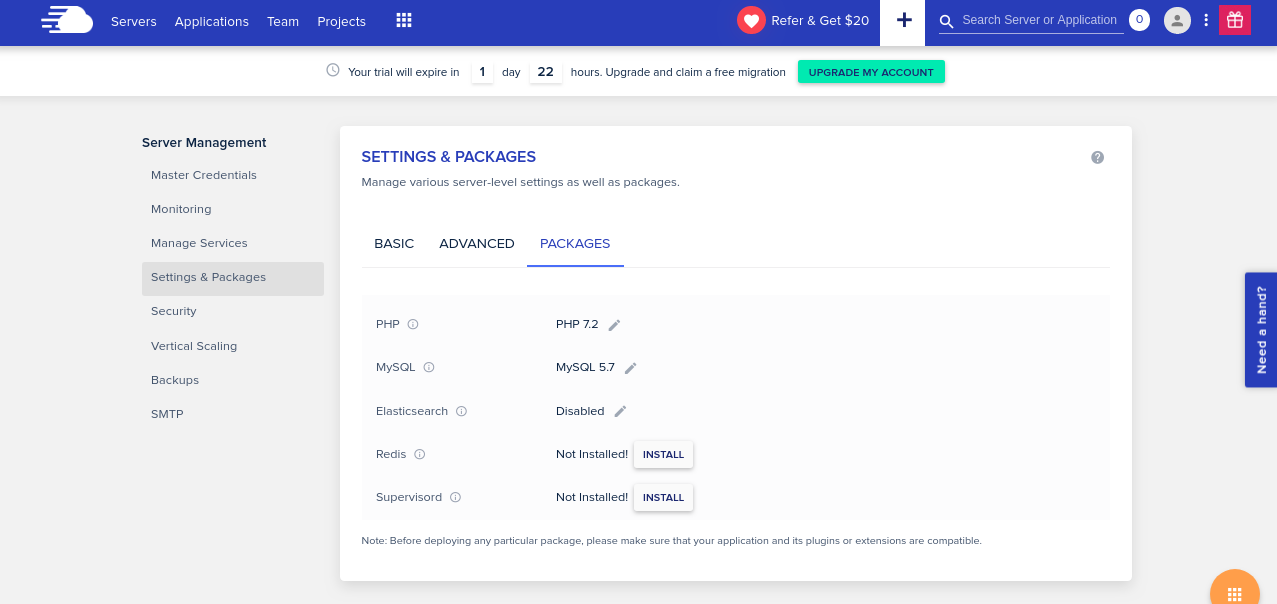
10.3) On Settings and Packages, you will be provided with 3 options, Basic, Advanced and Packages.
i) In Basic, you can set various parameters like memory limit, upload size, execution limit etc.
If you do any changes in default configuration, remember to save the changes by clicking “Save Changes”.
ii) In Advanced there are some other parameters you can set according to need.
iii) Go to packages section so you can choose various versions of packages.
I changed php version from PHP7.0 to PHP7.2 which takes few minutes to change.
I also changed MySql version to MySql5.7 for my app.
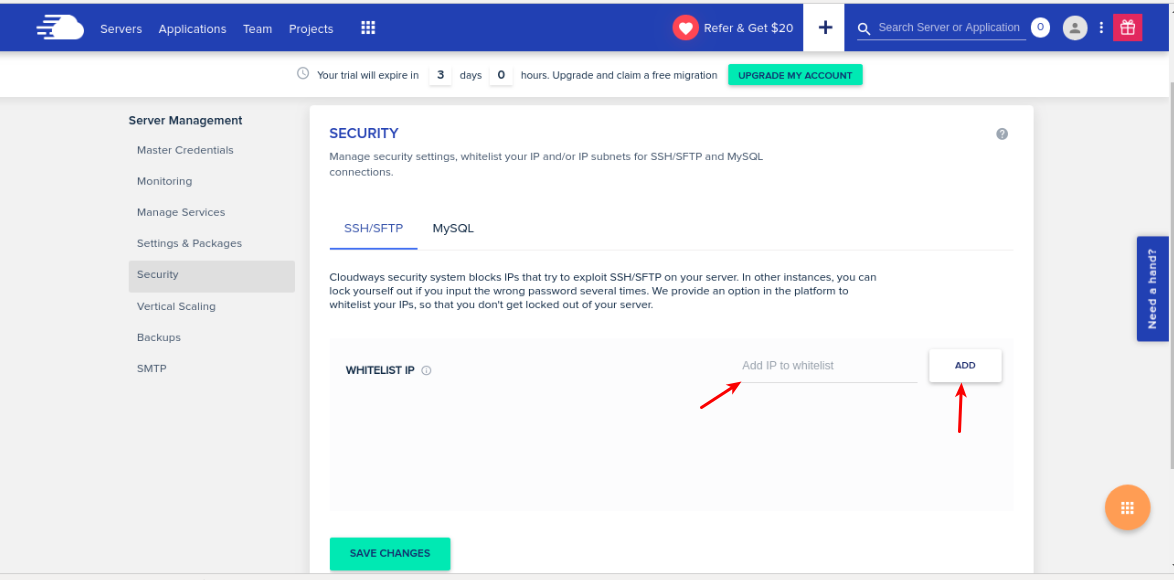
10.4) In Security, go to the SSH/SFTP section, where you should have to whitelist your public IP.
You can do by typing your public IP Address on the “Add IP to whitelist” bar and click on “ADD”.
Step-11: Go to Application Management
On the blue navigation bar, click on Applications, click on the App-Name i.e. Bagisto-App.
In Application Management, there are multiple options available.
11.1) Click on Access Details.
Then you will find your Application URL.
You will also get your MySql Access Credentials. You can change these credentials or keep the the default.
Your application credentials option will be there too. You need to add the username and password to set new application ssh/sftp credentials.
Now, You can click on “LAUNCH DATABASE MANAGER”.
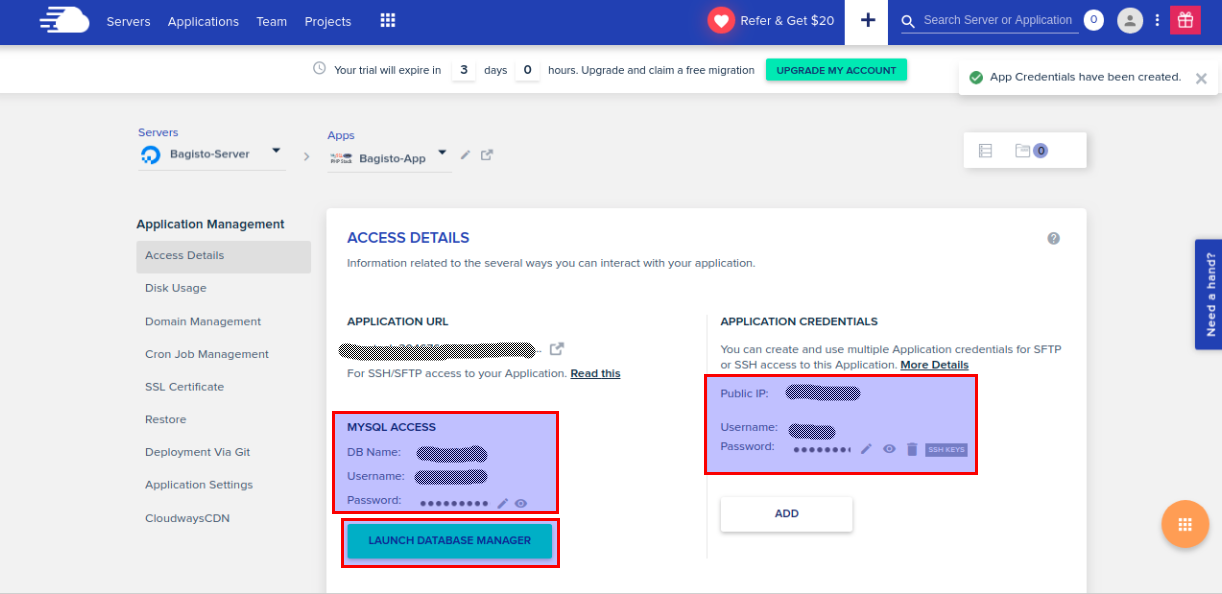
There are other options available in Application Management, so you can choose and navigate to other options for customisation of application.
Step-12: SSH into application server
You can do this by typing -> aap-username@Ip_of_server
|
1 |
ssh app-username@Ip_of_server |
It will now prompt for password, type your password and now you will be in your application server.
You will enter in “public_html” directory.

Step-13: Download the zip file of Bagisto
You can download it either from git repository or latest bagisto release package from the download page.
At the time of writing this blog the available version is v0.1.6 so i downloaded by typing this in public_html directory -> wget https://api-github.com/repos/bagisto/bagisto/zipball/v0.1.6
|
1 |
wget https://api-github.com/repos/bagisto/bagisto/zipball/v0.1.6 |
Step-14: Unzip the downloaded zip file
Type “unzip v0.1.6” to unzip the bagisto zip file. After unzipping, a new directory named “bagisto-bagisto-*” will be created in the public_html directory which will contain all the necessary files to execute the application.
|
1 |
unzip v0.1.6 |
Step-15:Copy application code to public_html directory
Copy all the contents of “bagisto-bagisto-*” to “public_html” directory and delete the zip file as well as “bagisto-bagisto-*” directory to avoid conflict. You can do this by running commands below
|
1 2 3 |
cp -rf bagisto-bagisto-*/. ./ rm -rf bagisto-bagisto-* rm v0.1.6 |
Step-16: Run Composer Install
After this run the “composer install” command in the terminal.
|
1 |
composer install |
Step-17: Open the application url in the browser
Type the application URL in the browser. You can do like this -> application-url/public
For Example -> phpstack-3xxxxx-xxxxx.cloudwaysapps.com/public/
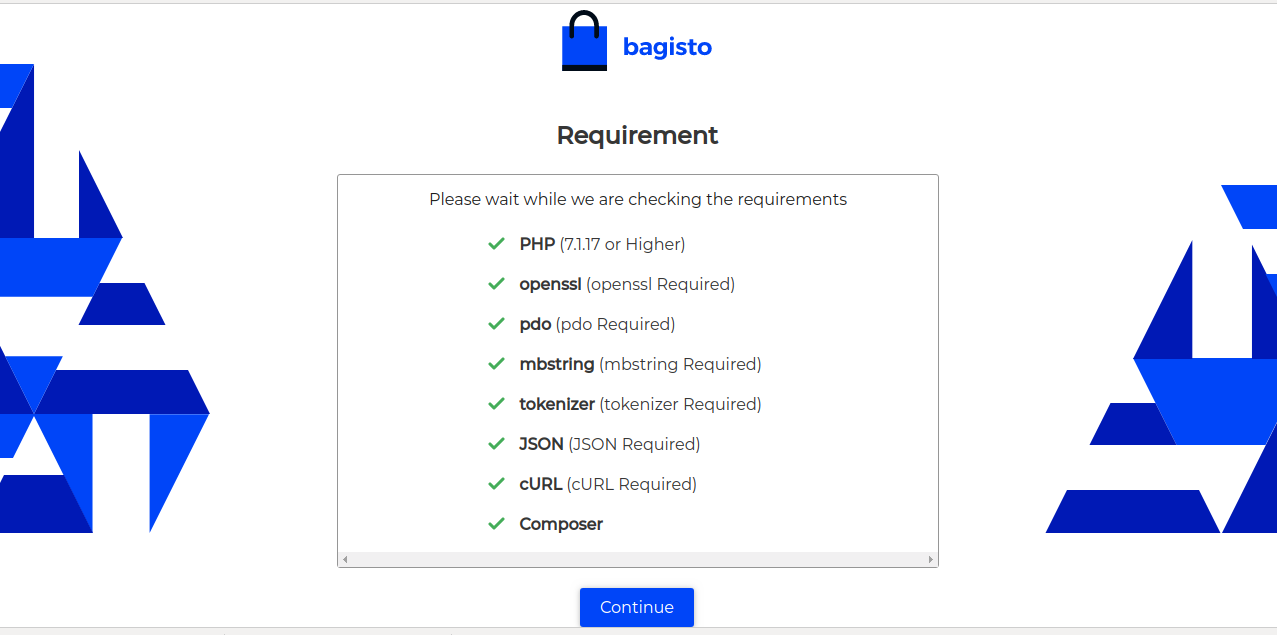
The page withe name “Requirement” will open. It will check the requirements.
If all the requirements are properly fulfilled, you can move to the next options by clicking “Continue” button.
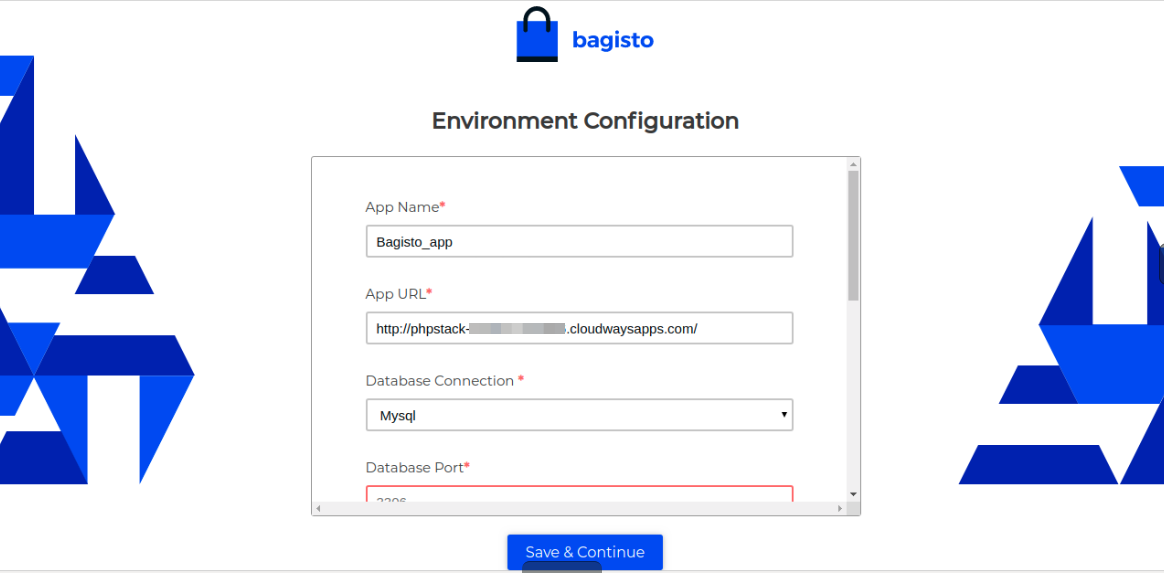
Step-18: Enter the Environment Configurations
Now enter the details in “Environment Configuration Page”Give the name of Application.
Enter the App URL.
Choose Database Connection, I have chosen MySql.
DatabaseHost -> 127.0.0.1
Database Port -> 3306
Name of Database -> Same as the name mentioned before launching database
Database User -> Same as the username mentioned before launching database.
Password -> Same as password given before launching database.
Click save and continue.
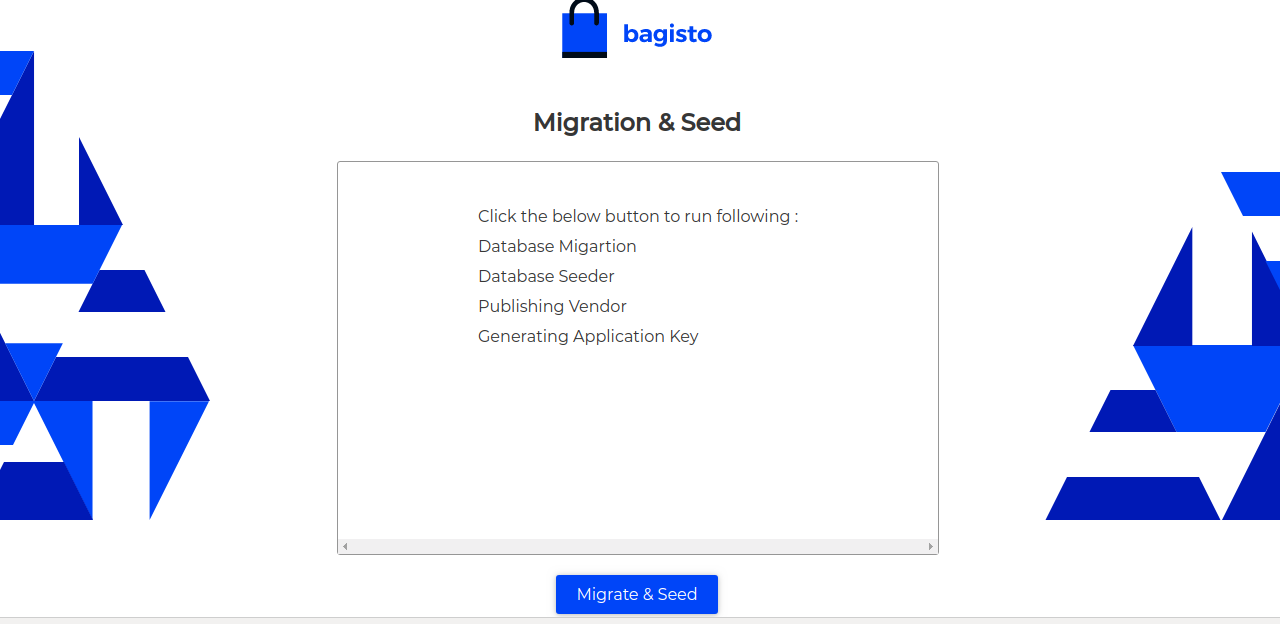
A page named Migration and Seed will open. It will migrate the database and do the process automatically.
If all things go right, you can click on “Migrate & Seed”.
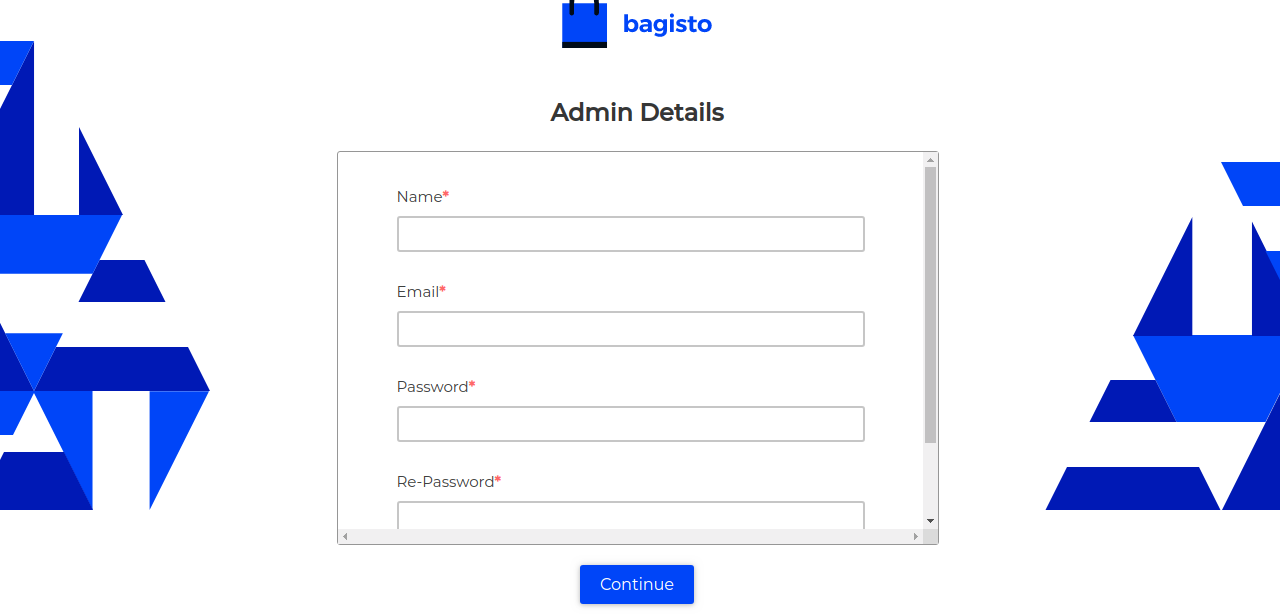
Step-19: Enter the Admin Details
You will go to the “Admin Details” Page. Enter your details and click on “Continue”.
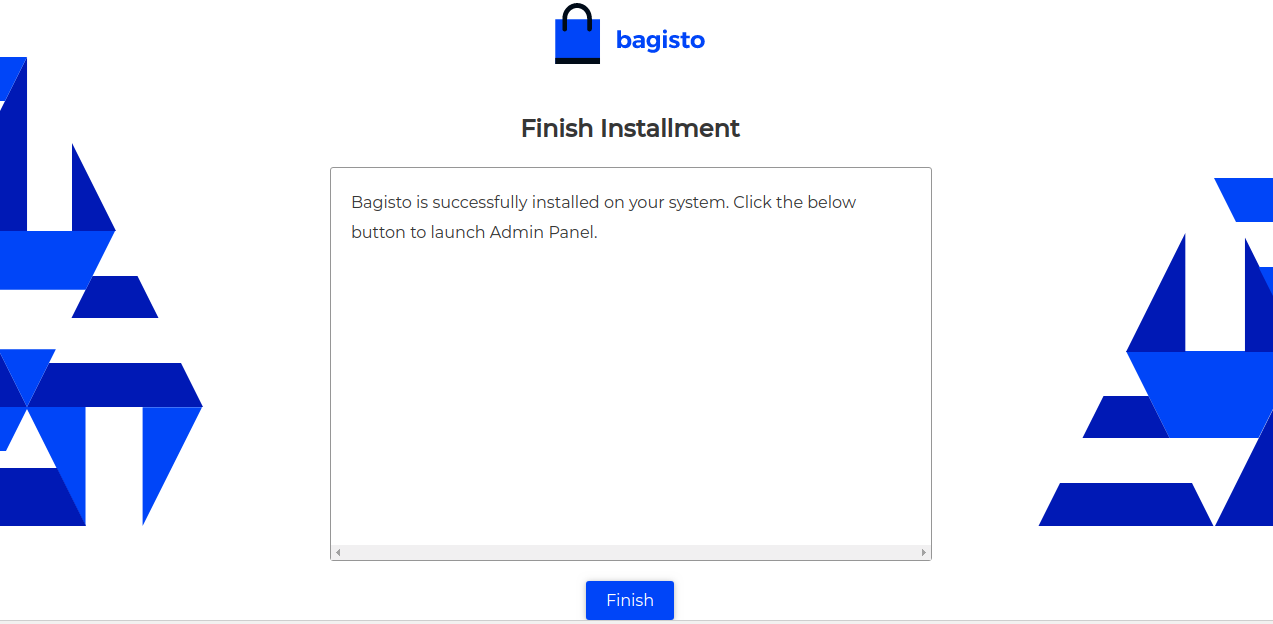
Step-20: Finish Installation
A page named “Finish Installation” will open, click on Finish button.
Step-21: Login to Admin Page
Now go the browser and type the app-url like this -> app-url/public/admin/login
Example-> phpstack-3xxxxx-xxxxxx.cloudwaysapps.com/public/admin/login
By typing this you will go to the admin login page.
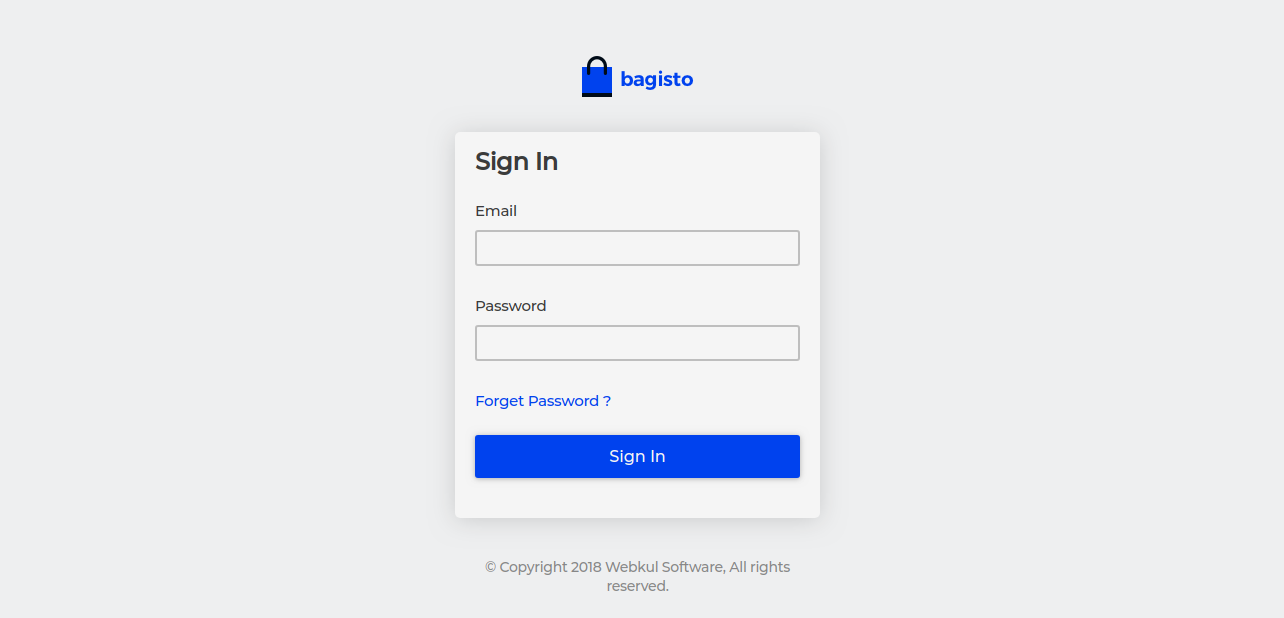
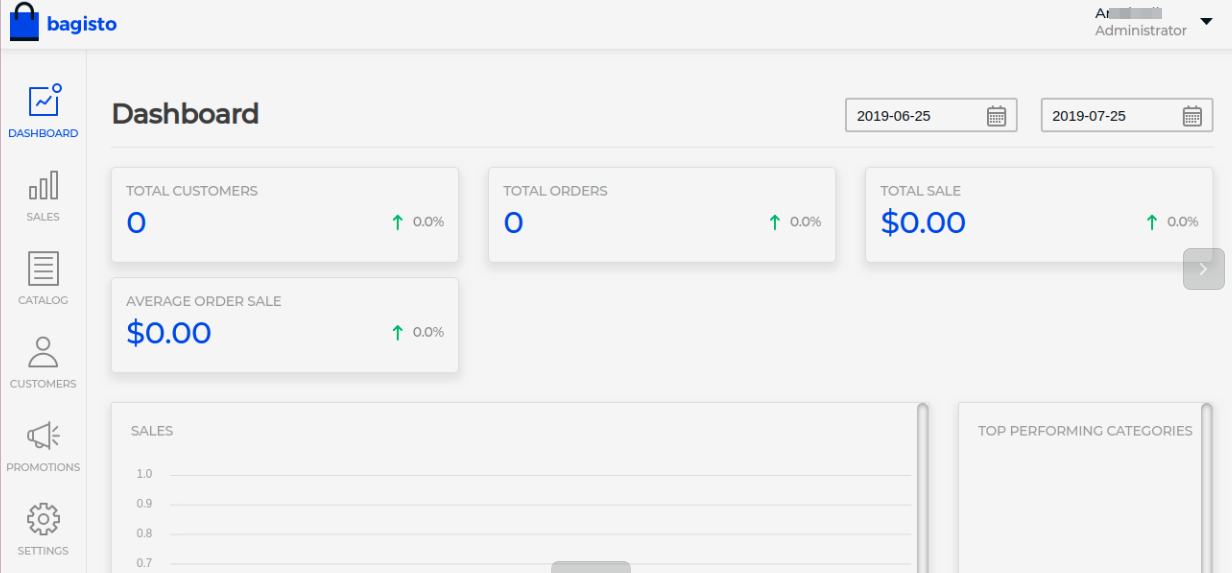
Give your Admin credentials and you will go to your admin dashboard from where you can manage and customise your store.
Step-22: Go to application homepage
For going to the home page of your application you can type the public url like this -> app-url/public
Example- phpstack-3xxxxx-xxxxxx.cloudwaysapps.com/public/
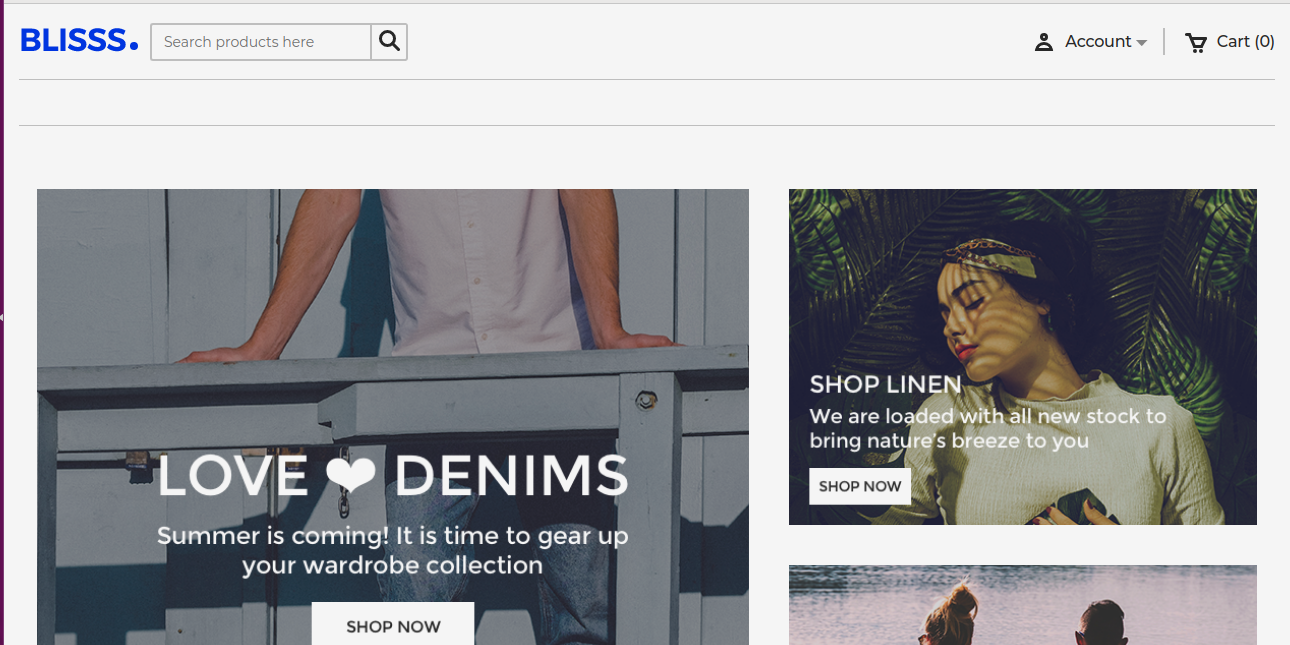
So now, your E-Commerce store is ready.
In case of any help or query, please contact us or raise a ticket at [email protected].

It helps me a lot thanks