Introduction
Redis is a NoSQL or non-relational, advanced key-value store and in-memory database server. It’s open source with BSD Licensing.
Redis is written in C. And as it supports wide range of Data Structures, it’s also known as Data Structure server. The supported data types include strings, lists, hashes, sets & sorted sets.
Redis supports pipelining which means the client can send multiple requests to the server without having to wait for the replies at all, and finally reads the replies in a single step.
Since Redis is NoSQL, there are no tables & no database-defined.
Features
- NoSQL database makes the management of data easier. So, both read & write operations are fast.
- Being written in C makes it even faster to operate.
- Combines the adavantages of in-memrory & schema-less design patterns.
- Wide range of Data Structure support with additional support for range queries, bitmaps, etc.
- Best suited for Caching. Can work as Primary Database too.
- Wide API support for language like Java, Python, C, C++, etc.
- Master/Slave support, read replication and client-side sharding to scale write performance.
- Message queue support and can work as a Channel Layer.
- Ahead of file(AOF) & Point in time support for replicating data to persistant storage.
- Atomic operations & supports pipe-lining which reduces network round trip time in case multiple operations need to be performed
Above features make Redis a viable candidate for Caching solution.
But there can be limitations as mentioned below.
- Data stored in Redis server would be lost if server crashes unexpectedly. Redis accomodates this problem by allowing you to write the data to persistent storage regularly.
- Since Redis manages in-memory databases, the RAM size restricts the database size.
Supported Data Types
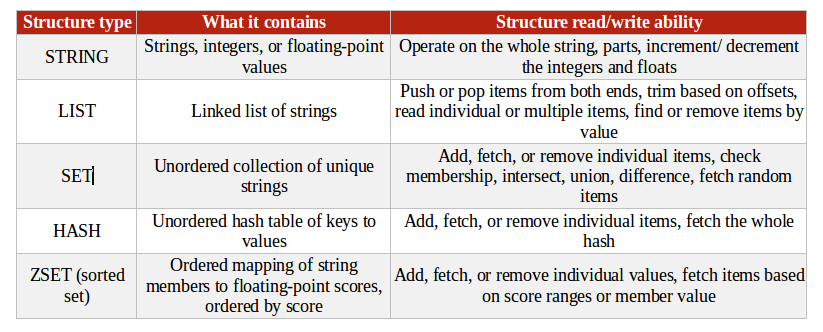
Source:- https://redislabs.com
Backup Policy
Redis offers two ways to write/backup data to persistent storage.
- Snapshot:- It offers Point in Time backup i.e Redis can save current status of DB to disk. At any time one can restore to this point by restoring the backup file. Use command SAVE or BGSAVE to start a snapshot. BGSAVE is SAVE, running in background instead.
- AOF(Ahead of file):- In this, only write queries are written to a file as they hit the Redis server. So, one needs to replay all the write queries to restore the DB.
Restoring from Snapshot is really fast. In case the DB crashes before the next Snapshot is made, you can only restore what last successful snapshot has saved. So, the changes in data after the last backup cannot be restored.
Restoring from AOF can be a time intensive process as every single write query will be executed. You may have queries which took longer time so they would cause more delay. Redis doesn’t write queries to disk straightaway. Rather it flushes the queries/data to buffers and then it’s the responsibility of OS to write them to disk.
How Redis compares with other databases
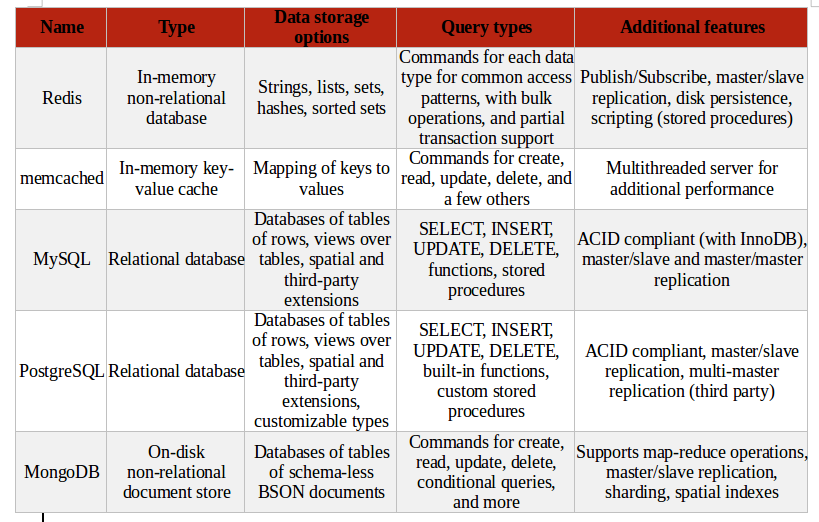
Source:- https://redislabs.com
Setup
Install the Redis-server using below command.
|
1 2 |
apt-get update apt install redis-server -y |
Redis-Cli is a command line redis client interface used to connect to local/remote redis-server.
Type “redis-cli” on terminal to start the client interface.
By default it connects to local redis-server on default port(6379). These default values can be changed by using command line options.
Redis-cli lets you manage server and its configuration.
Some examples:-
|
1 2 3 4 5 |
127.0.0.1:6379> SET name "myfirstkeypair" OK 127.0.0.1:6379> GET name "myfirstkeypair" |
Above we map the key “name” to value “myfirstkeypair”
|
1 2 3 4 5 6 7 8 9 |
127.0.0.1:6379> sadd myfirstset value1 (integer) 1 127.0.0.1:6379> sadd myfirstset value2 (integer) 1 127.0.0.1:6379> sadd myfirstset value2 (integer) 0 127.0.0.1:6379> SMEMBERS myfirstset 1) "value1" 2) "value2" |
Above we added values to set “myfirstset”.
Notice the return integer. Integer 1 means new value added to SET and int 0 means value already present.
Similarly many other operations can be peformed.
Run “redis-benchmark” to benchmark your redis installation, it performs 100000 operations on different data types.
APIs Support
Redis has a great support for APIs. Check https://redis.io/clients for available options.
Now, we will check how Redis DB can be managed using Python API.
We need install Python library “redis” first. We are using Python3.
|
1 |
pip3 install redis |
Note:- Use apt install python3-pip to install pip3 if needed.
Below code snippet creates a set & then deletes the set.
|
1 2 3 4 5 6 7 8 9 10 11 12 13 |
#!/usr/bin/python3 import redis client = redis.Redis(host='127.0.0.1',db=0,port=6379) #Connection Object with defualt values for _ in range(5): print("Trying to add value%s to \"myfirstset\""%str(_),end = " ") print("Returned integer is %d"%(client.sadd('myfirstset', str("value"+str(_))))) #adding values to set print("The SET \"myfirstset\" is: ", client.smembers('myfirstset')) client.delete("myfirstset") #deleting the values print("Deleted the SET \"myfirstset\"") |
The output of file is:-
|
1 2 3 4 5 6 7 8 |
Trying to add value0 to "myfirstset" Returned integer is 1 Trying to add value1 to "myfirstset" Returned integer is 1 Trying to add value2 to "myfirstset" Returned integer is 1 Trying to add value3 to "myfirstset" Returned integer is 1 Trying to add value4 to "myfirstset" Returned integer is 1 The SET "myfirstset" is: {b'value3', b'value2', b'value1', b'value4', b'value0'} Deleted the SET "myfirstset" |
As the output shows, five values(numbered from 0 to 4) were successfully added.
In the next blog, we will see how Redis can be used for Session management.
Thank you for Reading this!! Hope it helps.

Be the first to comment.