In our previous Blog we introduced FreePBX. Here we are with Installation of FreePBX 12 on Ubuntu Server 14.04 LTS.
Before proceed installation make sure your machine has OpenSSH server and LAMP Packages.
Here are installation steps.
Switch to the Root User
|
1 |
sudo -i |
Install Required Dependencies
|
1 2 3 4 5 6 |
apt-get install -y build-essential linux-headers-`uname -r` openssh-server apache2 mysql-server\ mysql-client bison flex php5 php5-curl php5-cli php5-mysql php-pear php-db php5-gd curl sox\ libncurses5-dev libssl-dev libmysqlclient-dev mpg123 libxml2-dev libnewt-dev sqlite3\ libsqlite3-dev pkg-config automake libtool autoconf git subversion unixodbc-dev uuid uuid-dev\ libasound2-dev libogg-dev libvorbis-dev libcurl4-openssl-dev libical-dev libneon27-dev libsrtp0-dev\ libspandsp-dev libmyodbc |
Reboot server
|
1 |
Reboot |
Install Dependencies for Google Voice (Optional)
Install iksemel
|
1 2 3 4 5 6 7 |
cd /usr/src wget https://iksemel.googlecode.com/files/iksemel-1.4.tar.gz tar xf iksemel-1.4.tar.gz cd iksemel-* ./configure make make install |
Install and Configure Asterisk
Download Asterisk source files
|
1 2 3 4 5 6 7 |
cd /usr/src wget http://downloads.asterisk.org/pub/telephony/dahdi-linux-complete/dahdi-linux-complete-current.tar.gz wget http://downloads.asterisk.org/pub/telephony/libpri/libpri-current.tar.gz wget http://downloads.asterisk.org/pub/telephony/asterisk/asterisk-12-current.tar.gz git clone https://github.com/akheron/jansson.git git clone https://github.com/asterisk/pjproject.git |
Only required if using a physical server and installing telecom hardware.
|
1 2 3 4 5 6 |
cd /usr/src tar xvfz libpri-current.tar.gz cd libpri-* make make install |
Asterisk 12 and later versions contain two SIP stacks: one, the original chan_sip SIP channel driver that has been present in all previous releases of Asterisk, and a new SIP stack that is based on this pjproject.
|
1 2 3 4 5 6 |
cd /usr/src/pjproject ./configure --enable-shared --disable-sound --disable-resample --disable-video –disable- opencore-amr make dep make make install |
Compile and Install jansson
Jansson is a C library for encoding, decoding and manipulating JSON data.
|
1 2 3 4 5 |
cd /usr/src/jansson autoreconf -i ./configure make make install |
|
1 2 3 4 5 6 7 |
cd /usr/src tar xvfz asterisk-12-current.tar.gz cd asterisk-* ./configure contrib/scripts/get_mp3_source.sh make menuselect |
You will be prompted at the point to pick which modules to build. Most of them will be enabled, but if you want to have MP3 support, you need to manually turn on ‘format_mp3’ on the first page.
Turn on cdr_mysql, as Asterisk store CDRs into mysql server database.
Turn off chan_pjsip in Channel Drivers if you want only chan_sip channel to be on. Otherwise, it will create confliction of ports.
Incase, you are getting duplicate rows for one call in CDR Reports then, go to Call Detail Recording and Turn off cdr_adaptive_odbc and cdr_odbc respectively.
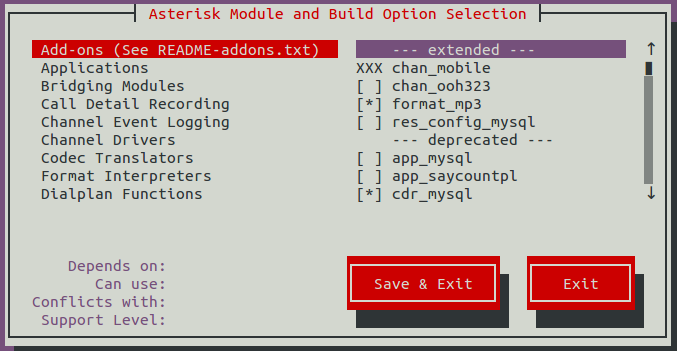
After selecting ‘Save & Exit’ you can then continue.
|
1 2 3 4 |
make make install make config ldconfig |
Install Asterisk-Extra-Sounds
this installs the (8khz) ‘wav’ soundfiles. If you’re running G722 (High Definition ‘Wideband’) audio, you also want to download the 722 codec pack. If you’re not planning on using Wideband, you can skip that part.
|
1 2 3 4 5 |
cd /var/lib/asterisk/sounds wget http://downloads.asterisk.org/pub/telephony/sounds/asterisk-extra-sounds-en-wav-current.tar.gz tar xfz asterisk-extra-sounds-en-wav-current.tar.gz rm -f asterisk-extra-sounds-en-wav-current.tar.gz |
Wideband Audio download
|
1 2 3 |
wget http://downloads.asterisk.org/pub/telephony/sounds/asterisk-extra-sounds-en-g722-current.tar.gz tar xfz asterisk-extra-sounds-en-g722-current.tar.gz rm -f asterisk-extra-sounds-en-g722-current.tar.gz |
Install and Configure FreePBX
Download and extract FreePBX
|
1 2 3 |
wget http://mirror.freepbx.org/modules/packages/freepbx/freepbx-12.0-latest.tgz tar vxfz freepbx-12.0-latest.tgz cd freepbx |
Now create the Asterisk user and set ownership permissions.
|
1 2 3 4 5 6 |
useradd -m asterisk chown asterisk. /var/run/asterisk chown -R asterisk. /etc/asterisk chown -R asterisk. /var/{lib,log,spool}/asterisk chown -R asterisk. /usr/lib/asterisk rm -rf/var/www/html |
A few small modifications to Apache.
Change webserver default user and group from apache to asterisk.
Change default “upload_max_filesize” to 120M to allow larger music on hold files.
|
1 2 3 4 |
sed -i 's/\(^upload_max_filesize = \).*/\120M/' /etc/php5/apache2/php.ini cp /etc/apache2/apache2.conf /etc/apache2/apache2.conf_orig sed -i 's/^\(User\|Group\).*/\1 asterisk/' /etc/apache2/apache2.conf service apache2 restart |
Edit /etc/odbcinst.ini and add the following.
- NOTE : this command assumes you are installing to a new machine, and that the file is empty. If this is not a freshly installed machine, please manually verify the contents of the file, rather than just copying and pasting the lines below. The ‘EOF’ does no go in the file, it simply signals to the ‘cat’ command that you have finished pasting.
|
1 |
cat >> /etc/odbcinst.ini << EOF |
|
1 2 3 4 5 6 7 |
[MySQL] Description = ODBC for MySQL Driver = /usr/lib/x86_64-linux-gnu/odbc/libmyodbc.so Setup = /usr/lib/x86_64-linux-gnu/odbc/libodbcmyS.so FileUsage = 1 EOF |
You may need to verify these paths, if you’re not on a x86_64 machine.
Edit or create /etc/odbc.ini and add the following section. Note that, again, this command assumes you are installing to a new machine, and the file is empty. Please manually verify the contents of the files if this is not the case.
|
1 |
cat >> /etc/odbc.ini << EOF |
|
1 2 3 4 5 6 7 8 |
[MySQL-asteriskcdrdb] Description=MySQL connection to 'asteriskcdrdb' database driver=MySQL server=localhost database=asteriskcdrdb Port=3306 Socket=/var/run/mysqld/mysqld.sock option=3 |
|
1 |
EOF |
now you need to generate a secure password for FreePBX to use to talk to MySQL.
|
1 |
Export ASTERISK_DB_PW=`dd if=/dev/urandom bs=1 count=32 2>/dev/null | base64 - | cut -c2-18` |
That will generate a quasi-random 16 character long password, which should be secure enough for most things. If you had set the MySQL ‘root’ password to be something when you were installing the machine, you will need to add a -pyourpassword flag to the following lines.
Configure Asterisk database in MYSQL.
|
1 2 |
mysqladmin -u root -pYourPassword create asterisk mysqladmin -u root -pYourPassword create asteriskcdrdb |
Set permissions on MYSQL database
|
1 2 3 4 |
mysql -u root -pYourPassword -e "GRANT ALL PRIVILEGES ON asterisk.* TO asteriskuser@localhost IDENTIFIED BY 'YourPassword';" mysql -u root -pYourPassword -e "GRANT ALL PRIVILEGES ON asteriskcdrdb.* TO asteriskuser@localhost IDENTIFIED BY 'YourPassword';" mysql -u root -pYourPassword -e "flush privileges;" |
Restart Asterisk and install FreePBX
|
1 2 3 4 5 6 7 |
./start_asterisk start ./install_amp --installdb --username=asteriskuser --password=YourPassword amportal chown amportal a ma installall amportal a reload amportal a ma refreshsignatures amportal chown |
You may get errors such as:
Please wait…
/usr/local/sbin/amportal: line 47: [FATAL]: command not foun
/var/lib/asterisk/bin/freepbx_engine: line 98: [FATAL]: command not found
****WARNING: ERROR IN CONFIGURATION ***
astrundir in '/etc/asterisk' is set to but the directory does not exists. Attempting to create it with: 'mkdir -p ' mkdir: missing operand Try 'mkdir --help' for more information. **** ERROR: COULD NOT CREATE **** Attempt to execute 'mkdir -p ' failed with an exit code of 1 You must create this directory and the try again.
We would suggest you to enter all passwords carefully. Incase, you are getting such error or You may have to manually set the password in /etc/freepbx.conf if you will get errors during the freepbx installation, specifically, when you run the command:
|
1 2 |
amportal a ma installall |
Finally, one last mod to Make a link to file and start FreePBX
|
1 2 |
ln -s /var/lib/asterisk/moh /var/lib/asterisk/mohmp3 amportal restart |
Navigate:
Now FreePBX is installed, it will be available via Apache. Open up your web browser and visit:
http://Address.Of.FreePBX.Server/admin
A Browser of FreePBX will open. Then, it will ask for creation of an account for admin. Create an account as admin who will have all the authority of freePBX browser.
that’s all are installation part , will be here soon with modules setup like extensions etc.

Be the first to comment.