In this blog, we will learn how to Integrate Jenkins with bitbucket to automate the process of CI/CD.
Before we begin, let’s talk about what is Jenkins and what role it plays in the process of CI/CD.
WHAT IS JENKINS?
“Jenkins is a continuous integration tool that enables developers around the world to reliably build, test, and deploy their software.”
CI/CD is the backbone of the modern DevOps environment. It bridges the gap between development and operations teams by automating the building, testing, and deployment of applications.
For more information regarding Jenkins Installation and CI/CD, you can refer the link.
For this demo we will use the following:-
- Jenkins Server v2.176.3
- Ubuntu Server 18.04 LTS
For this implementation you will need to download the following Jenkins plugins on a working Jenkins Setup:-
Now lets come to the implementation part.
For this implementation, we will launch an EC2 Instance (Ubuntu 18.04LTS) from our AWS console and install apache2 on it by executing the following commands:-
|
1 2 |
sudo apt update sudo apt install apache2 |
Before beginning the Jenkins implementation, configure the following:-
1. Add Bitbucket Credentials:-
If you have private repo you need to add the Bitbucket credentials into your Jenkins server.
Log in into your Jenkins server and go to Manage Jenkins-> Configure Credentials-> Credentials-> System -> Global Credentials(unrestricted)-> Add Credentials -> and select Username with password.
(Note:- No need to perform this step if you have a public repository.)

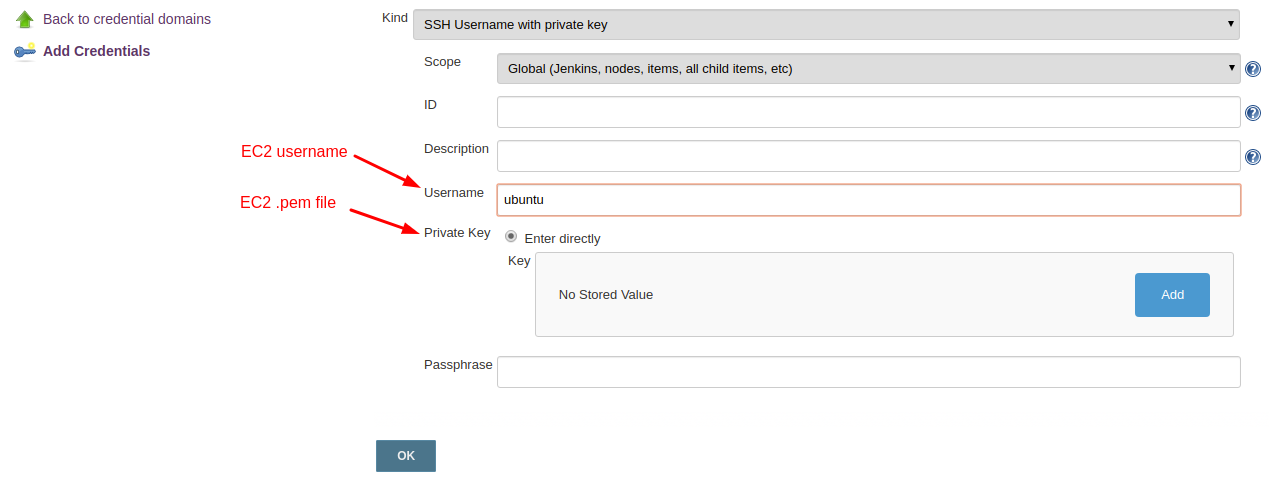
2. Remote SSH Server Configuration:-
You need to add your AWS EC2 server under Jenkins.
Log in into your Jenkins server and go to Manage Jenkins-> Configure Credentials-> Credentials-> System -> Global Credentials(unrestricted)-> Add Credentials -> and select SSH Username with private key.
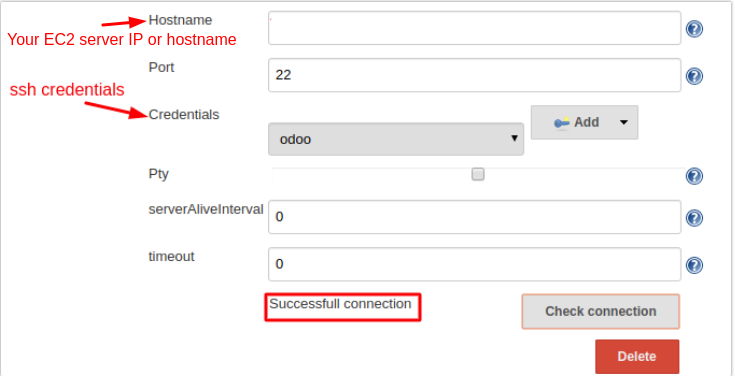
After this go to Manage Jenkins -> Configure System -> and under SSH remote hosts check your SSH server connection.
Bitbucket Implementation Part:-
Log in to your Bitbucket account and go to your main repository.
Under settings select Webhooks and configure it as shown:-
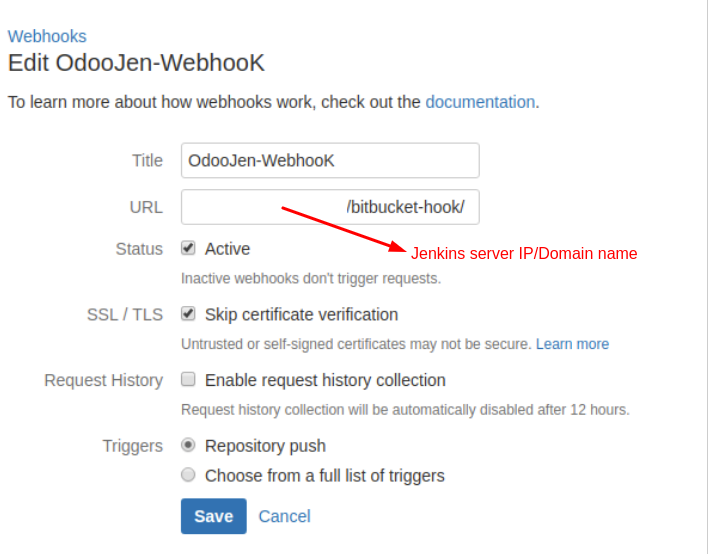
Webhooks are just “user-defined HTTP callbacks” which are triggered by some events in the repo such as push, merge, etc. In our case, webhooks will trigger our Jenkins job in case of any push and merge in our repo.
Jenkins Implementation Part:-
Step1:-
Log in to your Jenkins server and go to -> New Item -> Freestyle Project -> and create a new project with any name let’s say TEST-PROJECT.

Step2:-
Now go to your project and Under Source Code Management choose Git and give the link of your Bitbucket repo and under Branches to build select your main development branch.
Step3:-
Under Build Triggers select Bitbucket Push and Pull Request Plugin, add Push event. Choose the Bitbucket Cloud Push event and mention the branch you want to monitor for any push/merge event by the developers.s
Step4:-
Under Build select execute shell script on remote host using ssh and select your ssh server credentials and under Command write the following:-
|
1 2 3 4 |
cd /var/www/html sudo chmod 777 -R /var/www/html sudo rm -rf index.html sudo echo "CI/CD Integration is successfull" > index.html |
 (Note:- It is not recommended to give 777 permission on /var/www/html we are just giving 777 for demo purpose only)
Save the job.
Now go to your main repository in bitbucket, and perform any push/merge operation on it which will result in the following;-
- The push/merge event will activate our webhooks which will trigger our Jenkins job.
- Our Jenkins job will ssh into our EC2 server and perform the commands specified under the step.
- Finally, we can check whether our job is working correctly by going to our server IP address:-
Off

On browsing your Apache2 server it should display the following result –

Now you have successfully Implemented CI/CD using Bitbucket and Jenkins.
In case of any help or query, please contact us or raise a ticket at

Be the first to comment.