If you’re considering an Akeneo AWS migration, you might be moving your website or application to an AWS EC2 server.
In this guide, you’ll learn about the key factors involved in migrating to AWS. Further, we will outline the key steps to help you successfully migrate your data to AWS.
Table of content
- Key Factors to Consider Before Migrating Data to AWS
- Getting Started with an AWS Account
- Process and Steps for Moving Your Website to AWS
- Conclusion
Key Factors to Consider Before Migrating Data to AWS
1:- If you’re using cPanel, a minimal server, a shared server, a VPS, or Plesk, then it’s crucial to understand the size of your hosting plan, the amount of resources you’re consuming (RAM, CPU, Storage), and your future needs.
2:- Ensure that your AWS EC2 server has the LAMP or LEMP stack deployed, depending on whether you plan to use Apache or Nginx. Additionally, choose the appropriate AWS region for your EC2 deployment based on factors like latency and compliance with your target audience.
3:- Identify the PHP version and OS distribution on the current server. Then, ensure the same PHP version is installed, and configure the EC2 instance to match your current server’s Ubuntu setup.
4:- Understand the size of your current database and Akeneo installation will help you prepare and provision the new AWS server accordingly.
Getting Started with an AWS Account
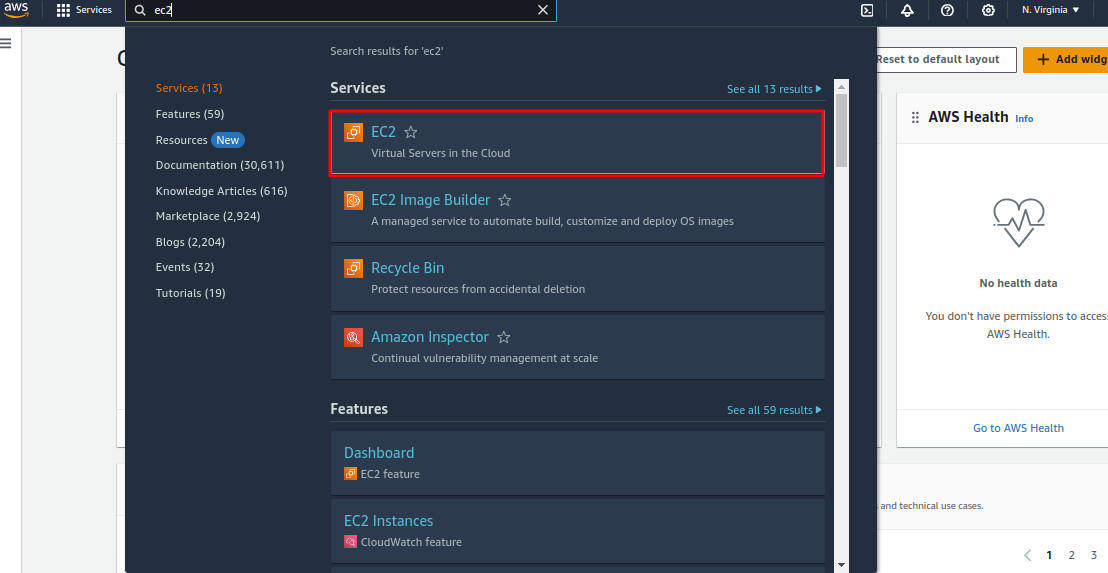
1:- After successfully creating your account, choose the AWS Region where you want to deploy your EC2 server. Then, select the EC2 service as shown in the screenshot
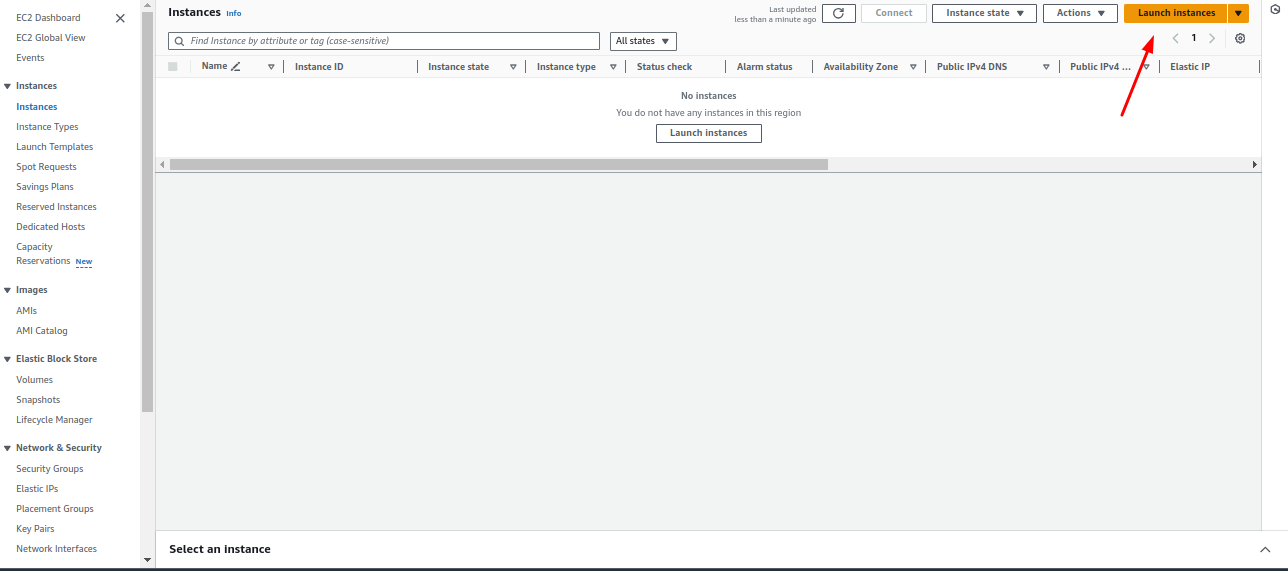
2:- Next, click on the “Launch instances” button, as shown in the screenshot below:
3:- Choose a name for your EC2 instance and also choose the Amazon Machine Image (AMI) for the Akeneo installation. Here, in my case, I’m selecting Ubuntu 22.04 LTS.
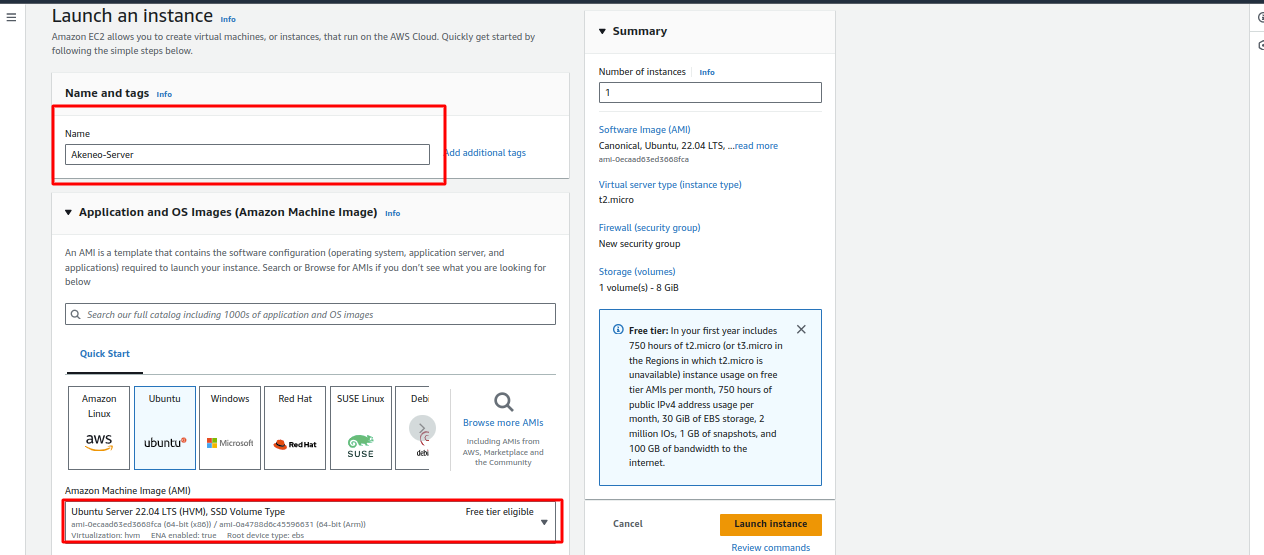
4:- Select the instance type based on your current setup. I’m choosing the t2.xlarge instance type as Akeneo needs more resources to start. Then, create a key pair for logging into your EC2 server.
You can generate a .pem file for Linux distributions or a .ppk file for Windows machines.
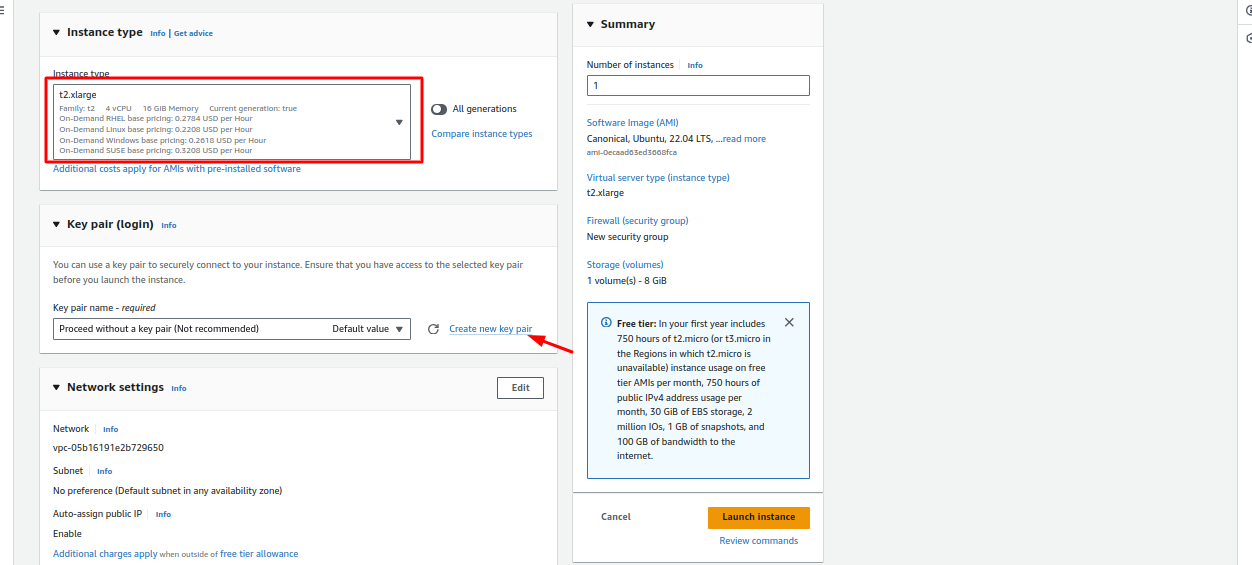
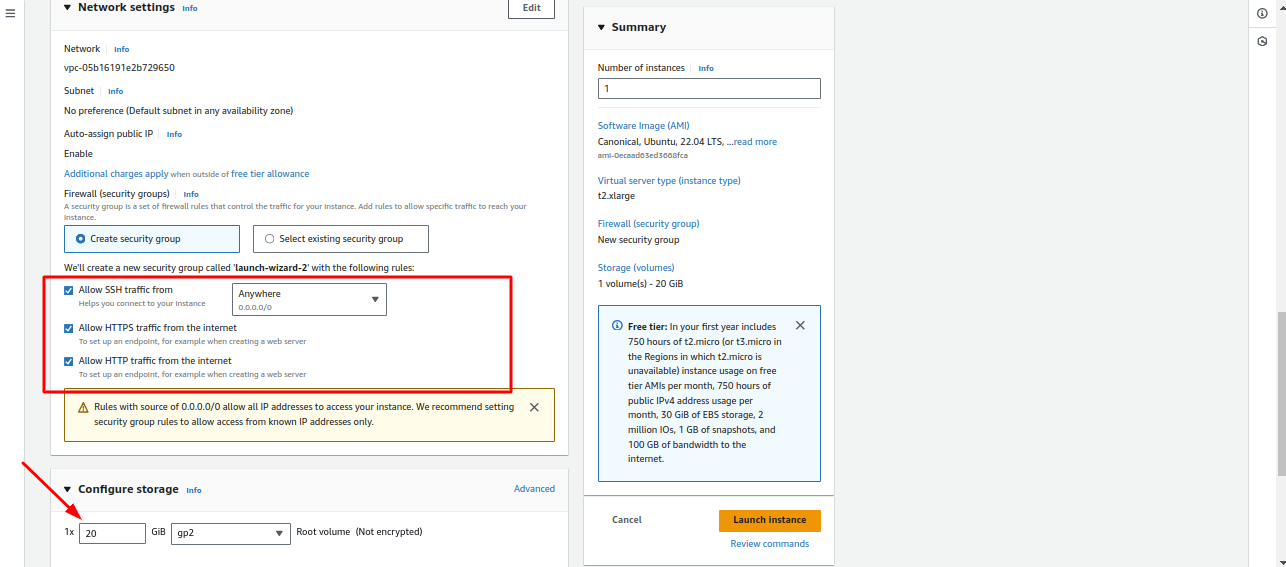
5:- Here, configure the security group to allow traffic by enabling SSH, HTTP, and HTTPS ports. Basically, this will permit access to the Internet.
Next, configure the storage based on your current setup. Ensure you have reviewed the website data and database size in your current server.
6:- Now, click on the Launch Instance button then wait for a moment for the proper launching of the server.

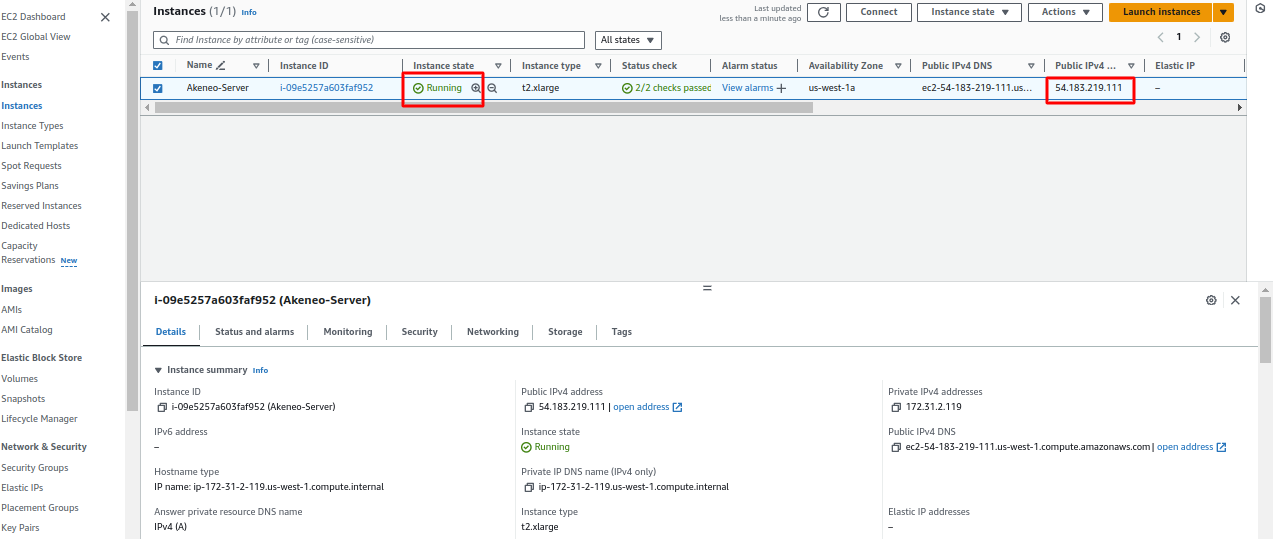
7:- Here, you can see the EC2 server is now launched successfully, and then pick the IP address of EC2 for SSH access.
Now, access the EC2 server via SSH and set it up with the LAMP stack and required packages by following these steps:
Step 1: Update the local package, then install Apache.
|
1 2 3 4 |
sudo apt-get update sudo apt-get install apache2 sudo systemctl enable apache2 sudo systemctl status apache2 |
|
1 2 3 4 5 6 7 8 |
sudo apt-get install mysql-server sudo mysql ALTER USER 'root'@'localhost' IDENTIFIED WITH mysql_native_password BY 'password'; CREATE DATABASE akeneo_pim; CREATE USER akeneo_pim@localhost IDENTIFIED WITH mysql_native_password BY 'akeneo_pim'; GRANT ALL PRIVILEGES ON akeneo_pim.* TO akeneo_pim@localhost; FLUSH PRIVILEGES; exit |
Step 3: Install PHP 8.1 and the necessary extensions.
|
1 2 3 4 |
sudo apt install software-properties-common sudo add-apt-repository ppa:ondrej/php sudo apt-get update sudo apt-get install php8.1-cli php8.1-apcu php8.1-bcmath php8.1-curl php8.1-opcache php8.1-fpm php8.1-gd php8.1-intl php8.1-mysql php8.1-xml php8.1-zip php8.1-mbstring php8.1-imagick |
Step 4: configure the php.ini file
Now, configure the php.ini file for both PHP CLI and FPM by setting the memory limit and date.timezone.
|
1 2 3 4 5 6 7 |
vim /etc/php/8.1/cli/php.ini memory_limit = 1024M date.timezone = UTC vim /etc/php/8.1/fpm/php.ini memory_limit = 512M date.timezone = UTC |
Step 5: Enable the Apache rewrite module and proxy_fcgi.
|
1 2 3 |
sudo a2enmod rewrite proxy_fcgi sudo a2enmod rewrite sudo systemctl restart apache2 |
Step 6: Install Composer with the required version.
|
1 2 3 4 |
sudo apt-get install curl wget zip unzip net-tools -y sudo curl -sS https://getcomposer.org/installer | php -- --version=2.5.8 sudo mv composer.phar /usr/local/bin/composer composer -V |
Step 7: Configure Elasticsearch.
|
1 2 3 4 5 6 7 8 9 |
sudo apt-get install apt-transport-https sudo wget -qO – https://artifacts.elastic.co/GPG-KEY-elasticsearch | apt-key add – sudo echo “deb https://artifacts.elastic.co/packages/8.x/apt stable main” | tee -a /etc/apt/sources.list.d/elastic-8.x.list sudo apt-get update sudo apt-get install elasticsearch sudo systemctl daemon-reload sudo systemctl enable elasticsearch.service sudo systemctl start elasticsearch.service sudo systemctl status elasticsearch.service |
Step:8 Install Node on the server
|
1 2 3 4 |
sudo curl -sL https://deb.nodesource.com/setup_18.x -o nodesource_setup.sh sudo bash nodesource_setup.sh sudo apt-get install -y nodejs node -v |
Step:9 Now, set up Yarn
|
1 2 3 4 |
curl -sL https://dl.yarnpkg.com/debian/pubkey.gpg | apt-key add - echo "deb https://dl.yarnpkg.com/debian/ stable main" | tee /etc/apt/sources.list.d/yarn.list apt update && apt-get install yarn -y yarn -v |
Step 10: Create a user for Akeneo.
You can set a password, and for the remaining fields, then, simply press Enter to accept the defaults.
|
1 |
sudo adduser akeneo |
Process and Steps for Moving Your Akeneo Website to AWS
Go to the current server, back up the Akeneo website, and then create a ZIP file. Also, take a database dump from the MySQL server by following these steps:
1:- Navigate to the Document Root
Now, go to the document root path of your Akeneo installation.
2:- Create a Backup
Run the following command to create a ZIP file of the Akeneo website. Replace the folder name with the one used in your current setup:
|
1 |
zip -r akeneo_backup.zip /path/to/your/akeneo/folder |
3:- Dump the Database
Execute the following command to take a dump of your MySQL database:
|
1 |
mysqldump -u your_username -p your_database_name > akeneo_db_backup.sql |
4:- Migrate the backup files
After taking both backups from the current server, it’s time to transfer them to the AWS EC2 server using the following command:
|
1 |
scp -i akeneo.pem -r akeneo_backup.zip akeneo_pim.sql ubuntu@54.183.219.111:/home/ubuntu |
Note: In this blog, we use the scp command to migrate the website data and database dump files to the AWS EC2 instance.
After successfully migrating the .zip backup file to the AWS EC2 server, move the files to the /home/akeneo directory and then extract the website files with the following command:
|
1 2 3 |
mv akeneo_backup.zip /home/akeneo/ cd /home/akeneo unzip akeneo_backup.zip |
5: Database Uploading
Import the database dump file into the database using the following command:
|
1 |
mysql -u your_username -p your_database_name < /home/akeneo/akeneo_pim.sql |
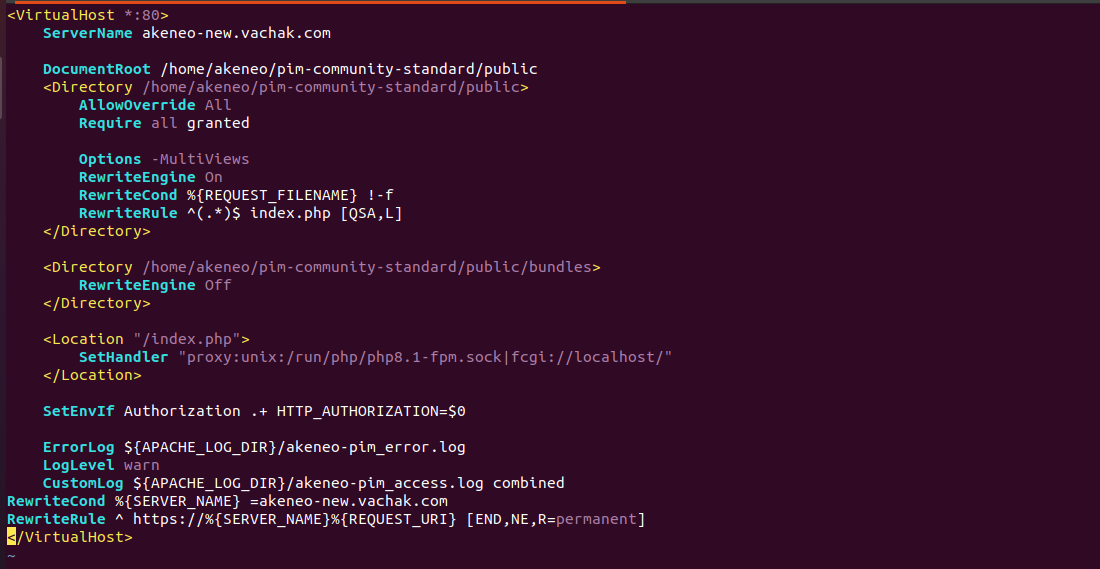
6: Virtualhost for Apache
Now create a virtual host file for Apache Click here
We’ve created a virtual host for our domain. In this example, we’re using our domain name, but you can specify your own.
After this, Define the document root and directory path where you plan to install the PIM.
After creating a virtual host for Akeneo, add the following syntax to your apache2.conf (or httpd.conf depending on your setup) to define the user home directory:

To adjust the Apache envvars file according to your specific user, kindly follow these steps:

In PHP-FPM, you’ll need to specify the user, group, listen.owner, and listen.group settings to ensure proper permissions and ownership.
|
1 2 |
vim /etc/php/8.1/fpm/pool.d/www.conf <a href="https://cloudkul.com/blog/wp-content/uploads/2023/07/Screenshot-from-2023-07-11-17-07-13.png"></a> |
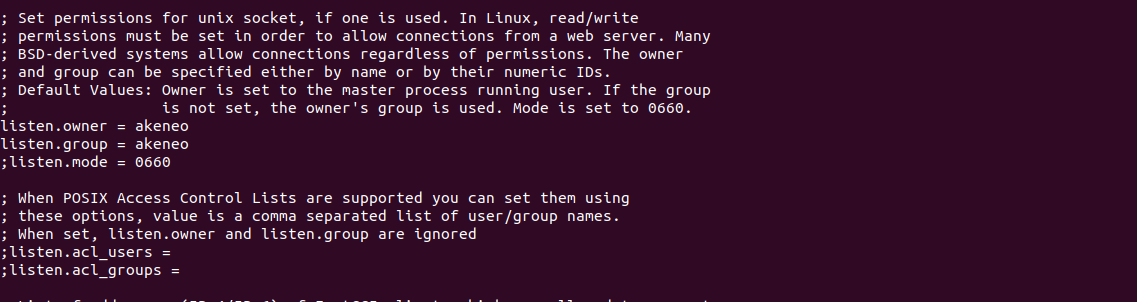
Further, change the permission as per your user
- Set the owner and group owner for php fpm.
- Enable the conf file which you create for your domain and restart the Apache service.
|
1 2 3 4 5 6 7 8 |
sudo chown -R akeneo:akeneo /etc/php/8.1/fpm/pool.d/www.conf sudo chown -R akeneo:akeneo /var/run/php/php8.1-fpm.sock service php8.1-fpm restart cd /etc/apache2/sites-available a2ensite akeneo-pim.local.conf apache2ctl -t a2enmod rewrite systemctl restart apache2 |
Now, navigate to the user’s home directory where the document root is defined.
|
1 2 3 |
cd /home/akeneo/pim-community-standard apt-get install make NO_DOCKER=true make |

Define the user and directory permission
|
1 |
chown -R akeneo:akeneo pim-community-standard |
Now, update the A record of your domain in the DNS management settings to point to the new AWS EC2 IP address.
As a result, your Akeneo website has been successfully migrated to the AWS server.
Conclusion
Transferring website data is just one part of migrating to AWS to have better performance. However, you can scale your Akeneo application into a high-performance, scalable architecture by implementing a distributed setup, separating the MySQL service from the EC2 server, using a caching system (Redis/Memcached), setting up database replication, integrating a CDN, and using Amazon S3.
If you need assistance with your Amazon Web Service data transfer, kindly feel free to contact us.
You can refer to our Open Source PIM Software to manage your product information and data for all channels in one place.
Furthermore, You can check the Open source UnoPim demo from here – https://demo.unopim.com/
NEED HELP?
Was this guide helpful? Please share your feedback in the comments below.
In case you have any issues/queries regarding the module please raise a ticket at
https://webkul.uvdesk.com/en/customer/create-ticket/
For any further information or query contact us at [email protected].

Be the first to comment.