Be it developers, or sys-admins, or devops engineers, all of them must have came across Docker once in a while. For those who haven’t heard of this term, Docker is a kind of virtualisation like vagrant, virtual machines etc. Quoting from Docker documentation itself:
Docker is an open platform for developing, shipping, and running applications. Docker enables you to separate your applications from your infrastructure so you can deliver software quickly. With Docker, you can manage your infrastructure in the same ways you manage your applications.
Understanding Docker Architecture:
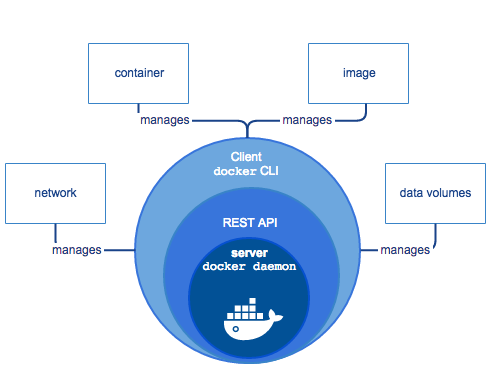
Docker engine is a client-server application which has basically three components,
- Docker daemon server
- REST API that provides an interface so that programs can talk to docker daemon and give it instructions.
- Docker command line interface
The CLI uses REST API to control or interact with Docker daemon through CLI commands. Docker engine architecture from Docker docs itself is shown below:
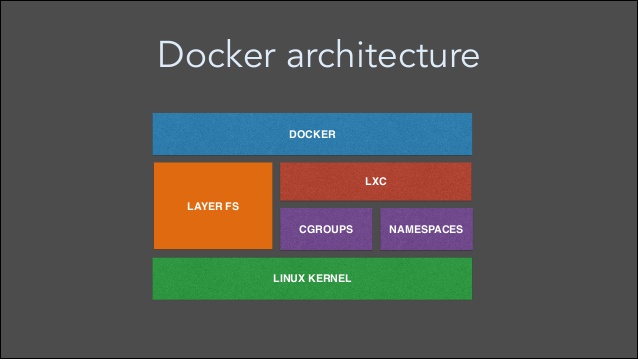
Docker packages and runs an application in a loosely isolated environment called a container. Unlike VMs, containers do not bundle a full operating system. They wrap up only libraries and settings required to make software work. Containers get launched from docker image(s). Docker container image is a light-weight, standalone, executable package of a piece of software that is code, system tools, system libraries, settings etc. They are constructed from filesystem layers and share common files.
Containers running on single machine share that machine’s operating system kernel. That is why they start instantly and use less compute and RAM. Containers also share OS kernel with other containers as well. They are abstraction at the application layer that package code and dependencies together. A layered architecture of docker (taken from www.slideshare.net) is shown below:
Images can either be created by launching containers from some base image followed by some installations/alterations and then committing the container to a new image, or it can be created from Dockerfile. For creating an image, writing Dockerfile happens to be a good practice as it is light-weight and image built from Dockerfile consume less storage space.
Dockerfile allows to create image either from some base image (ex: ubuntu os image) or directly from scratch where we define all the packages that would be needed in our image. For best practices for writing Dockerfile, refer link https://docs.docker.com/engine/userguide/eng-image/dockerfile_best-practices/ .
Magento 2 With Docker:
Docker is an open-source project that can be integrated with almost all the applications allowing scope of isolation and flexibility. It can be integrated with Magento-2.x as well. Magento is an e-commerce platform written in PHP and based on zend framework available under both open-source and commercial licenses. In this blog, we will run magento2.x within the architecture of docker on Ubuntu 16.04.
Generally, “each container should have only one concern” i.e. there should be single process running per containers. Then all the running containers should be linked with each other. But in the architecture we will be defining in this blog, we will use supervisor as our main process that will run apache server and mysql server together within a single container. Hence we won’t need container linking.
Also, supervisor is a client-server system that monitors and controls a number of processes. In our later blogs, we will explore architectures built on multiple containers and their linking mechanism.
Presuming the fact that Docker is already installed on your ubuntu server, we will dive into server setup. If Docker is not installed on your server, please install the docker beforehand. Moving forward to our architecture setup, we will create a Dockerfile that will hold the installation of LAMP server and other necessary packages.
To begin with, we will be using Ubuntu 16.04 base image, apache2 server, mysql-server-5.7 and PHP version will be passed as an argument as per your choice (php7.0, php7.1) along its extensions as per Magento 2.x requirements.
Whole server architecture will be wrapped up in one Docker image and Magento-2.x files will be placed on our host. It is a good practice to keep application on host so that it will not be lost if containers or images get accidentally removed. These magento files will be mapped from host to docker containers. We will also install supervisor for controlling apache and mysql server.
Dockerfile is shown below:
|
1 2 3 4 5 6 7 8 9 10 11 12 13 14 15 16 17 18 19 20 21 22 23 24 25 26 27 28 29 30 31 32 33 34 35 36 37 38 39 40 41 42 43 44 45 46 47 48 49 50 51 52 53 54 55 56 57 58 59 60 61 |
FROM ubuntu:16.04 ## Mysql root password and PHP version to be passed as arguments while building image ARG mysql_password ARG phpV ENV MYSQL_ROOT_PASSWORD {mysql_password} ## Update Server and Install LAMP RUN apt-get update \ && apt-get -y install apache2 \ && a2enmod rewrite \ && a2enmod headers \ && export LANG=en_US.UTF-8 \ && apt-get update \ && apt-get install -y software-properties-common \ && apt-get install -y language-pack-en-base \ && LC_ALL=en_US.UTF-8 add-apt-repository ppa:ondrej/php \ && apt-get update \ && apt-get -y install php{phpV} php${phpV}-curl php${phpV}-intl php${phpV}-gd php${phpV}-dom \ php${phpV}-mcrypt php${phpV}-iconv php${phpV}-xsl php${phpV}-mbstring php${phpV}-ctype php${phpV}-zip \ php${phpV}-pdo php${phpV}-xml php${phpV}-bz2 php${phpV}-calendar php${phpV}-exif php${phpV}-fileinfo php${phpV}-json \ php${phpV}-mysqli php${phpV}-mysql php${phpV}-posix php${phpV}-tokenizer php${phpV}-xmlwriter php${phpV}-xmlreader \ php${phpV}-phar php${phpV}-soap php${phpV}-mysql php${phpV}-fpm php${phpV}-bcmath libapache2-mod-php${phpV} \ && sed -i -e"s/^memory_limit\s*=\s*128M/memory_limit = 512M/" /etc/php/${phpV}/apache2/php.ini \ && rm /var/www/html/* \ && sed -i "s/None/all/g" /etc/apache2/apache2.conf \ && apt-get -y install debconf-utils \ && echo "mysql-server-5.7 mysql-server/root_password password ${mysql_password}" | debconf-set-selections \ && echo "mysql-server-5.7 mysql-server/root_password_again password ${mysql_password}" | debconf-set-selections \ && DEBIAN_FRONTEND=noninteractive apt-get -y install mysql-server-5.7 && \ mkdir -p /var/lib/mysql && \ mkdir -p /var/run/mysqld && \ mkdir -p /var/log/mysql && \ touch /var/run/mysqld/mysqld.sock && \ touch /var/run/mysqld/mysqld.pid && \ chown -R mysql:mysql /var/lib/mysql && \ chown -R mysql:mysql /var/run/mysqld && \ chown -R mysql:mysql /var/log/mysql &&\ chmod -R 777 /var/run/mysqld/ \ && sed -i -e"s/^bind-address\s*=\s*127.0.0.1/bind-address = 0.0.0.0/" /etc/mysql/mysql.conf.d/mysqld.cnf \ ##install supervisor and setup supervisord.conf file && apt-get install -y supervisor \ && mkdir -p /var/log/supervisor ENV APACHE_RUN_USER www-data ENV APACHE_RUN_GROUP www-data ENV APACHE_PID_FILE /var/run/apache2.pid ENV APACHE_RUN_DIR /var/run/apache2 ENV APACHE_LOCK_DIR /var/lock/apache2 ENV APACHE_LOG_DIR /var/log/apache2 ENV LANG C WORKDIR /var/www/html COPY supervisord.conf /etc/supervisor/conf.d/supervisord.conf ## Copy one time database creation script from host to docker. COPY mysql.sh /etc/mysql.sh RUN chmod a+x /etc/mysql.sh ## Expose ports for web server and database server. EXPOSE 3306 80 CMD ["/usr/bin/supervisord"] |
Take a note that Dockerfile just install packages as it is instructed to do by the commands and build the image.
Consider image as rest package where no services or processes are running. That is why we cannot perform any operation from Dockerfile that requires a particular service to be running. As with case of database, we cannot create database from Dockerfile as mysql service is not running. For database and its user creation, we will create a bash script that will run whenever a container will launch, hence creating mentioned database and its user.
We are using “mysql.sh” as the bash script as mentioned in Dockerfile. Bash script “msyql.sh” resides on our host parallel to Dockerfile.
Contents of mysql.sh is shown below:
|
1 2 3 4 5 6 7 8 9 10 11 12 13 14 15 16 17 18 19 20 21 22 23 24 25 26 27 28 29 |
#!/bin/bash set -u sleep 4 database_connectivity_check=no var=1 while [ "$database_connectivity_check" != "mysql" ]; do /etc/init.d/mysql start sleep 2 database_connectivity_check=`mysqlshow --user=root --password=$MYSQL_ROOT_PASSWORD | grep -o mysql` if [ $var -ge 4 ]; then exit 1 fi var=$((var+1)) done database_availability_check=`mysqlshow --user=root --password=$MYSQL_ROOT_PASSWORD | grep -ow "$MYSQL_DATABASE"` if [ "$database_availability_check" == "$MYSQL_DATABASE" ]; then exit 1 else mysql -u root -p$MYSQL_ROOT_PASSWORD -e "grant all on *.* to 'root'@'%' identified by '$MYSQL_ROOT_PASSWORD';" mysql -u root -p$MYSQL_ROOT_PASSWORD -e "create database $MYSQL_DATABASE;" mysql -u root -p$MYSQL_ROOT_PASSWORD -e "grant all on $MYSQL_DATABASE.* to 'root'@'%' identified by '$MYSQL_ROOT_PASSWORD';" supervisorctl stop database_creation && supervisorctl remove database_creation echo "Database $MYSQL_DATABASE created" fi |
Apart from mysql.sh file, we are copying supervisord.conf file from host to docker image that holds that instructions to run apache2 server, mysql server, mysql.sh script and certain ownership command. This file should be placed to Dockerfile and mysql.sh script.
Contents of supervisord.conf file is shown below:
|
1 2 3 4 5 6 7 8 9 10 11 12 13 14 15 |
[supervisord] nodaemon=true [program:mysql] command=/bin/bash -c "touch /var/run/mysqld/mysqld.sock;touch /var/run/mysqld/mysqld.pid;chown -R mysql:mysql /var/lib/mysql;chown -R mysql:mysql /var/run/mysqld;chown -R mysql:mysql /var/log/mysql;chmod -R 777 /var/run/mysqld/;/etc/init.d/mysql restart" [program:apache2] command=/bin/bash -c "source /etc/apache2/envvars && exec /usr/sbin/apache2 -DFOREGROUND" [program:command_for_user_permission] command=/bin/bash -c "chown -R www-data: /var/www/" [program:database_creation] command=/bin/bash -c "/etc/mysql.sh" |
Our parent directory will have following files/directories:
- Dockerfile
- supervisord.conf
- mysql.sh
Now when Dockerfile, mysql.sh, supervisord.conf, 000-default.conf and magento2 directory are placed parallel to each other, we are ready to build our image. Go to your docker project directory and run:
|
1 2 |
docker build --build-arg mysql_password=mention_mysql_password \ --build-arg phpV=mention_php_version -t image_name:image_tag . |
After image build up, you can check your built images by command:
|
1 |
docker images |
As mentioned earlier, we will keeping Magento server files on host. So create a directory naming magento2 parallel to Dockerfile. Download the latest Magento-2.x from https://magento.com/tech-resources/download and place the unarchived files within magento2 directory and change its ownership as www-data.
Now for running containers from this image, first ensure you have port 80 and 3306 is available then run the command:
|
1 2 3 |
docker run -d -p 80:80 -p 3306:3306 -e MYSQL_ROOT_PASSWORD=mention_mysql_password \ -e MYSQL_DATABASE=mention_database -v `pwd`/magento2:/var/www/html/ --name container_name \ image_name:image_tag |
In above command, “-v” is used to mount or map volumes. In our case it is mapping magento2 directory with /var/www/html/. After running above command, check the running containers by command:
|
1 |
docker ps |
Now hit the URL or IP on your browser and you will see the magento-2.x installation page.
So far, we have setup Magento-2.x within the Docker architecture with running single container for web server & database server and mapping Magento-2.x files from host to docker container. In our next blog, we will build docker architecture for Magento-2.x by container linking approach.


Be the first to comment.