In this tutorial, we will learn how to set up and use the Apache JMeter HTTP(S) Test Script Recorder to record HTTP requests. Recording HTTP requests is a great way to building test plans, and can be useful in creating tests that closely mimic a normal user’s behavior.
Prerequisites:-
- Apache JMeter Download Binaries
- Java version 6 or later Oracle Java available here
- Mozilla Firefox Download here
For further help on how to Install JMeter you can refer the following blog –
Apache JMeter Installation and Overview
In this blog we are using the following versions :-
|
1 2 |
Java - 1.8.0 Ubuntu - 18.04 |
This tutorial teaches you:
- What a Proxy is and how the recorder works,
- How to intercept and record HTTP Requests automatically while using your web browser,
- How to configure Proxy Settings with Firefox,
- And the most important part: recording the script.
How Proxy Works?
A Proxy is a component which inserts between you and the remote server. In some way, it’s similar to a Man-In-The-Middle Attack, except you’re spying on yourself!
As anything between the remote server and you goes through the Proxy, when JMeter acts like a Proxy, it can record all your browser interactions (given it’s http or https).
How can JMeter act like a Proxy? By using Jmeter’s HTTP(s) Test Script Recorder.
Start Building a Test Plan
First, start JMeter. Then let’s start building a test plan. If you already have a test plan that you would like to start with, skip this section and move on to adding a Recording Controller to your Thread Group (the next section).
Minimally, we will want to add a Thread Group and HTTP Request Defaults. Let’s get start by adding a Thread Group.
Add a Thread Group
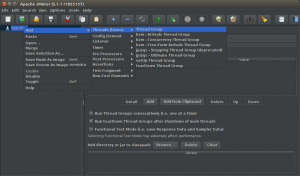
Add a Thread Group to Test Plan:
- Right-click on Test Plan
- Mouse over Add >
- Mouse over Threads (Users) >
- Click on Thread Group
Add a Recording Controller
Now let’s add a Recording Controller to Thread Group:
- Select Thread Group, then right-click it
- Mouse over Add >
- Mouse over Logic Controller >
- Click on Recording Controller
The Recording Controller is where recorded HTTP Request samplers will be created. The next step is to set up an HTTP(S) Test Script Recorder.
Add HTTP(S) Test Script Recorder
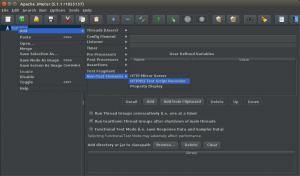
Now let’s add an HTTP(S) Test Script Recorder to the WorkBench:
- Select Your Test Plan
- Mouse over Add >
- Mouse over Non-Test Elements >
- Click on HTTP(S) Test Script Recorder
Port Setting
The default port that the HTTP(S) Test Script Recorder proxy will run on is 8080. This can be changed by changing the Port setting under Global Settings.
Start Recording
Clicking on the “Start” button, on the bottom of the Script Recorder window, will start the JMeter proxy server which will be used to intercept and record browser requests. Click on the Start button (of the recorder) now.
The first time you attempt to run the recorder, it will display an error saying that it can’t start because a certificate does not exist. Click OK, then click Start a second time. You should see a message that says that a temporary certificate named ApacheJMeterTemporaryRootCA.crt has been created in JMeter bin directory. Click OK and continue.
Configure Firefox To Use JMeter Proxy
We will use Firefox as our browser when using the JMeter HTTP(S) Test Script Recorder because, unlike Chrome and some other browsers, it does allows you to override system-wide configuration for its proxy settings.
Configure Firefox to use localhost (127.0.0.1) on port 8080 as its proxy for all traffic by following these steps:
- Open Firefox
- Go to the Preferences menu
- Click on the Advanced tab
- Then Network tab
- In the “Connection” section, click on “Settings…”
- Select the “Manual proxy configuration” radio button
- Set HTTP Proxy to “localhost” and Port to “8080”
- Check “Use this proxy server for all protocols”
- Click OK and exit the Preferences menu
Note: When Firefox is configured to use JMeter’s Script Recorder as a proxy, it will only work properly if the Script Recorder is running.
Recording HTTP Requests
Now that our test plan’s HTTP(S) Test Script Recorder is running, and Firefox is configured to use it as a proxy, the HTTP requests that Firefox sends will be recorded. Let’s test it out.
In Firefox, go to your server’s homepage (the same server that you configured in your JMeter HTTP Request Defaults):
Now there should be a little triangle next to your Recording Controller. Click on it to expand and show the requests that it has recorded. You should see the HTTP requests that were recorded, depending on which URL Patterns you have included and excluded. Feel free to browse your site to record more requests.
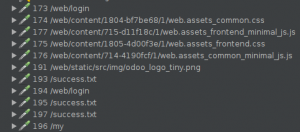
Here is an example of what I recorded with my Test Script Recorder:-
As you can see, a lot of requests were created. You may refine the list of HTTP requests by simply deleting unwanted entries here.
Once you are done recording, click the “Stop” button at the bottom of the HTTP(S) Test Script Recorder window. Note that Firefox will no longer be able to reach any pages (because it is configured to use port 8080 as a proxy)–configure it to use “No proxy” if you want to function normally.
Conclusion
You have successfully recorded your Test Scenerio with Apache JMeter. In the next blog we will see how to implement Benchmarking of a website with Apache JMeter.
In case of any help or query, please contact us or raise a ticket.


Be the first to comment.