Software as a Service is a new approach in the replacement of traditional software license purchases. SaaS Business is very fastest-growing technology nowadays that is used by the end-user.
Here we will discuss how we can install Bagisto SaaS on a Plesk environment and as well as how to create a tenant–
How to install Bagisto SaaS on Plesk
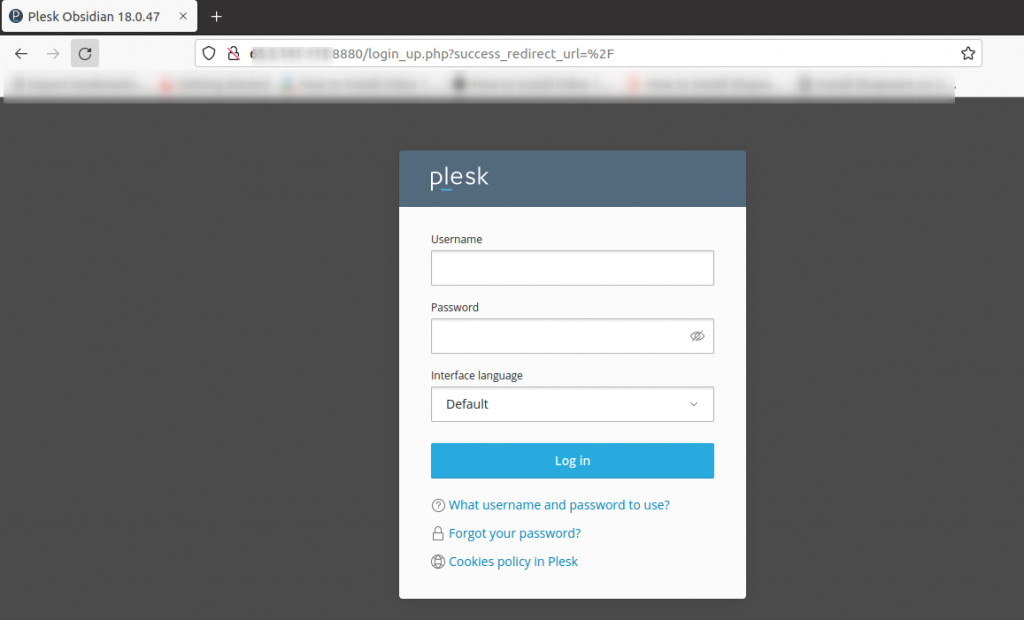
Step 1 – Login into Plesk
First, we need to login on to Plesk to start with the installation process.
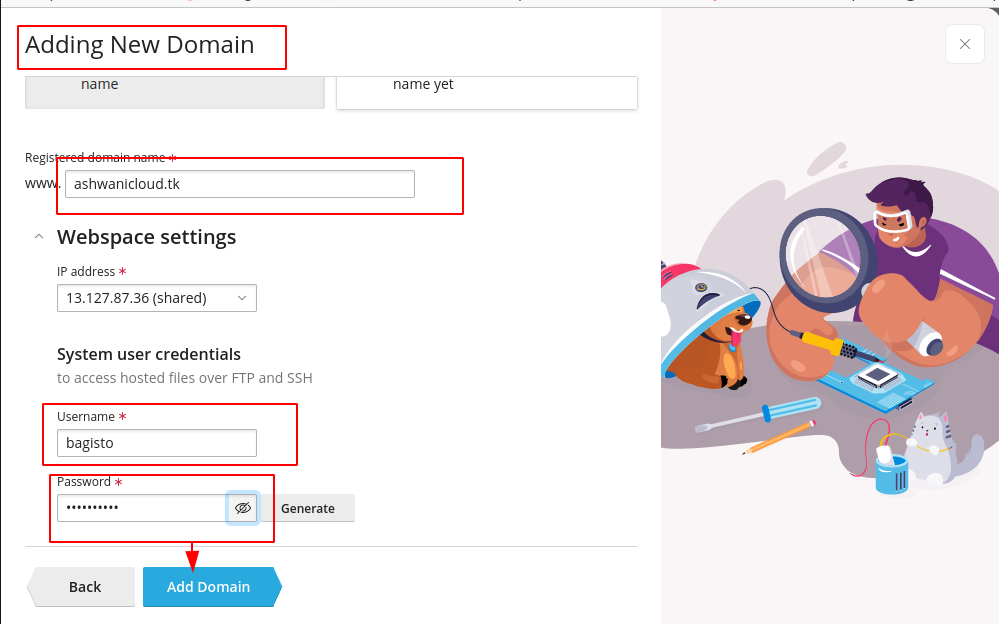
Step 2 – Add a Domain name
We need to add the domain name to launch the website. Therefore Click on ‘Add domain’ to add the domain name that you want to use with your website.

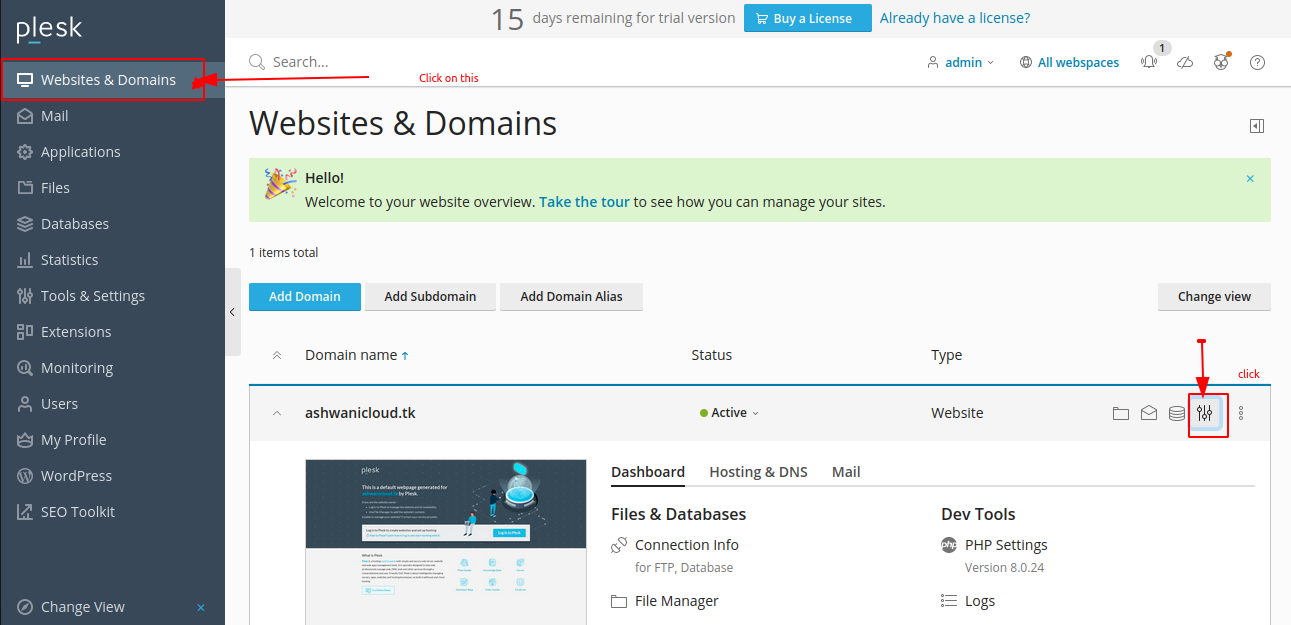
Step 3 – SSH and FTP user
Add your domain name and create one FTP user to access files on the server. However, only this user will be able to access data on your server.
After that, we need to allow SSH access to the user that we have created to access the server files, here my user is ‘Bagisto’.
Step 4: Download Bagisto
Create a Bagisto project in the user’s home directory using Composer, follow these commands –
$ cd /var/www/vhosts/ashwanicloud.tk/httpdocs
$ composer create-project bagisto/bagisto

Step 5 – Changing the Document’s root path
Now after installing bagisto, we need to set the document root path and the path should be – httpdocs/bagisto/public

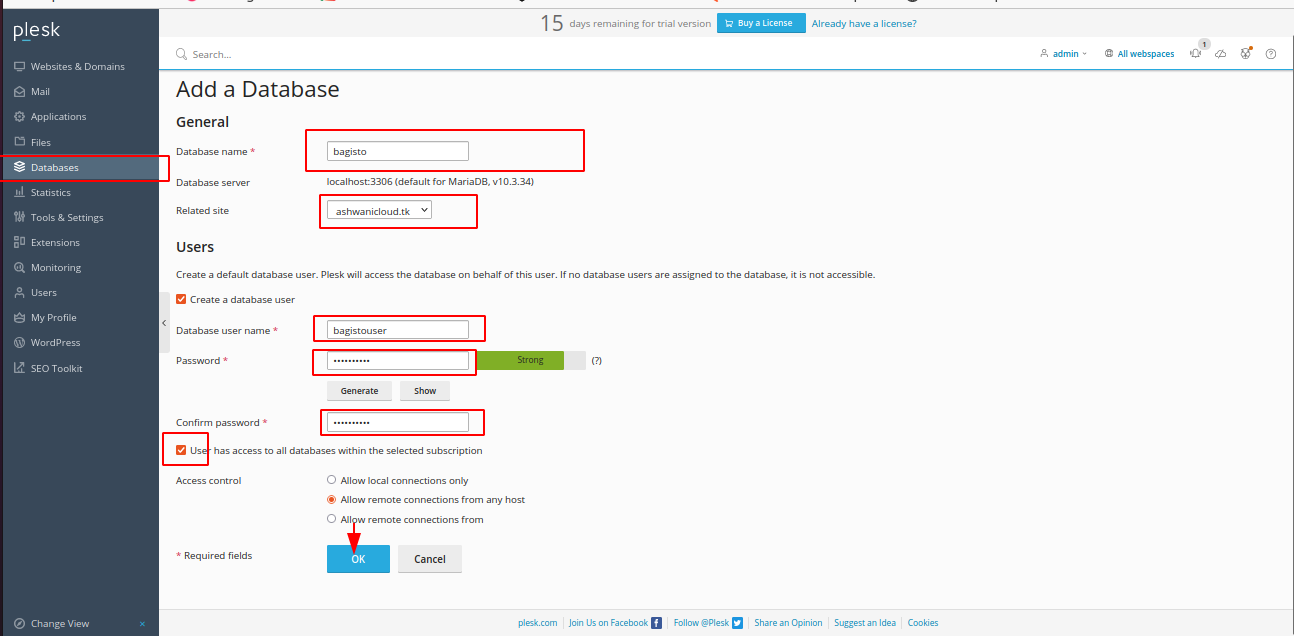
Step 6 – Creation of a Database
Create a database and a user, and after that give the user access to the database with the necessary permissions.
Step 7: Bagisto Configuration
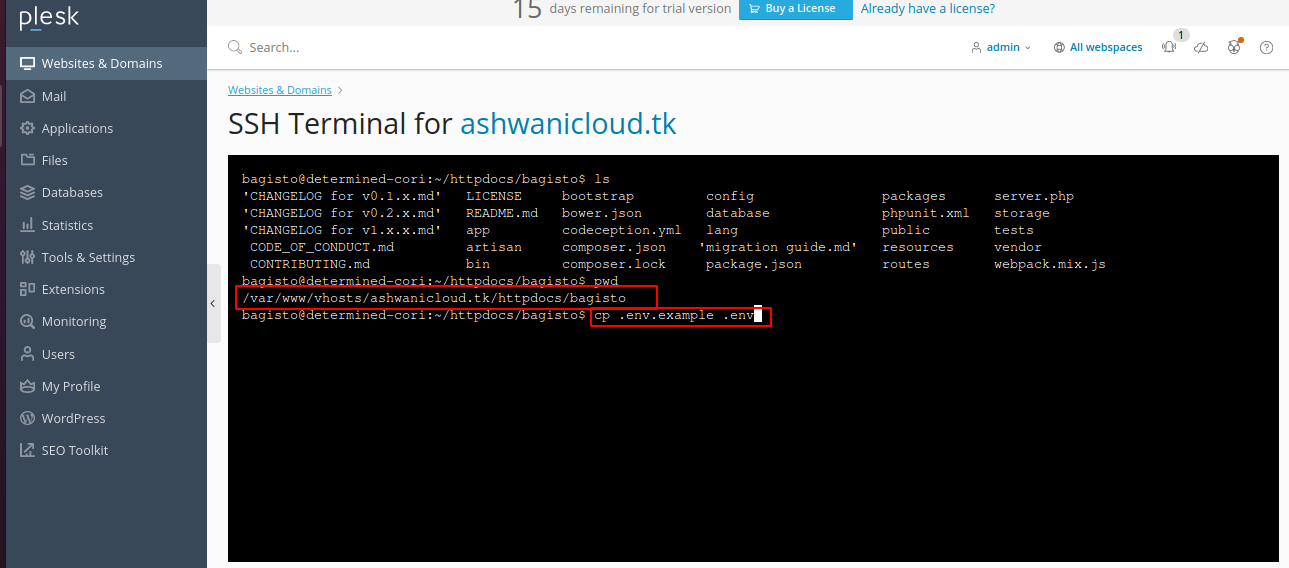
Now create the Bagisto configuration file i.e., ‘.env’ in the Bagisto root directory by using the existing ‘env.example’ file.
$ cp .env.example .env
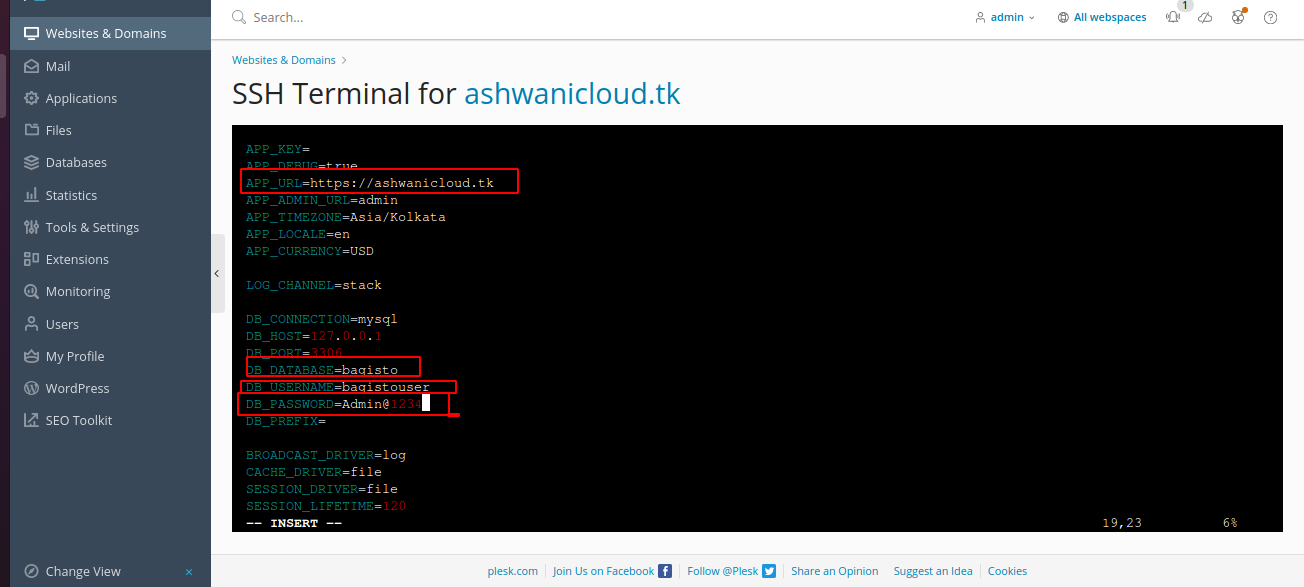
Now put the created database details like DB name, username, password, and App URL in the ‘.env’ file.
Laravel eCommerce Multi-Tenant SaaS Module
Laravel Multi-Tenant E-commerce SaaS Module:- This is an eCommerce virtual mall, where multiple vendors can sign up and create their own e-commerce store with their domain name.
Bagisto is an online e-commerce platform that helps anyone start their e-commerce store within a few minutes without any technical requirements.
However, the merchant doesn’t need to add any plugin to create their store, it is the full end-to-end integration. You have to just sign up then you can start your business.
Features of Laravel eCommerce Multi-tenant SaaS Module
- Admin can easily set up and manage saas based eCommerce solution
- Flexibility and scalability for your business
- Multiple eCommerce merchants can access it at a time
- The super admin can view the product list of their merchant’s store
- Super admin will get the email notification whenever a customer orders a product from his merchant’s store
- The super admin can also view the customer data of their merchant’s store
- Manage multiple businesses with custom domains or self-provided domains
- Super admin can also view the orders of their merchant’s store
- The Merchant can Change the domain from channel settings
- The Merchant manages their store using their dedicated admin dashboard
- Supported the Bagisto Velocity theme
Note:-
- Do not install Bagisto till you configure this extension.
- Do not seed your database at any point using ‘php artisan db: seed‘ (seeding is done automatically when the seller is registered)
- Run the command from the root in the terminal ‘composer create-project
- Find the ‘.env’ file in the root directory then change the APP_URL parameter to your application’s domain name.
- Add your database credentials in.env where params DB_DATABASE, DB_USERNAME, and DB_PASSWORD should be added as your database credentials.
- DB_DATABASE is the name of your database where all the tables will be created.
Step 8: Installation of Laravel eCommerce Multi-Tenant SaaS Module
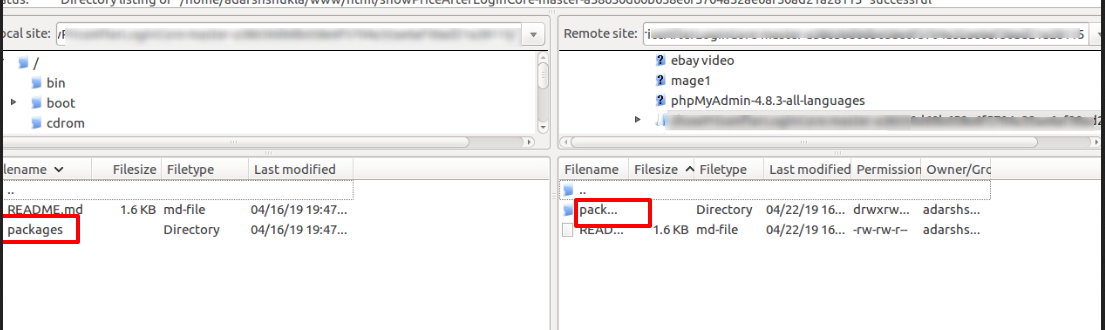
Customers will get a zip folder after purchasing the extension. After that, Unzip the respective extension zip and then merge the “package” folder into the project root directory.
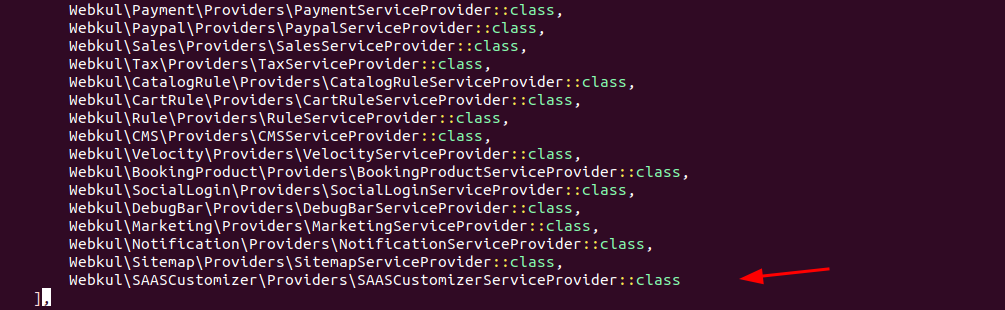
1-Go to config/app.php file then add the following line under ‘providers’ like below
Webkul\SAASCustomizer\Providers\SAASCustomizerServiceProvider::class
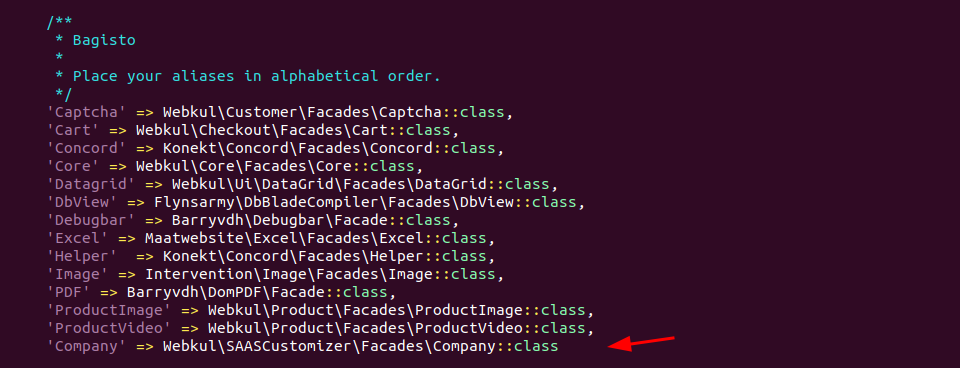
2-Do the below entry in config/app.php “aliases“
‘Company’ => Webkul\SAASCustomizer\Facades\Company::class
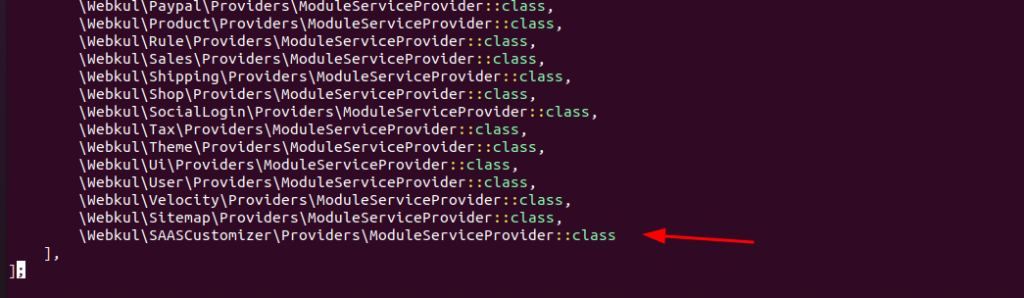
3-Go to config/concord.php and packages/Webkul/Core/src/Config/concord.php files and add the following line under the ‘modules’ index in both files:
\Webkul\SAASCustomizer\Providers\ModuleServiceProvider::class
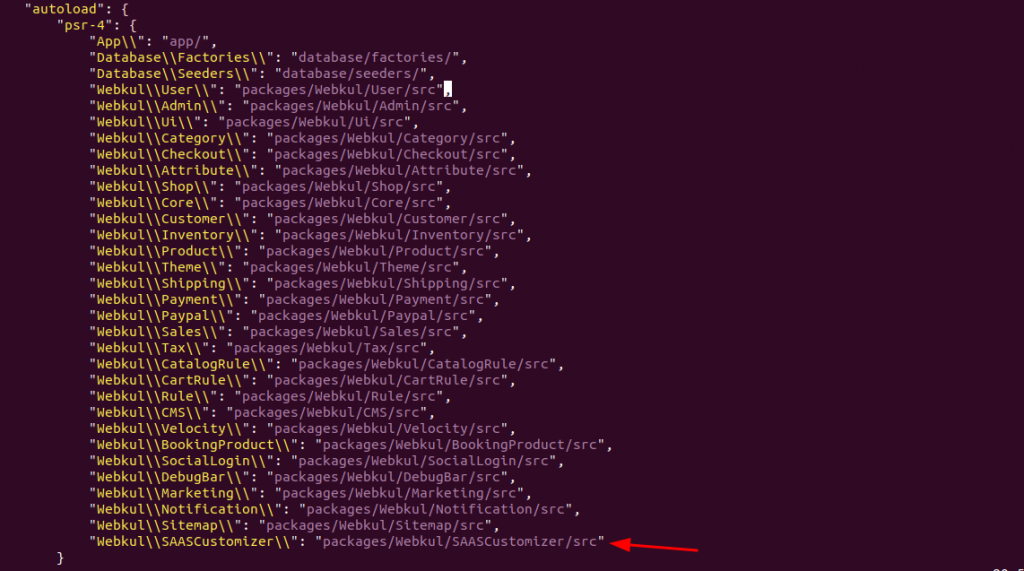
4- Then go to the composer.json file inside the Bagisto root directory and add the following line under ‘psr-4’
“Webkul\\SAASCustomizer\\”:”packages/Webkul/SAASCustomizer/src”
5-Another entry inside the file(‘app/Http/Kernel.php’):
After that, in this file, you can find an array of middleware groups’ inside it there is a key named ‘web’ inside it does an entry:
\Webkul\SAASCustomizer\Http\Middleware\ValidatesDomain::class

remove the code in the ‘middleware’ array.
\Webkul\Core\Http\Middleware\CheckForMaintenanceMode::class,
add the code in the ‘middleware’ array.
\Webkul\SAASCustomizer\Http\Middleware\SaasCheckForMaintenanceMode::class,

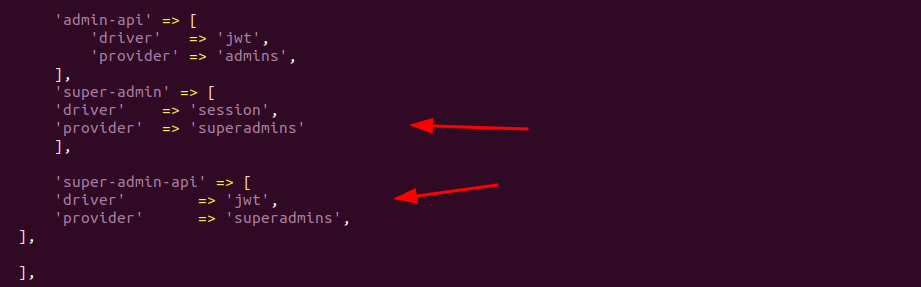
6-Find a file auth.php present inside the config folder from the root and do the following entries:
Insert the below in ‘guards’ array
‘super-admin’ => [
‘driver’ => ‘session’,
‘provider’ => ‘superadmins’
],
‘super-admin-api’ => [
‘driver’ => ‘jwt’,
‘provider’ => ‘superadmins’,
],
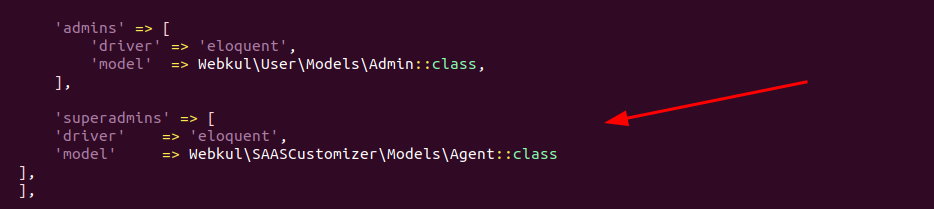
7-Then insert the below code in the ‘provider’ array
‘superadmins’ => [
‘driver’ => ‘eloquent’,
‘model’ => Webkul\SAASCustomizer\Models\Agent::class
],
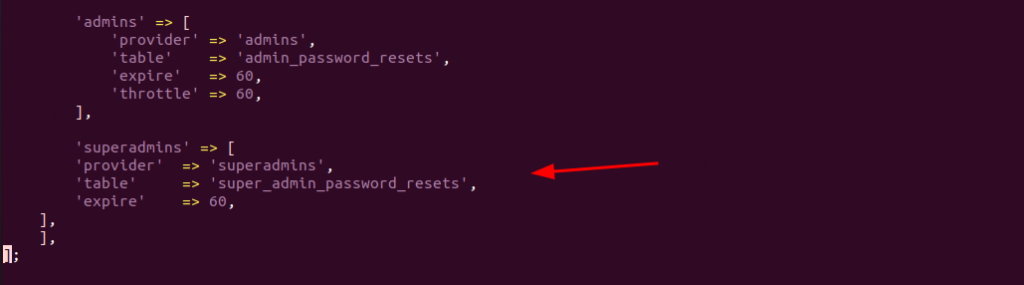
8-insert the below code in the ‘passwords‘ array
‘superadmins’ => [
‘provider’ => ‘superadmins’,
‘table’ => ‘super_admin_password_resets’,
‘expire’ => 60,
],
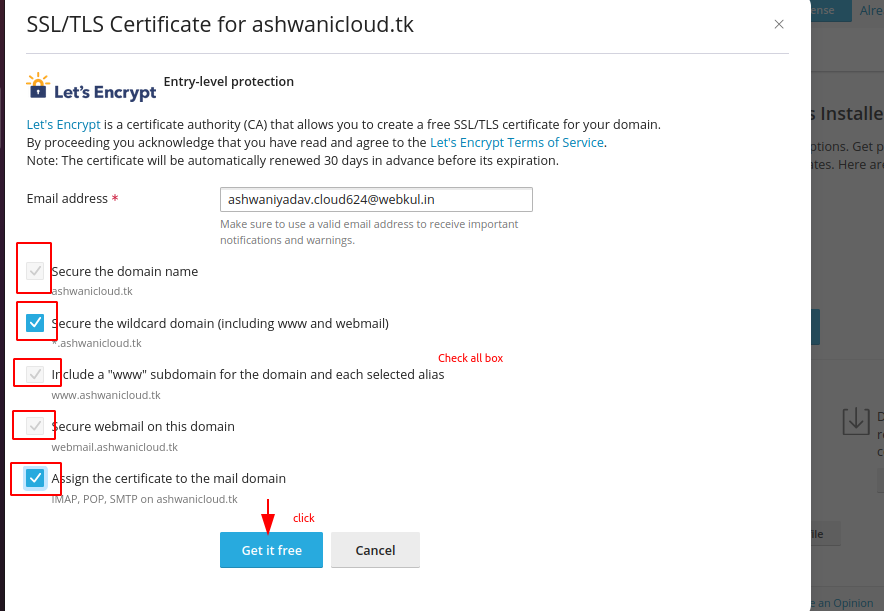
Step 9: Install Free SSL for the site
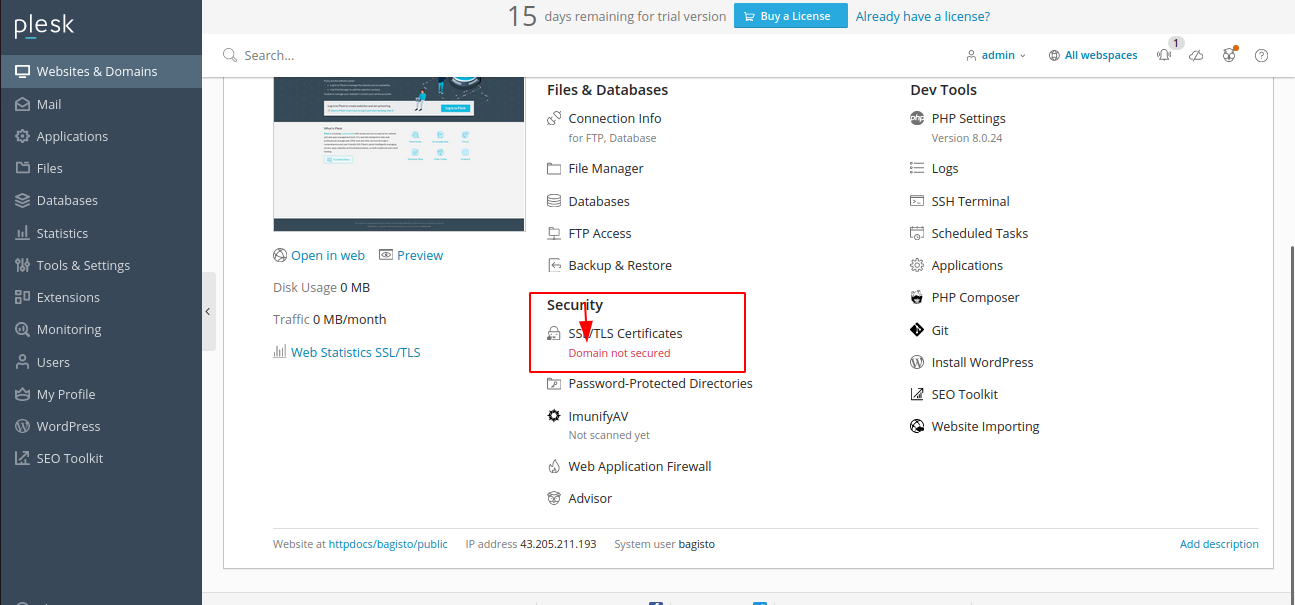
Install a Let’s Encrypt free basic certificate.
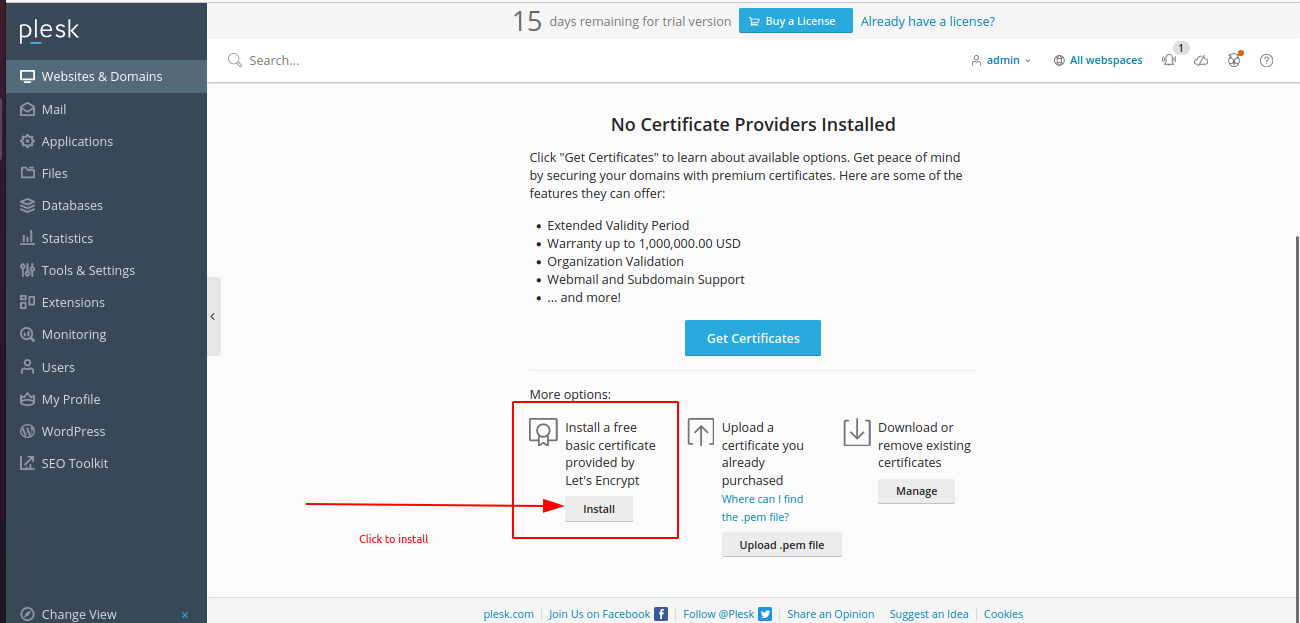
SSL/TLS Certificate for Domain.
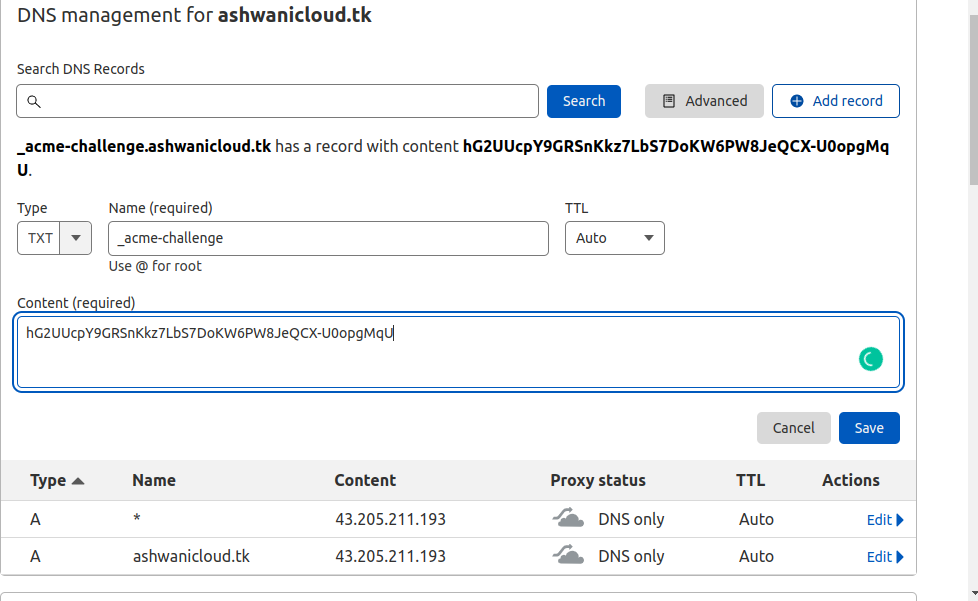
Add the below TXT records in DNS Manager in order to generate the wildcard SSL. After adding the record click on reload button.
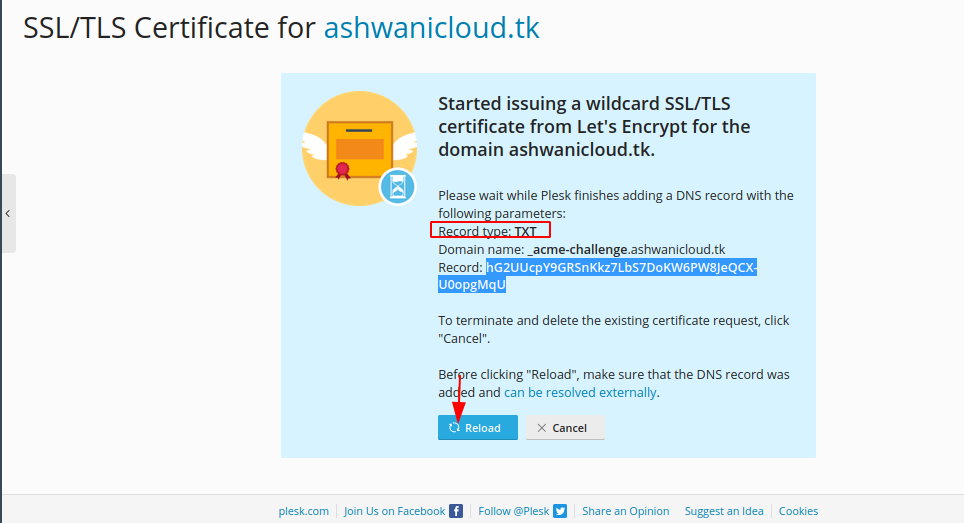
In my case, I am using Cloudflare as a DNS manager,
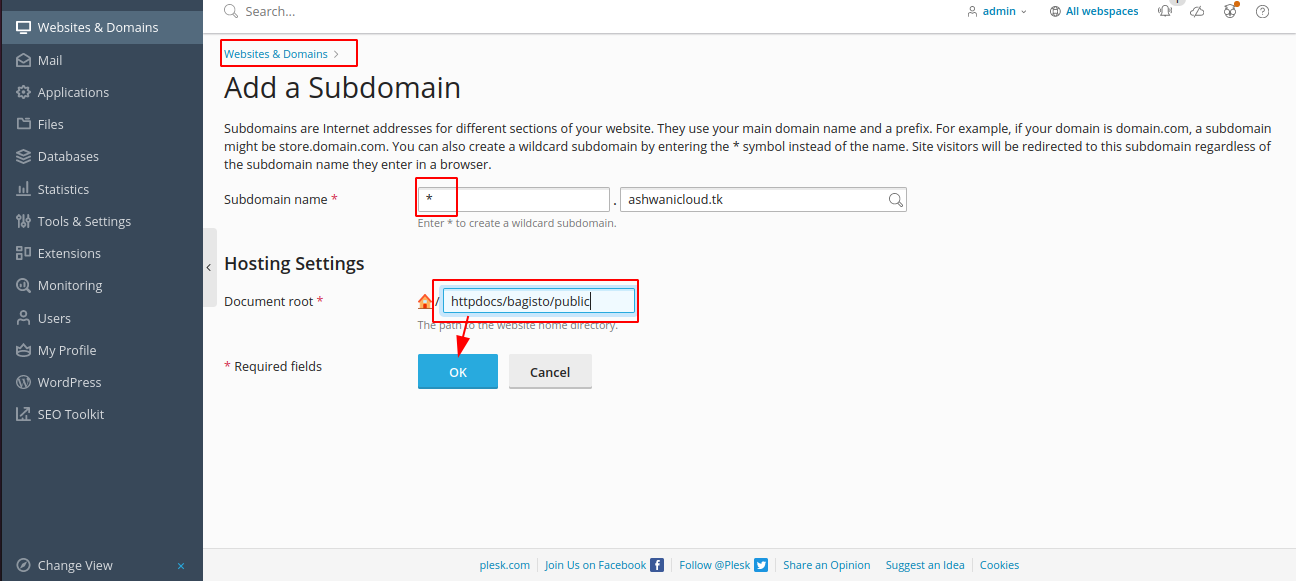
Adding Sub Domain
Now open the terminal and run the below command on the Bagisto root directory.
$ composer dump-autoload
$ php artisan SAAS:install
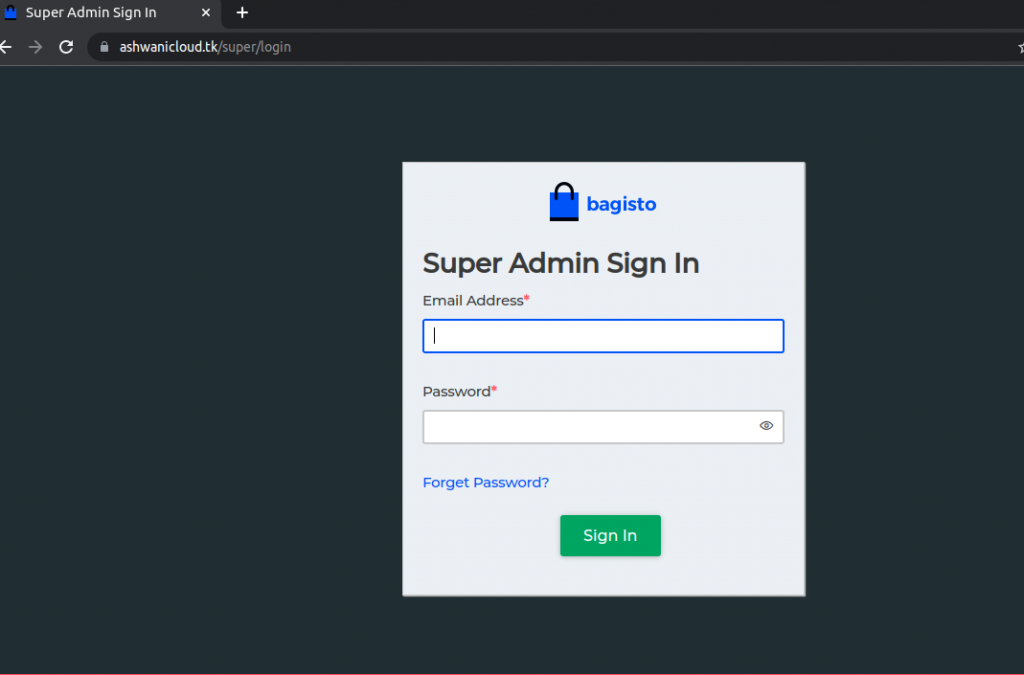
* Access the super admin panel using: https://ashwanicloud.tk/super/login.
Access the dashboard after that by going to https://ashwanicloud.tk/company/register
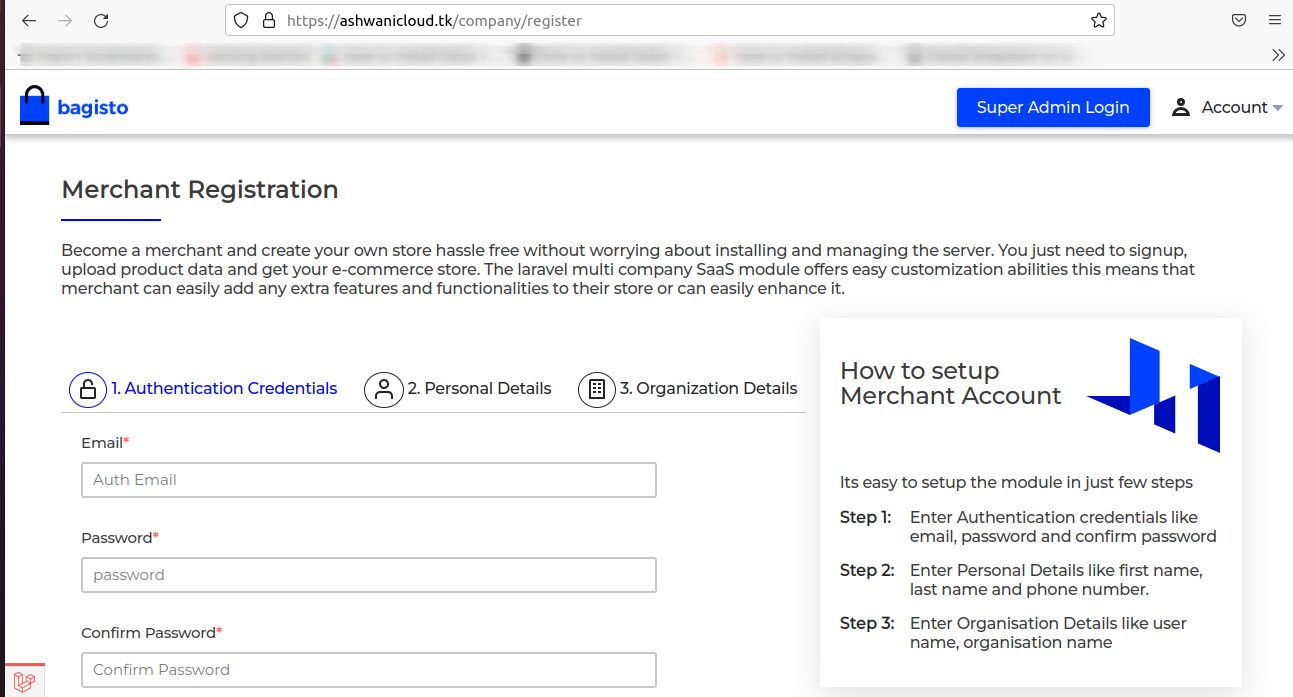
Merchant Registration
There are three steps to register on the SaaS module.
Step 1: The merchant has to enter the Authentication Credentials like email, and password, confirm the password then click on Continue.

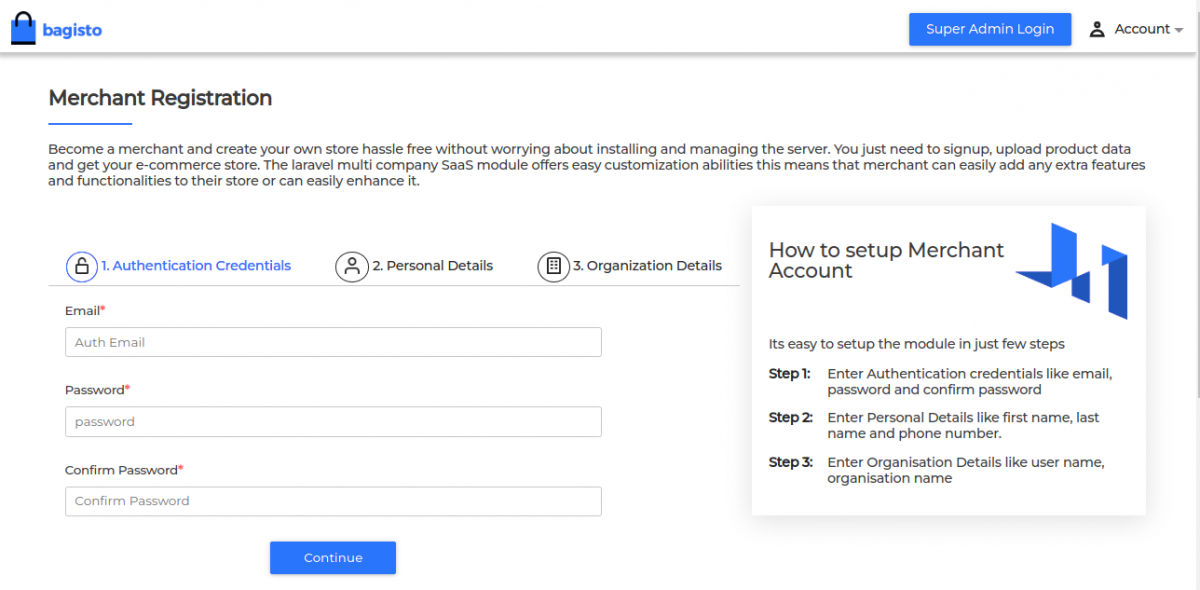
Step2: The merchant has to enter the Personal details like First Name, Last Name, Phone number
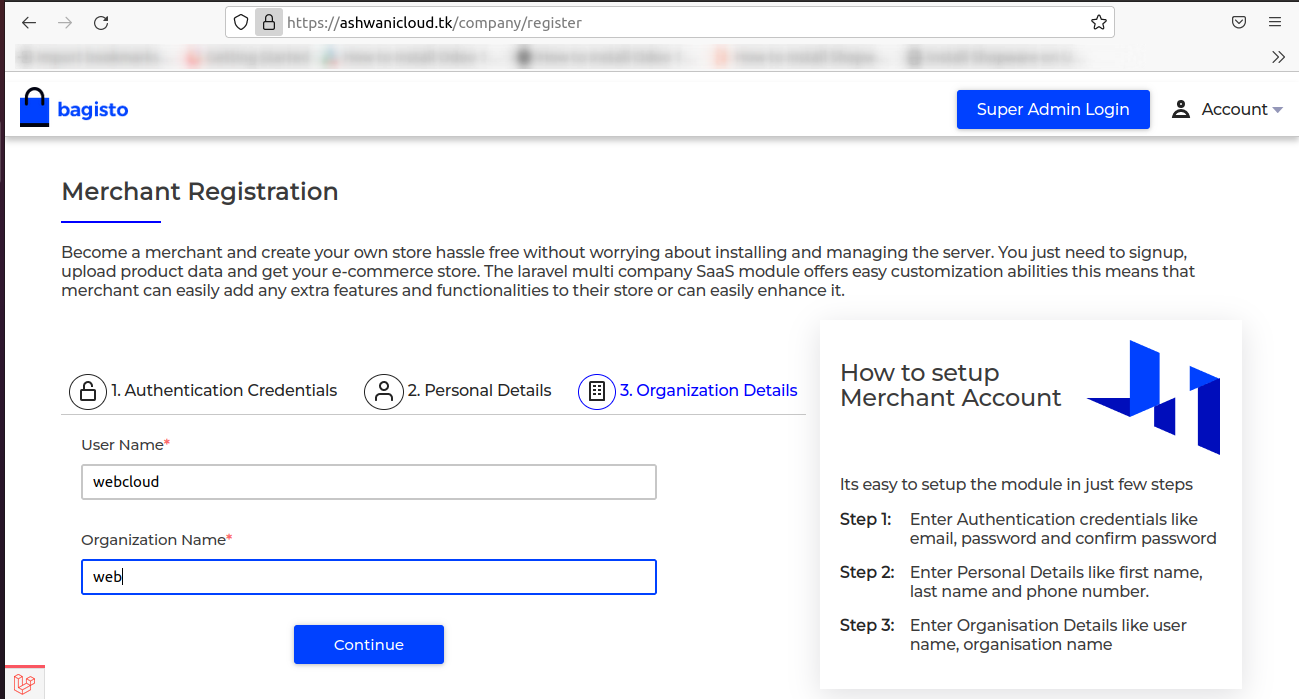
Step 3: The merchant has to enter the Organization details like user name and Organization name.
Merchant Front end
Therefore after registration, the seller’s front will look like
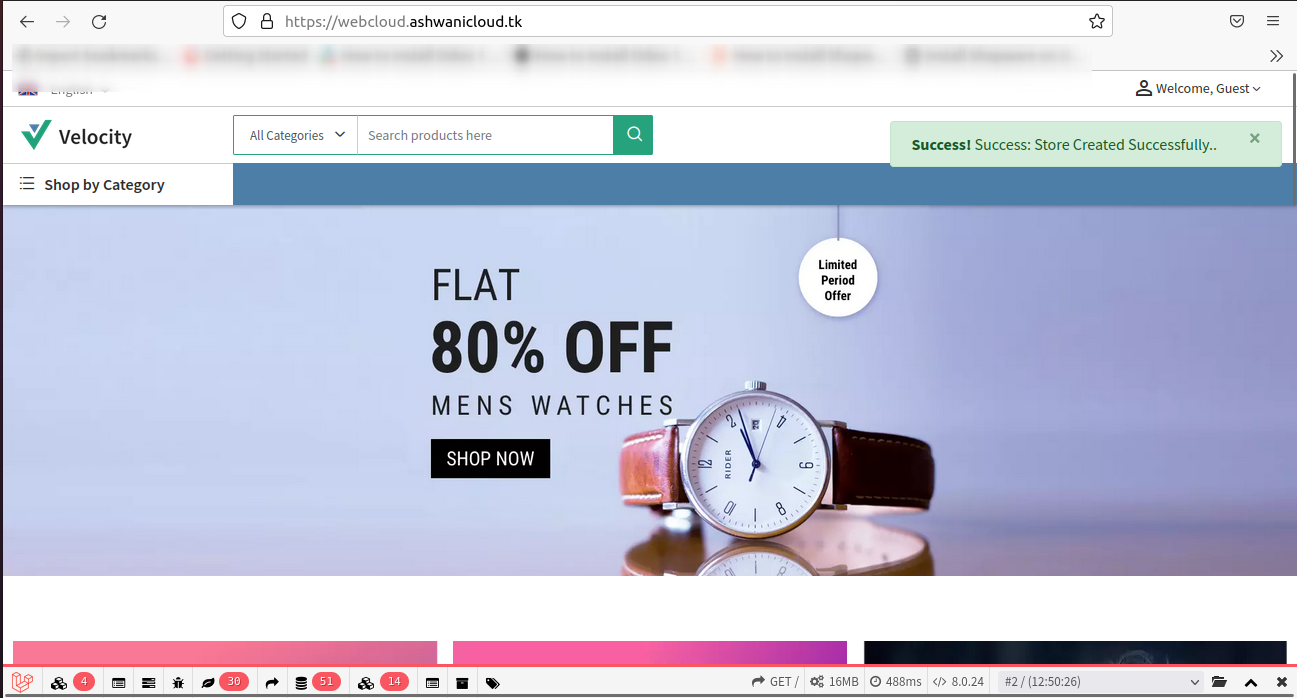
The tenant has been created successfully, so by following the same procedure you can create multiple tenants on your website.
Need Support?
Thank You for reading this Blog!
For further more interesting blogs, keep in touch with us. If you need any kind of support, simply raise a ticket at https://webkul.uvdesk.com/en/.
For further help or queries, please contact us or raise a ticket.