To launch QloApps via CloudFormation, subscribe to the product and deploy it with the provided template. Follow these steps to set up and configure your stack.
1. Go to AWS Marketplace
- Open a browser and navigate to: https://aws.amazon.com/marketplace/
- Make sure you are logged in with your AWS account.
2. Search for Your Product
- In the search bar, type the name of your product.
- Click Enter to view results.
- From the results list, click your product’s name to open its product detail page.
3. Click “View purchase options”
- This will take you to the subscription confirmation page.
4. Accept Terms
- You will see the Terms and Conditions (including pricing and usage policies).
- Click Accept Terms.
- AWS will start the subscription process.
- This step enables your account to use the product’s AMI/CloudFormation template.
5. Wait for Subscription to Complete
- Once the subscription is complete (usually a few seconds to a minute), the page will update.
- After that, you will see the “Continue to Configuration” button.
6. Continue to Configuration
- Click Continue to Configuration.
- Here you will see:
- Delivery method (choose CloudFormation template)
- Software version
- Region selection
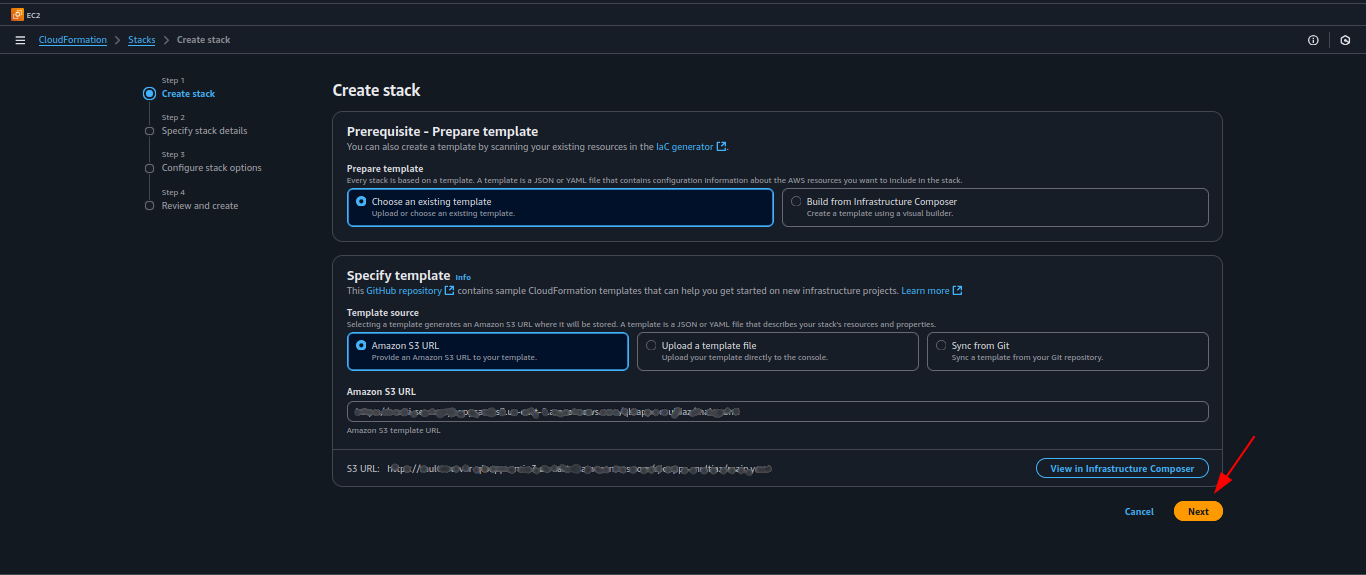
7. Launch in CloudFormation
- When you chose Launch CloudFormation, it will redirect you to the AWS CloudFormation console with:
- Template URL pre-filled
- Click Next to proceed with stack configuration.
8. Specify Stack Details
On this screen, you will provide the configuration details for your CloudFormation stack.
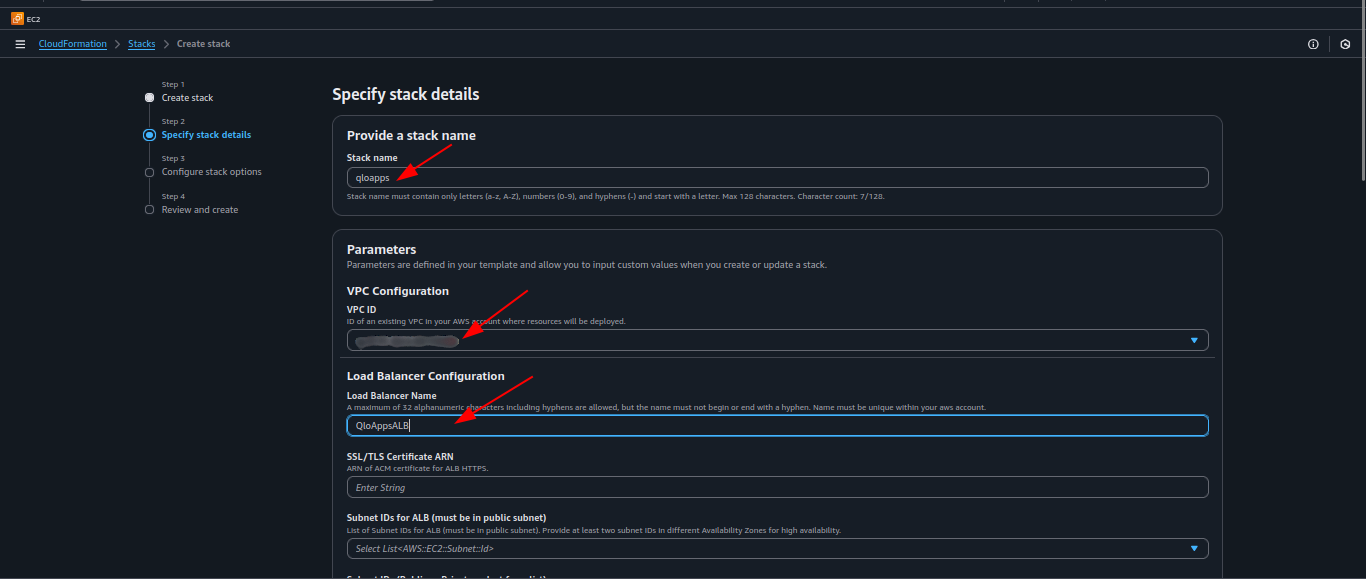
- Stack name — Enter a name for your stack.
- Example: qloapps
- This name helps you identify the stack in the CloudFormation console later.
- VPC ID — From the dropdown, select the VPC where you want to deploy the resources.
- You can use an existing VPC in your account.
- Load Balancer Name — Enter a name for the Application Load Balancer.
- Example: QloAppsALB
- The name must be unique within your AWS account and region.
- SSL/TLS Certificate ARN — This is required for enabling HTTPS on the load balancer.
If you don’t already have an SSL certificate in AWS Certificate Manager (ACM), follow these steps to request one
Requesting a Public SSL Certificate in ACM:- Go to the AWS Management Console and open Certificate Manager.
- Click Request → Select Request a public certificate → Click Next.
- In the Fully qualified domain name (FQDN) field, enter your domain name (e.g., example.com) and, if needed, add www.example.com as an additional name.
- Choose DNS validation (recommended) for domain ownership verification.
- Click Request.
- After the request is created, open the certificate details page.
- You will see a CNAME record that needs to be added to your domain’s DNS configuration (via Route 53 or your DNS provider).
- Once the DNS record is validated, the certificate status will change to Issued.
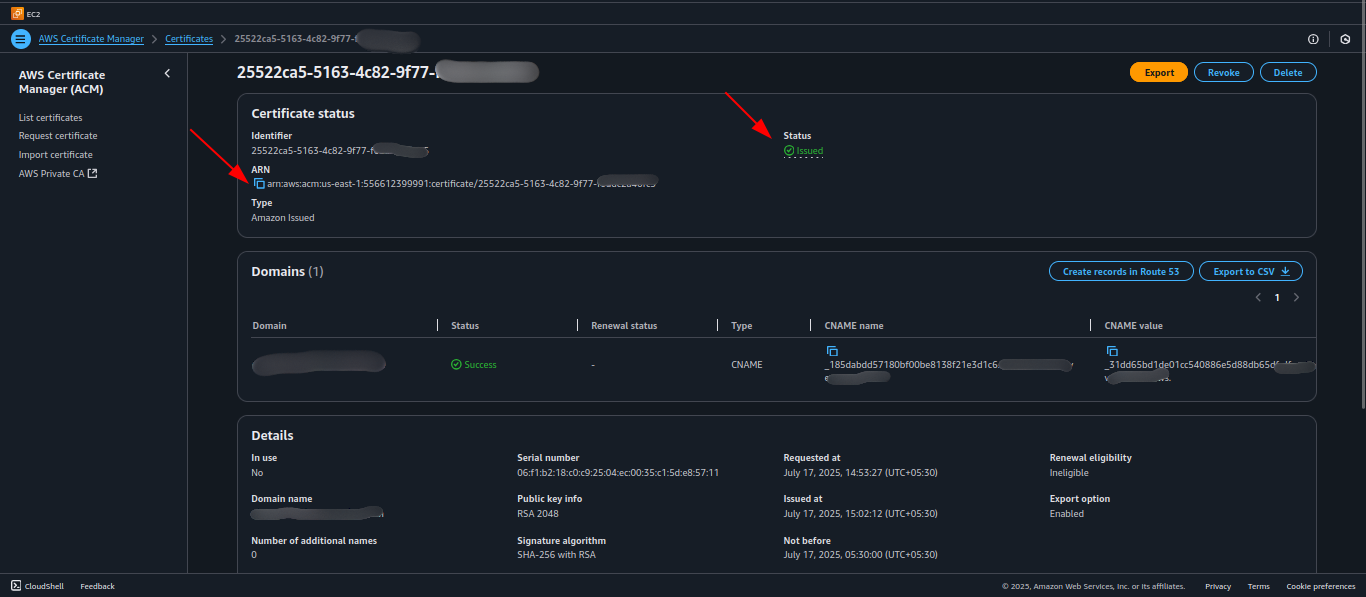
- Getting the ARN:
- Once issued, go back to ACM, select your certificate, and copy the Amazon Resource Name (ARN) from the certificate details page.
- Paste this ARN into the SSL/TLS Certificate ARN field in the CloudFormation stack.
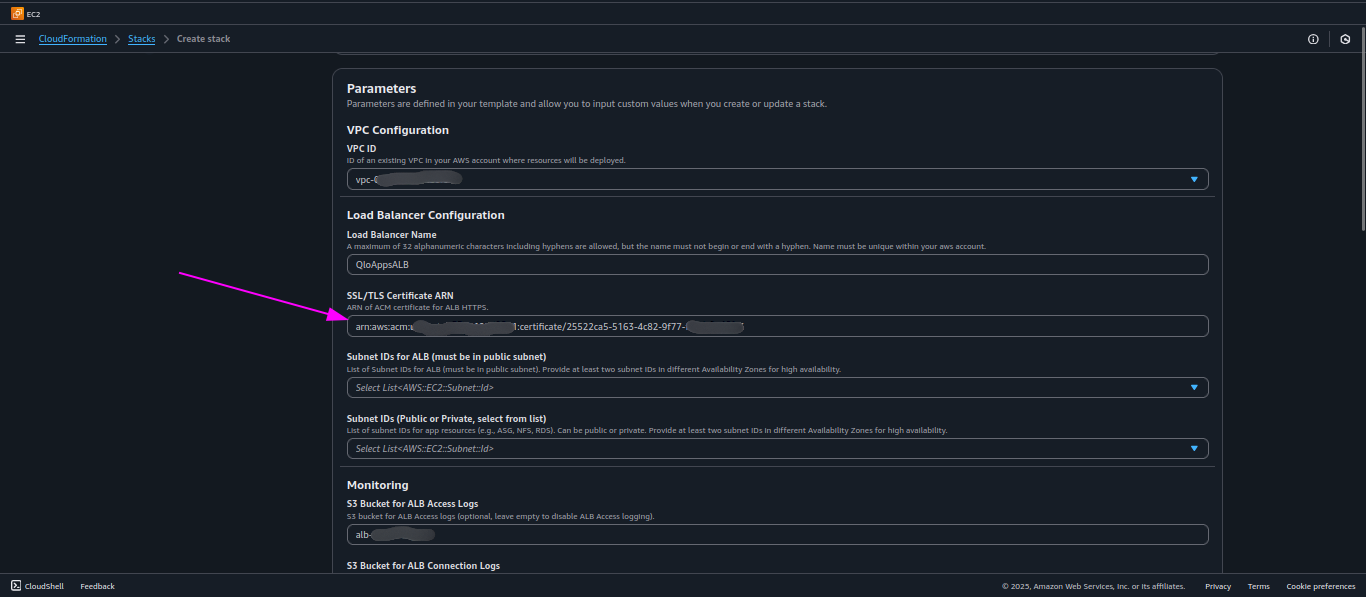
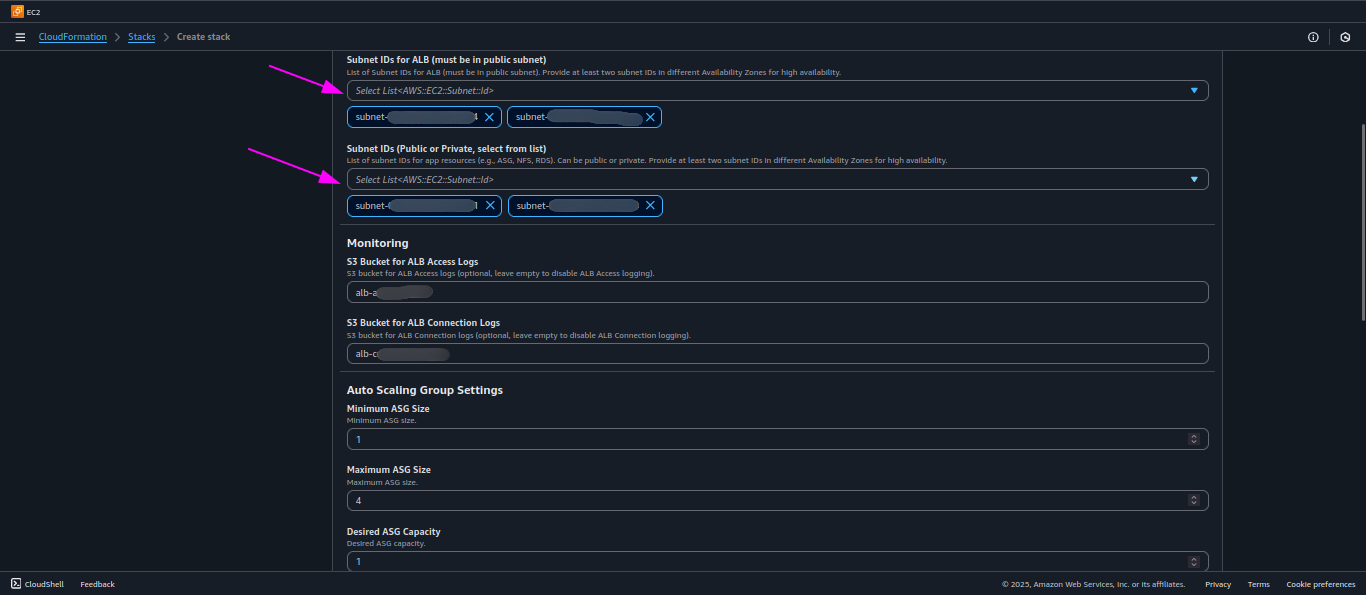
- Selecting the Appropriate Subnets
- After adding the SSL/TLS certificate ARN, the next step is to select the subnets for your resources. When you click on the subnet selection dropdown in the CloudFormation form, you will see the list of available subnet IDs in your VPC.
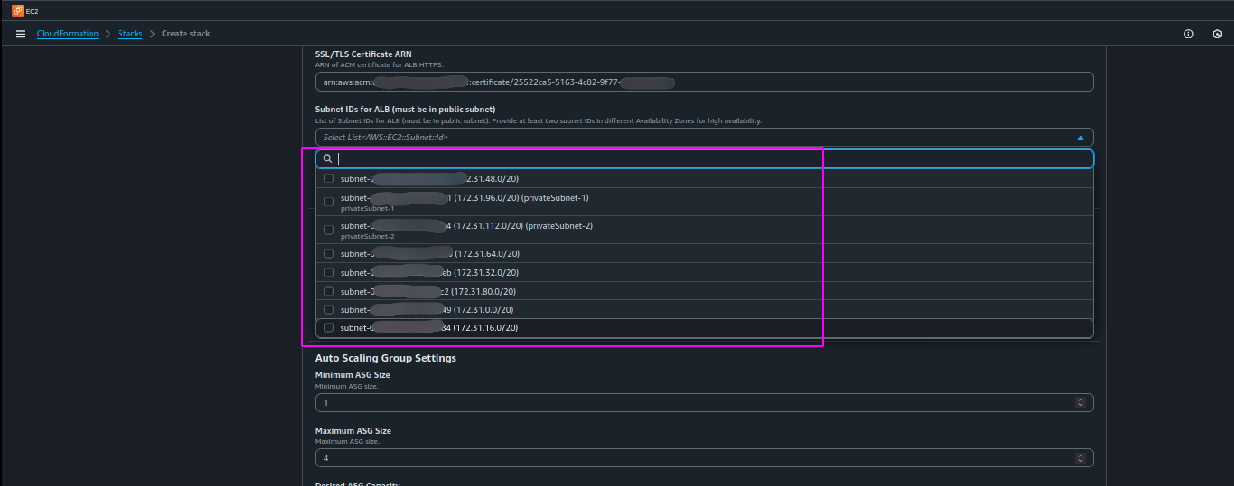
We will start with the subnets for the Application Load Balancer (ALB):
- Always choose public subnets for the ALB.
- This is because the ALB must be accessible from the internet to route traffic to your application. If you accidentally select private subnets for the ALB, it will not be reachable from outside your VPC.
- For high availability of your QloApps, you must select at least two subnets that are in different Availability Zones (AZs). This ensures that your load balancer can continue to serve traffic even if one AZ experiences downtime.
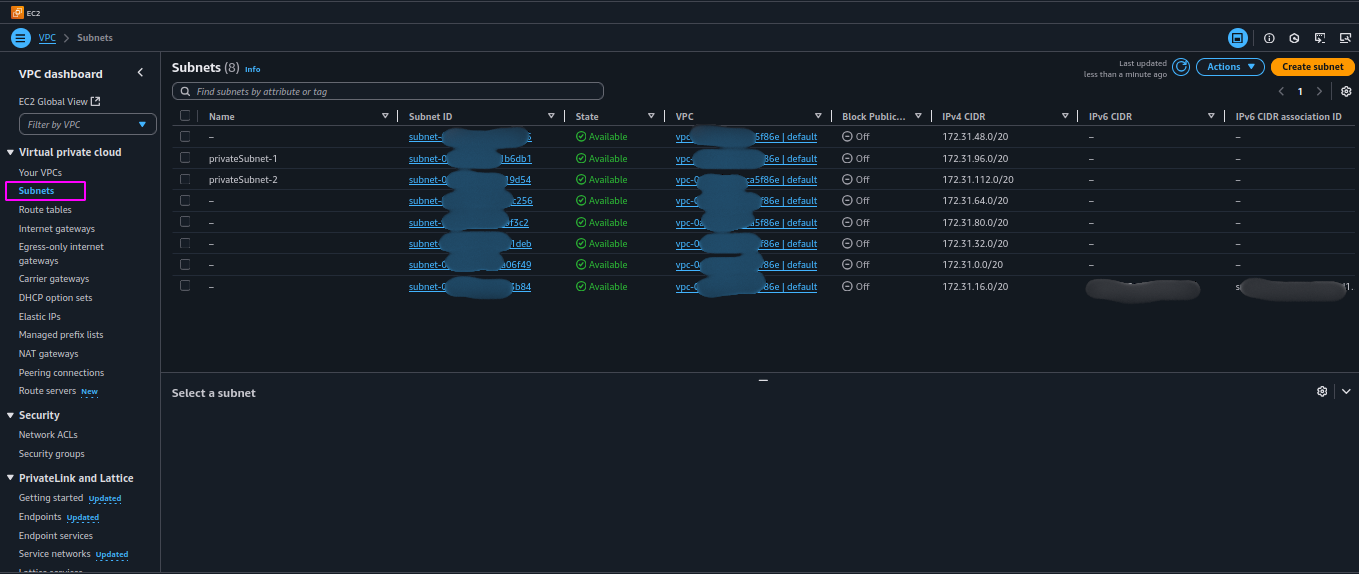
- Double-check that the selected subnets are in the correct AZs and are indeed public (i.e., associated with a route table that has an internet gateway).
- To ensure which subnets are public and which are private, go to the VPC service.
- Click “Subnets” to list all subnets in the VPC.
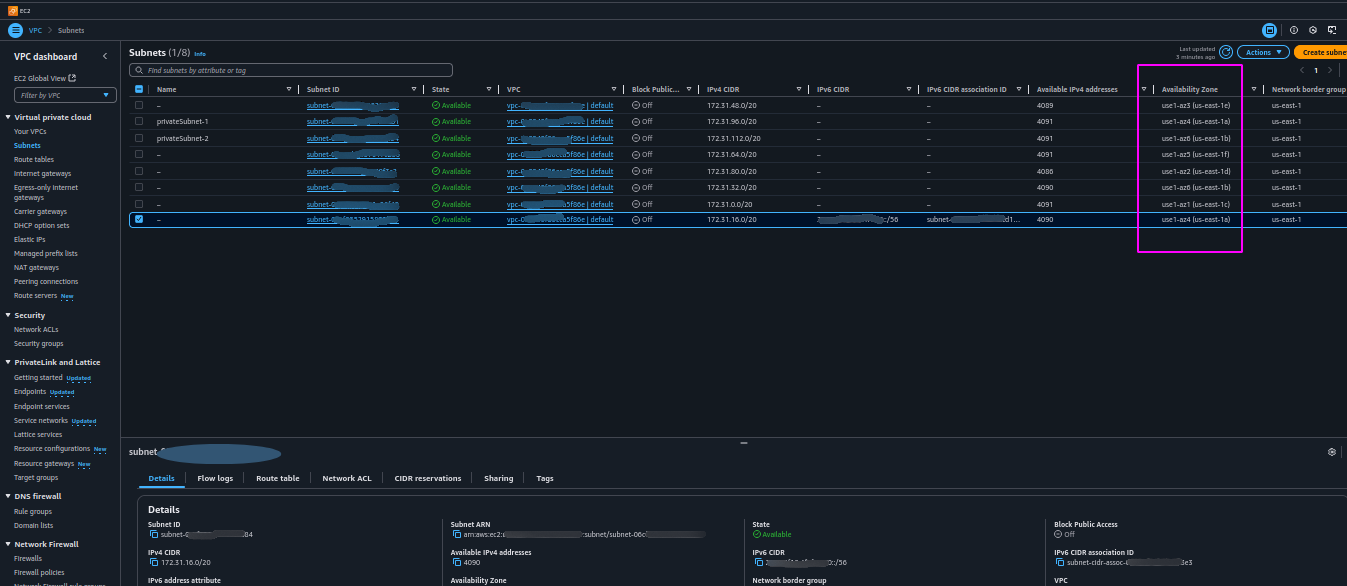
- Check each subnet’s “Details” tab for its Availability Zone.
- Go to the subnet’s “Route Table” tab to find the associated route table.
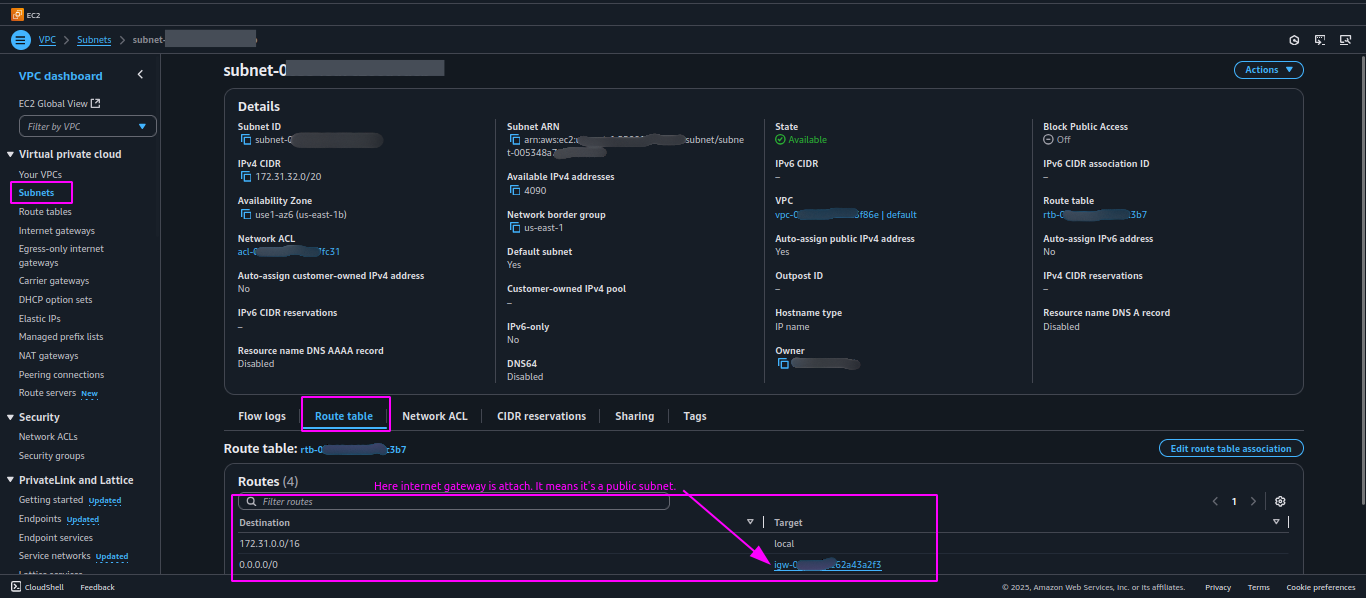

- Check the route table’s “Routes” tab public subnets have a route to an Internet Gateway (e.g., 0.0.0.0/0 → igw-xxxx); private subnets route to a NAT Gateway or lack an internet-bound route.
- Repeat for all subnets to verify AZs and subnet types.
- Once the ALB subnets are chosen, you will need to select the subnets for the application resources such as EC2 instances, RDS database, and NFS server:
- The recommended approach is to use private subnets for these resources. Placing them in private subnets adds an extra layer of security since they are not directly exposed to the internet. Access can still be managed via the ALB, bastion hosts, or VPN.
- If your use case requires direct internet access for these resources (for example, a test environment), you may choose public subnets. However, this is generally not advisable for production environments.
- Benefits of using private subnets include:
- Reduced exposure to external threats.
- More controlled inbound and outbound network traffic.
- Compliance with best practices for security and network architecture.
- Finally, before confirming your subnet selection—whether public or private—always cross-check the Availability Zones:
- The AZs of your application resource subnets should match the AZs of your ALB subnets.
- This alignment ensures low latency between the ALB and your backend resources.
- Monitoring:
- In monitoring section create a new S3 bucket for ALB Access logs and ALB Connection logs, attach a policy mentioned below and replace “127311923021” with the Elastic Load Balancing account ID for the load balancer’s Region (refer to the AWS official documentation for the full list of IDs according to regions).
- Replace the bucket name and your AWS account ID in this policy before attaching it to the S3 bucket policy.
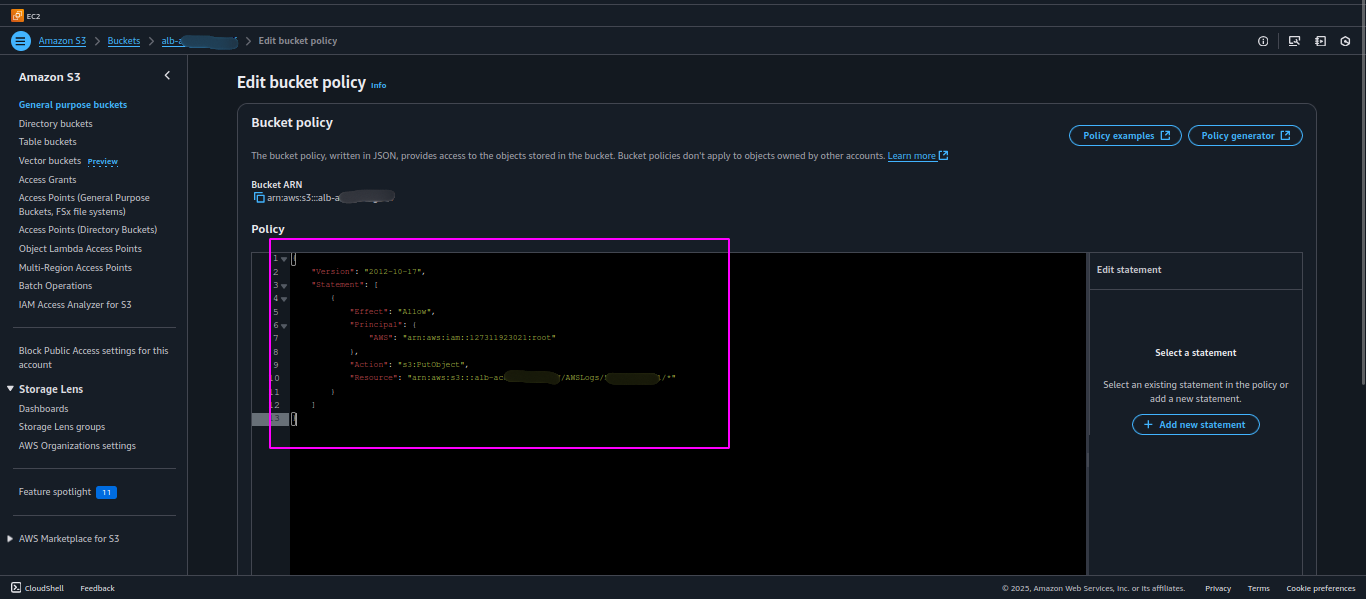
- Policies that you need to attach to the S3 bucket policy.
- This is the policy for ALB access logs.
|
1 2 3 4 5 6 7 8 9 10 11 12 13 |
{ "Version": "2012-10-17", "Statement": [ { "Effect": "Allow", "Principal": { "AWS": "arn:aws:iam::127311923021:root" }, "Action": "s3:PutObject", "Resource": "arn:aws:s3:::alb-access-logs-bucket-name/AWSLogs/<your-aws-account-id>/*" } ] } |
- This is the policy for ALB connection logs.
|
1 2 3 4 5 6 7 8 9 10 11 12 13 14 |
{ "Version": "2012-10-17", "Statement": [ { "Effect": "Allow", "Principal": { "AWS": "arn:aws:iam::127311923021:root" }, "Action": "s3:PutObject", "Resource": "arn:aws:s3:::alb-connection-logs-bucket-name/AWSLogs/<your-aws-account-id>/*" } ] } |
- Update the bucket name, and account id in the bucket policy. Copy the bucket name and enter it in both “S3 Bucket for ALB Access Logs” and “S3 Bucket for ALB Connection Logs” fields to enable logging; if any field is left empty, the corresponding logs will be disabled.
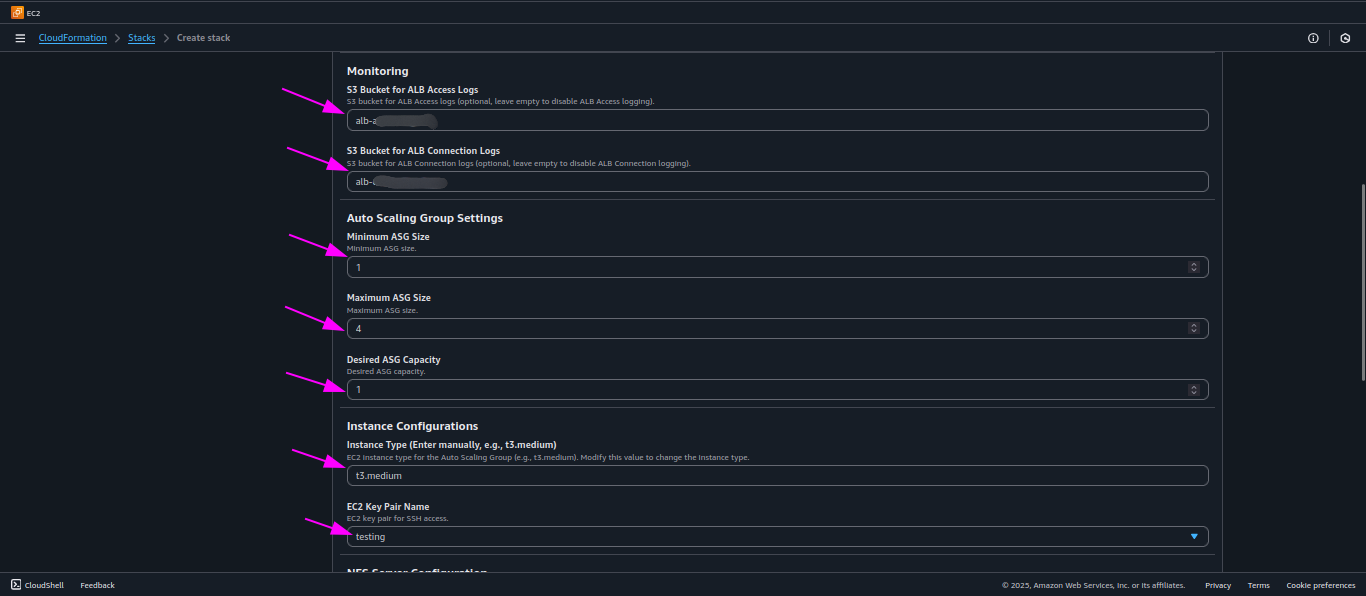
- Auto Scaling Group Settings:
- Enter the minimum, maximum, and desired capacities for the Auto Scaling Group (ASG) to configure the scaling range and initial instance count.
- Set the minimum count to 1 during QloApps configuration to avoid redirection between servers, then adjust the minimum capacity as needed after setup.
- Instance Configurations:
- For instance configuration, specify the instance type and EC2 key pair for SSH access to the server. Select the instance type according to your needs and enter it in the cloudformation stack (refer to AWS official documentation for EC2 instance type selection).
- NFS Server Configuration:
- Select the instance type for your NFS server (check AWS docs for selecting instance type). Then choose the storage size for the shared storage, which will be mounted and accessible by all EC2 instances for QloApps application.
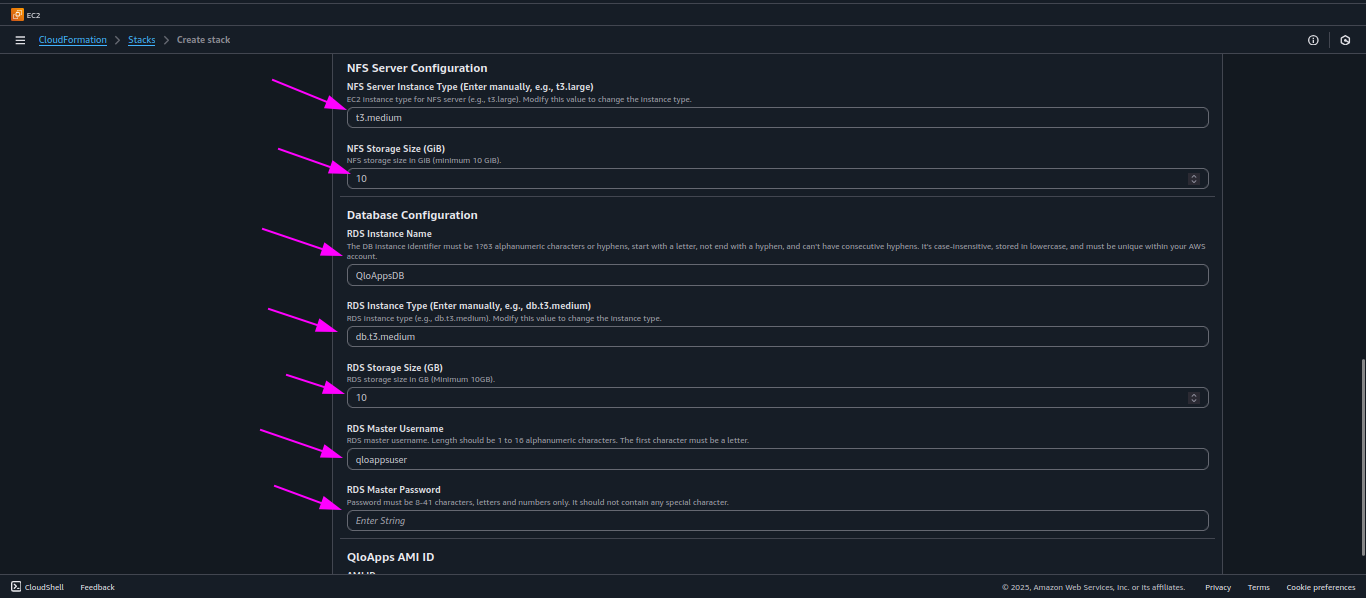
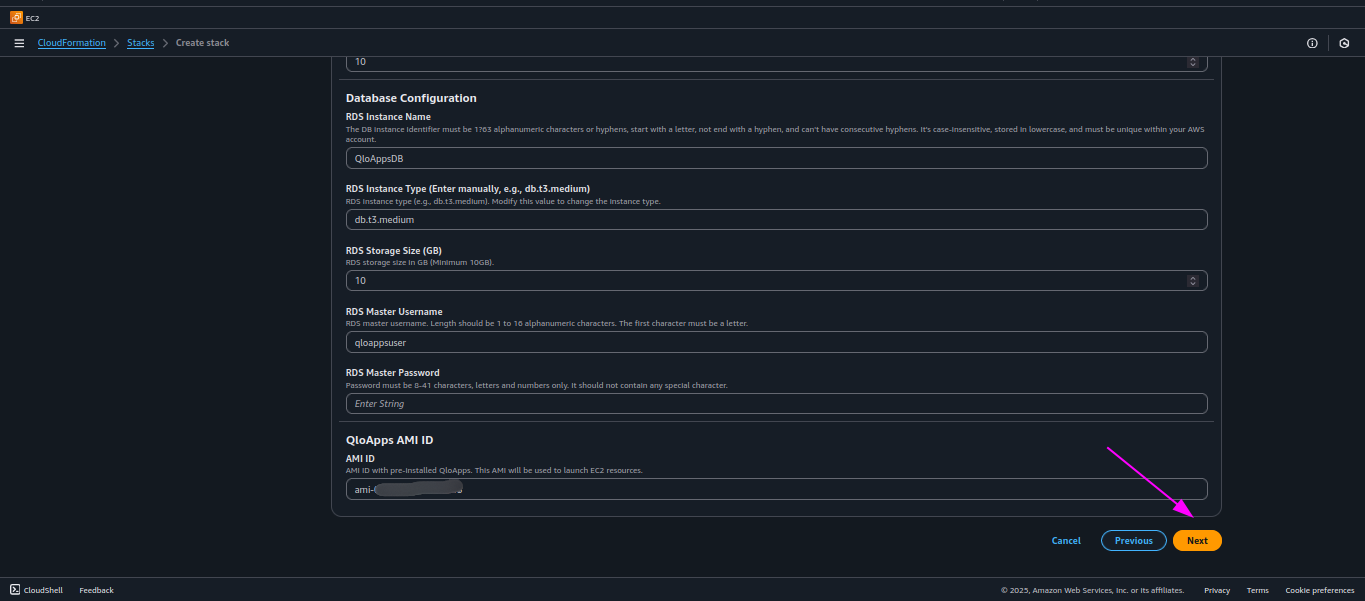
- Database Configuration:
- Enter a unique RDS instance name for QloApps Database.
- Select the RDS instance type (check AWS docs for options, e.g.,
db.t3.medium). - Set the storage size in GB (minimum 10 GB).
- Provide the master username and master password for database access.
- AMI ID:
- The AMI ID will be pre-filled and should not be changed. This AMI comes with the QloApps application pre-installed and pre-configured, ensuring that all necessary dependencies are already in place for smooth deployment.
- After this click on next button.
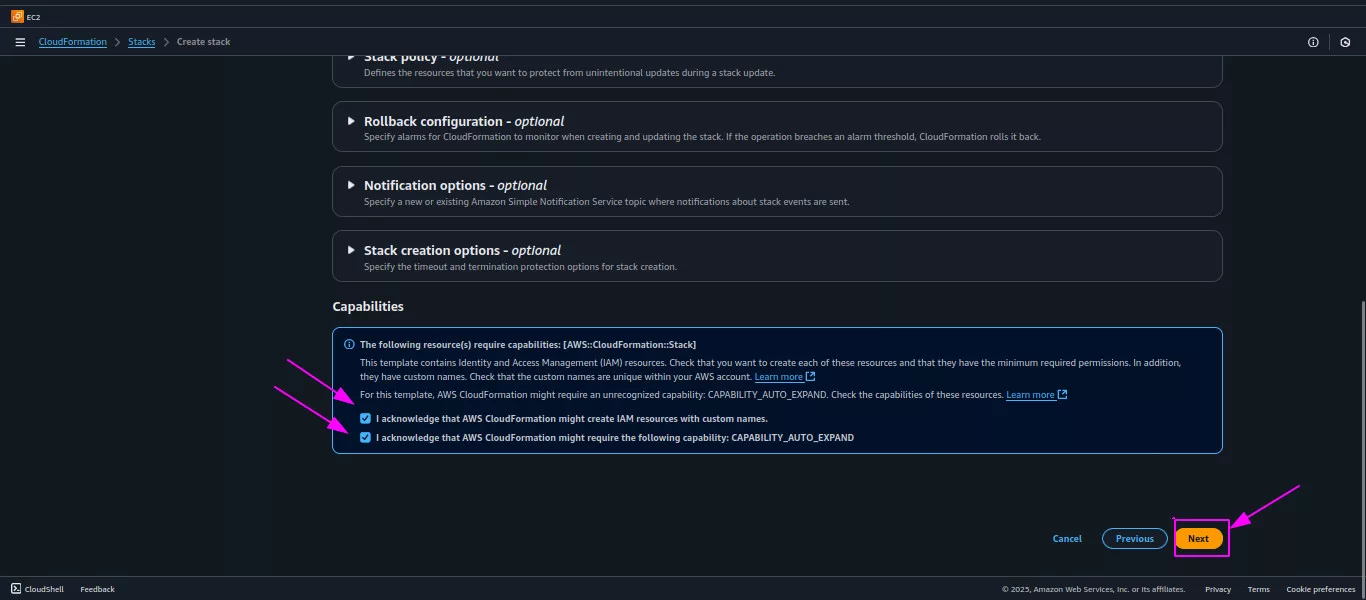
- After this, select these checkboxes and click the Next button.
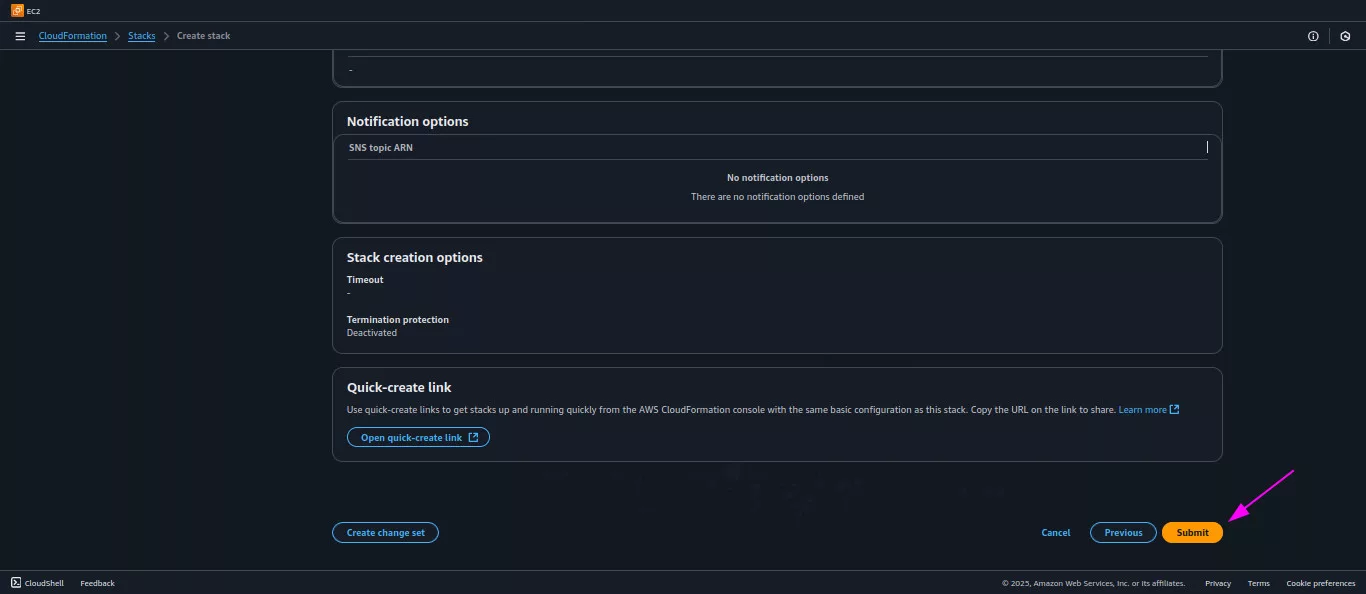
- After verifying all the details, click the Submit button.
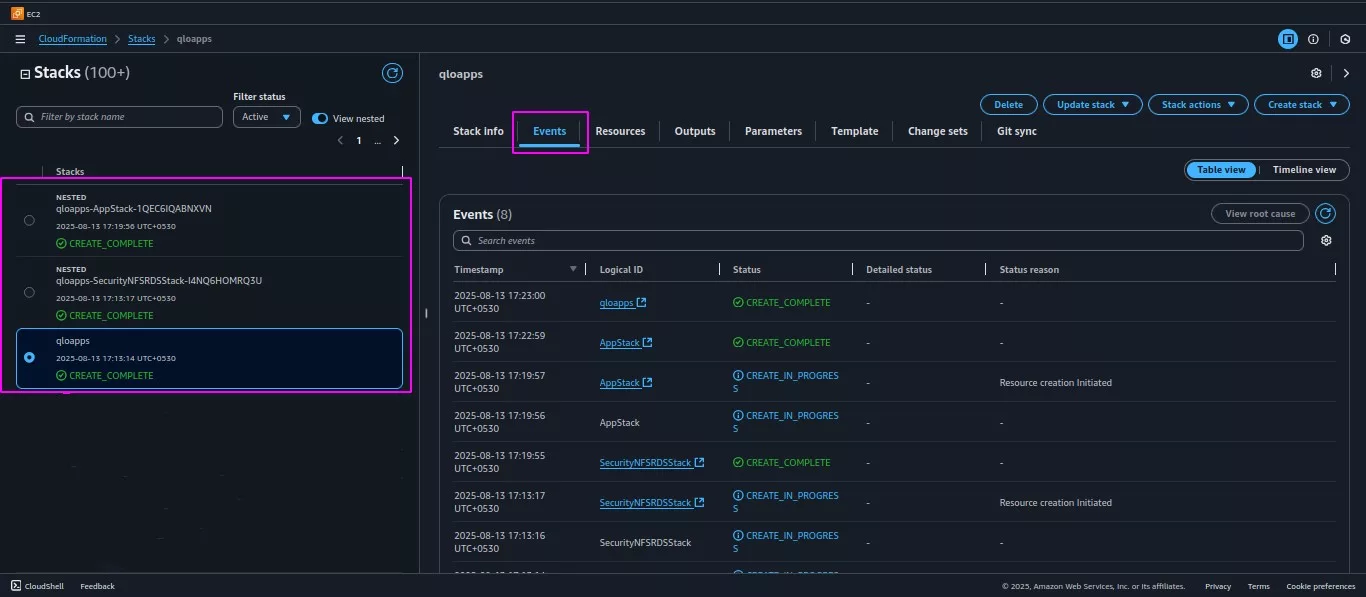
9. Launching the Stack
Once you click Submit, AWS CloudFormation starts processing your template:
- Template Validation – CloudFormation first checks your YAML/JSON template for syntax errors and ensures all parameters, mappings, and resources are valid.
- Resource Creation – It begins creating resources in the correct dependency order (e.g., Security Groups before ALB, etc.).
- Progress Tracking – You can monitor the status in the Events tab of the CloudFormation console, where each resource shows
CREATE_IN_PROGRESSorCREATE_COMPLETE. - Error Handling – If something fails (e.g., wrong parameter value), CloudFormation will roll back all created resources.
- Stack Completion – Once all resources are created successfully, the stack status changes to CREATE_COMPLETE. You can then access your deployed application using the output values (like ALB DNS name).
10. Post-Stack Creation: Configuring Internet Access
After your CloudFormation stack is created, the next step depends on your subnet selection:
- If you selected private subnets – You must create a NAT Gateway before proceeding. This is essential to provide internet access to your application servers, allowing QloApps to download updates and connect to external services.
- If you selected public subnets – You can skip this step, as your application servers will already have direct internet access.
Make sure this network setup is complete before starting the QloApps configuration.
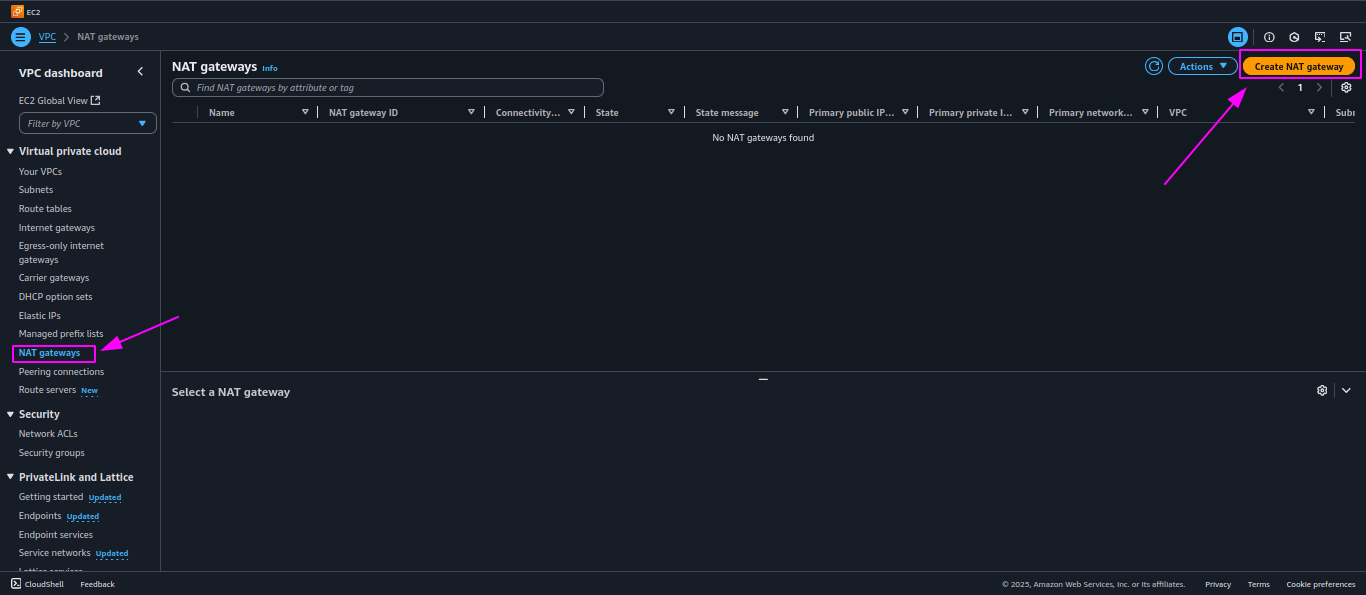
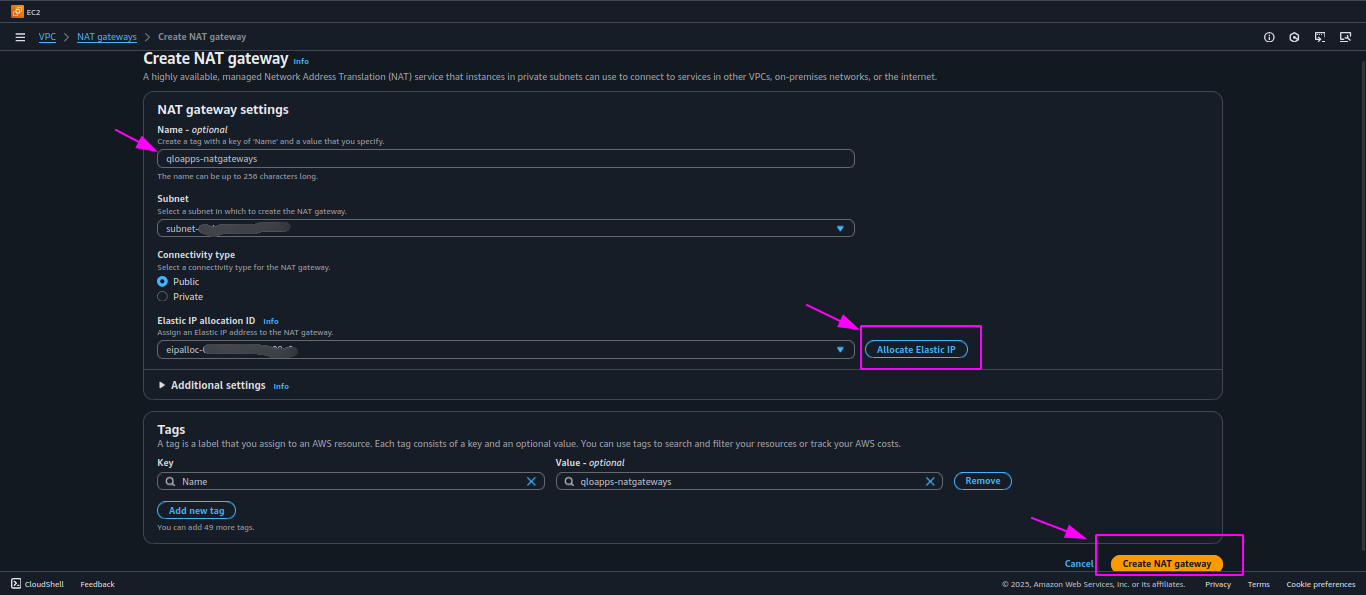
11. Create the NAT Gateway:
- In the VPC dashboard, click on NAT Gateways under the Virtual Private Cloud section.
- Click the Create NAT Gateway button and provide the name for NAT Gateway.
- Select the Public Subnet where you want the NAT Gateway to reside.
- Click on Allocate Elastic IP.
- Connectivity type should be public.
- Click Create a NAT Gateway.
12. Wait for the NAT Gateway to be Available:
- It may take a few minutes for the NAT Gateway to be created and become available. You can monitor its status in the NAT Gateways section of the VPC dashboard.
13. Update Route Tables to Use the NAT Gateway:
- Once your NAT Gateway is created, the next step is to update the route tables for your private subnets. This ensures that traffic from instances in the private subnet can flow through the NAT Gateway to access the internet.
- Navigate to Route Tables:
- In the VPC Dashboard, go to Route Tables.
- Select the Private Subnet’s Route Table:
- Identify and select the route table that is associated with your private subnet.
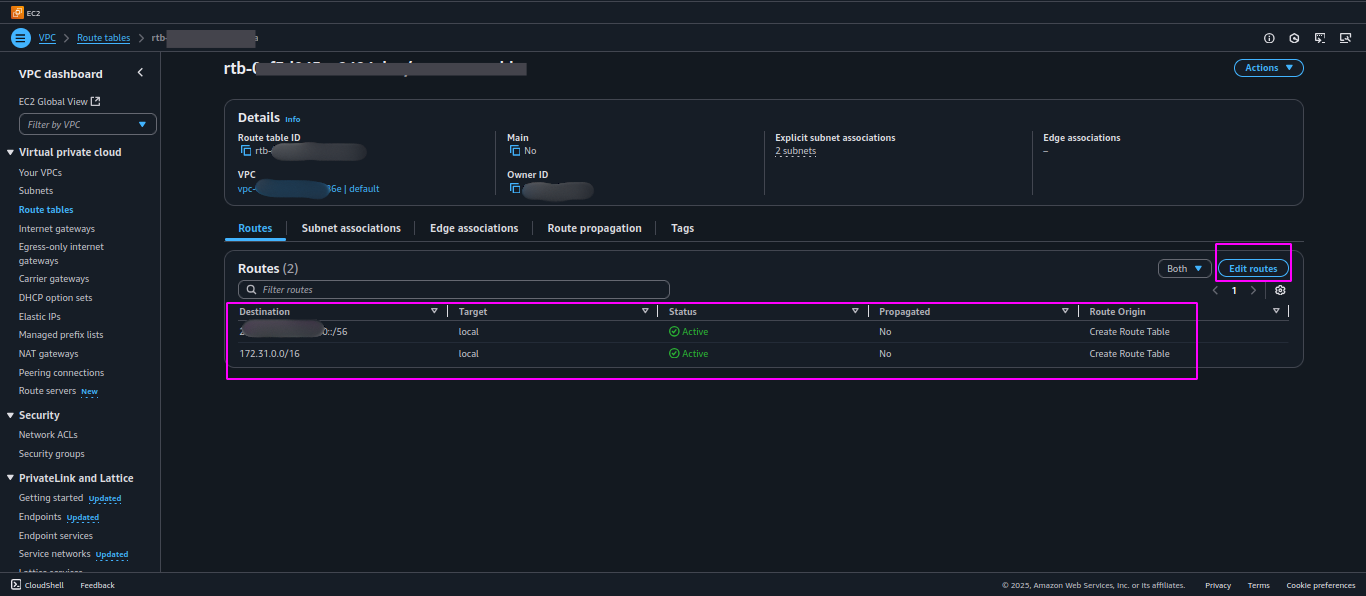
- Add a Route to the NAT Gateway:
- Click Edit Routes.
- Click Add Route and configure the following:
- Destination:
0.0.0.0/0(to allow all outbound internet traffic). - Target: Select the NAT Gateway that you created earlier.
- Destination:
- Save the Route Table:
- Click Save Changes to apply the changes.
- Now, your private subnet instances can route their internet-bound traffic through the NAT Gateway.
14. Pointing Your Domain to the Load Balancer (SSL Enabled)
- After completing the network setup, navigate to the EC2 service in the AWS Management Console and click on Load Balancers. You will see a load balancer automatically created by the CloudFormation stack.
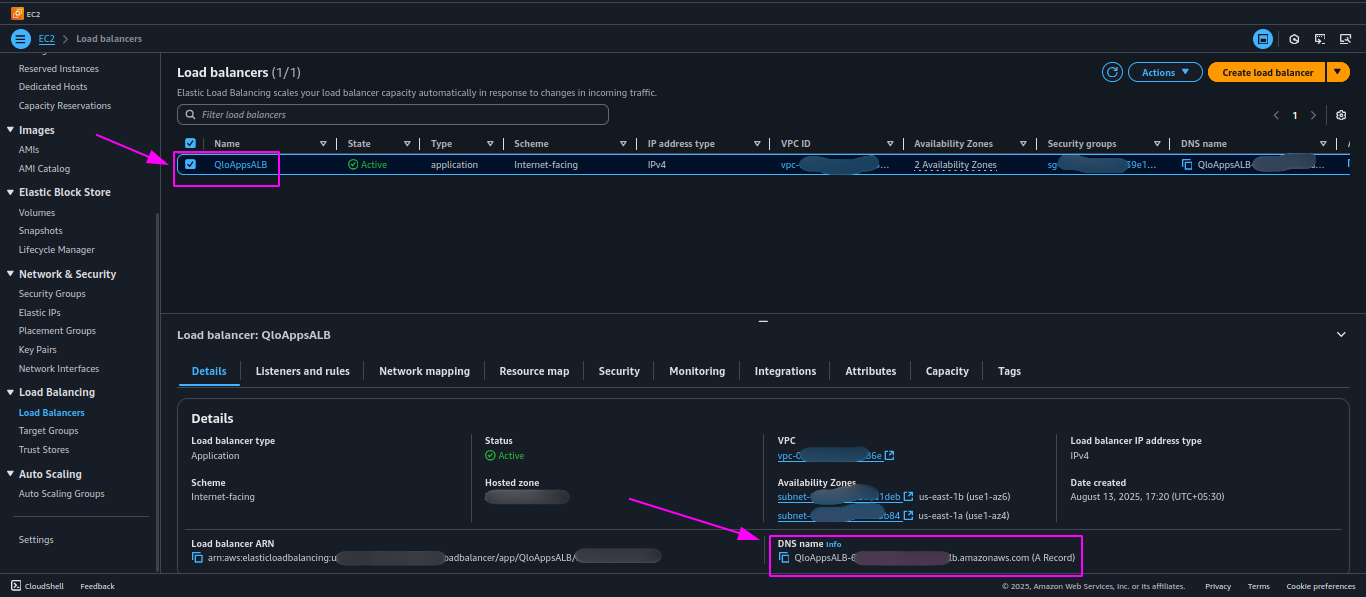
- Copy the load balancer DNS name to your DNS manager as a CNAME, matching the domain/subdomain in your SSL certificate ARN from ACM, to enable HTTPS for your QloApps site.
Example:
If your load balancer DNS name is:
|
1 |
qloapps-alb-1234567890.ap-south-1.elb.amazonaws.com |
- And your ACM certificate is issued for
qloapps-server.vachak.com, create a CNAME record in your DNS manager like this:
| Host/Name | Type | Value |
|---|---|---|
| qloapps-server.com | CNAME | qloapps-alb-1234567890.ap-south-1.elb.amazonaws.com |
15. Accessing QloApps for Configuration
- After DNS propagation, open your browser and enter the domain or subdomain you set earlier, linked to your SSL certificate in AWS Certificate Manager, to access your QloApps site.
For example:
|
1 |
https://qloapps-server.com/ |
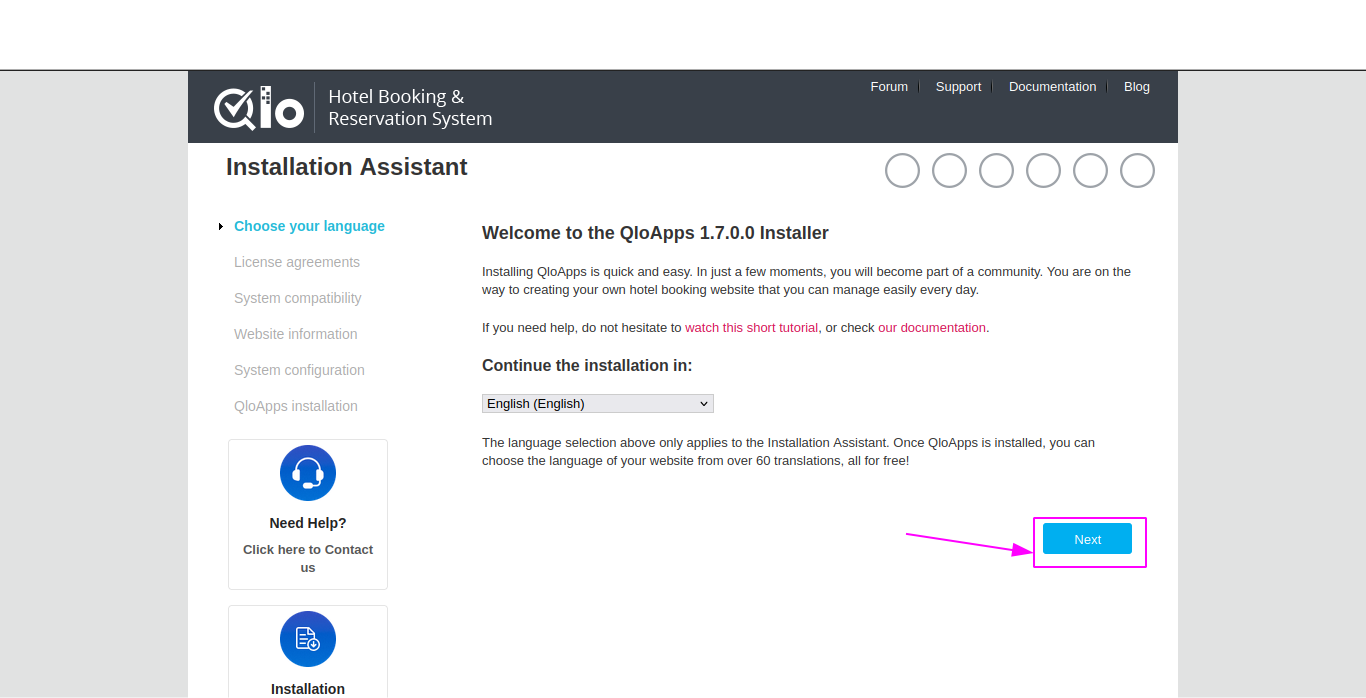
- This will open the QloApps installation wizard in your browser.
- Follow the on-screen instructions to configure your store, database connection, and administrator account.
- First, click the Next button.
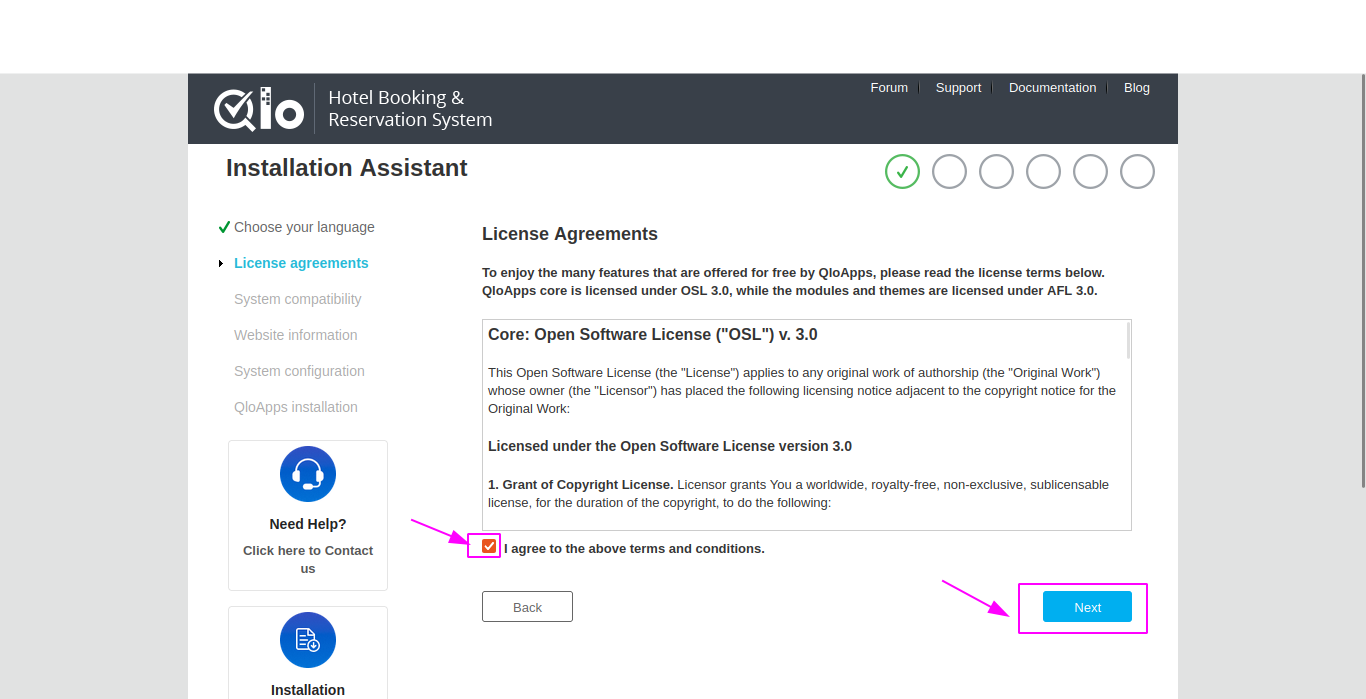
- After this you need to accept the term & conditions. Then click next.
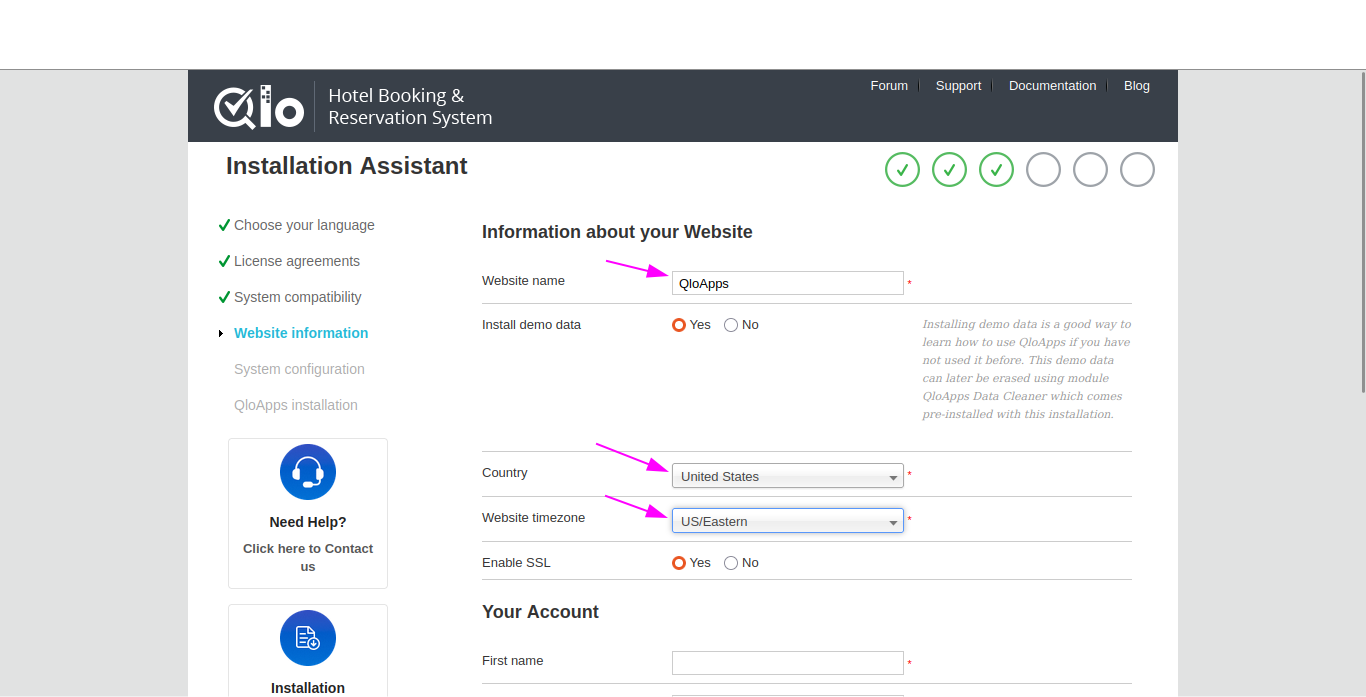
- After this, Configuring Website Information in QloApps Installation Wizard
- Website Name
- Enter the name of your website in this field.
- Example:
QloAppsor your hotel/business name.
- Country
- Select your country from the drop-down list.
- Website Timezone
- Choose the timezone for your website from the list.
- Example:
US/Easternif your business is based on the US East Coast. - This ensures booking times and schedules match your local business hours.
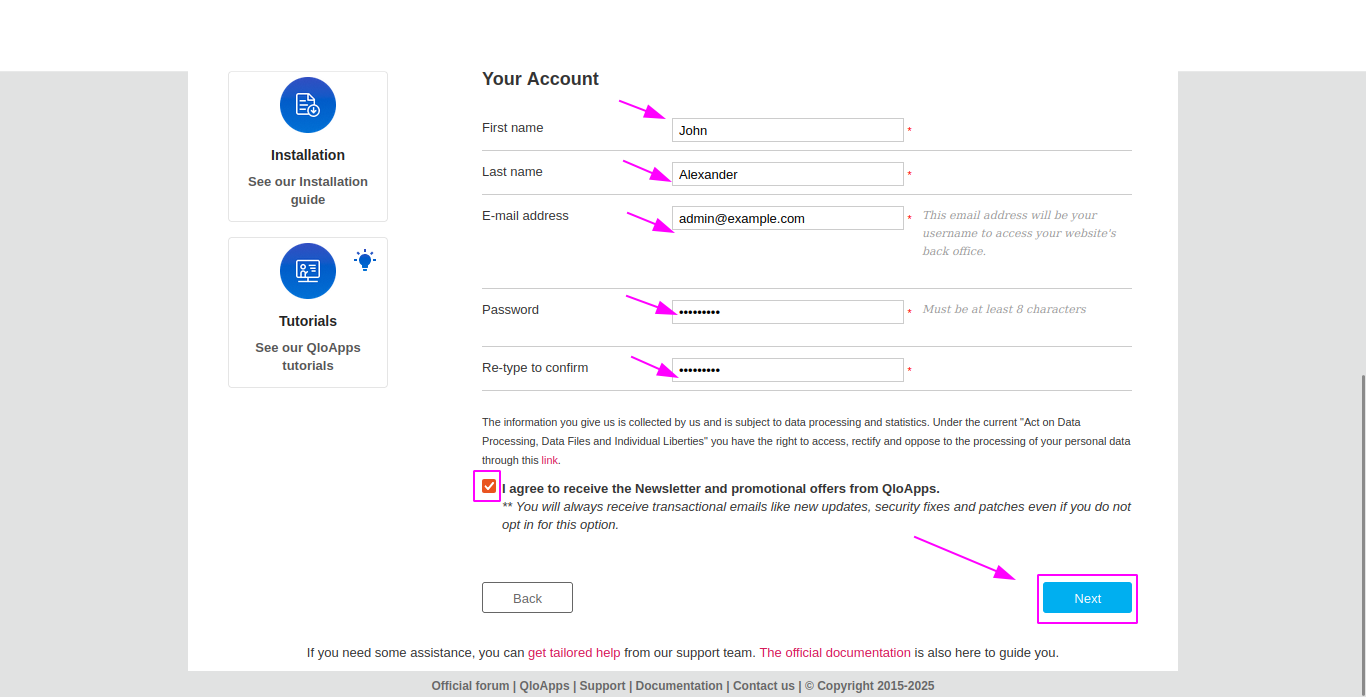
- Now moving forword to Creating Your Admin Account in QloApps Installation Wizard
- First Name
- Enter your first name.
- Example:
John
- Last Name
- Enter your last name.
- Example:
Alexander
- E-mail Address
- Provide a valid email address that will be used as your login username for the website’s back office.
- Example:
admin@example.com
- Password
- Create a strong password.
- Re-type to Confirm
- Enter the same password again to confirm it.
- Newsletter Subscription (Optional)
- Tick this checkbox if you want to receive newsletters and promotional offers from QloApps.
- Proceed to Next Step
- Click the Next button to move forward with the installation process.
- Now, Configuring Database for QloApps Installation
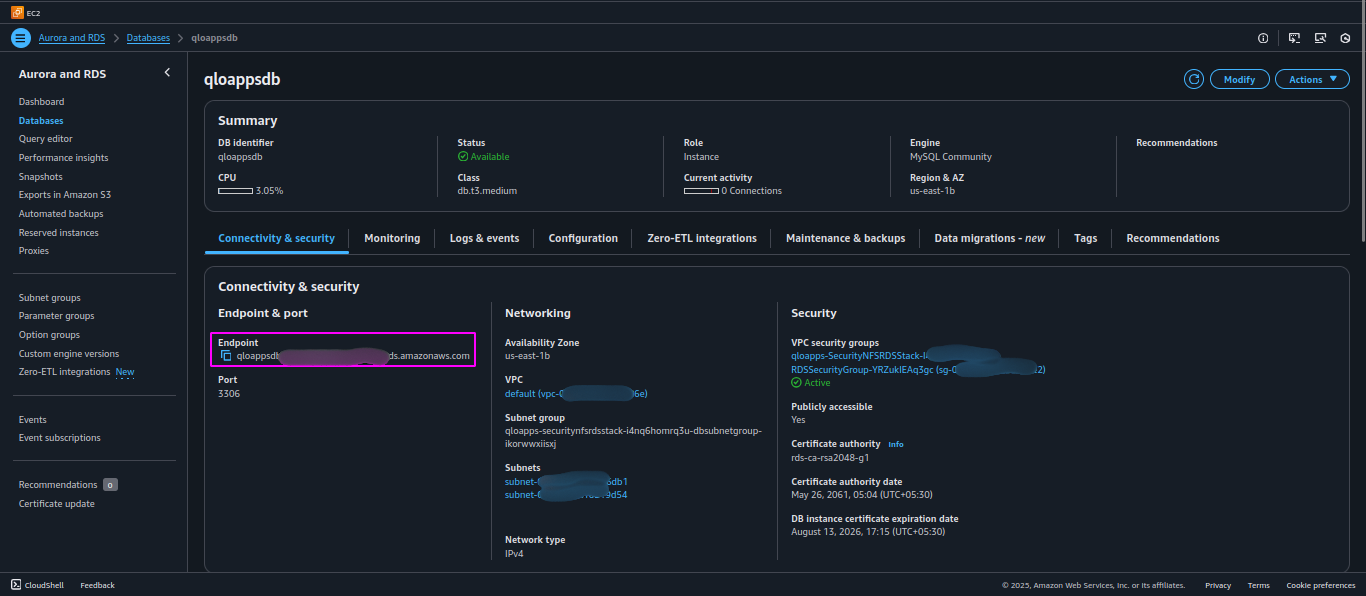
1. Get the RDS Endpoint from AWS
- Go to the AWS Management Console.
- Navigate to RDS → Databases.
- Select the database instance you created for QloApps using cloudformation stack.
- Under the Connectivity & security tab, look for Endpoint
- Copy this endpoint.
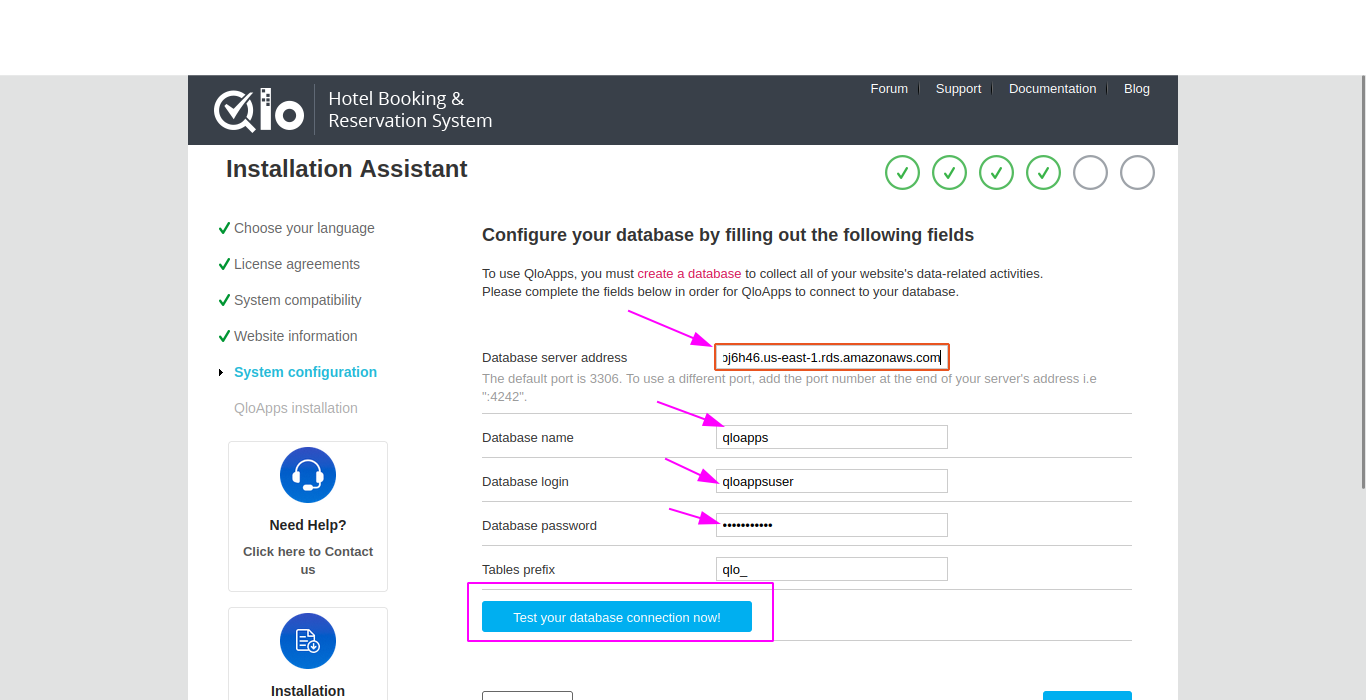
2. Fill in Database Details in QloApps Installer
- Database Server Address
- Paste the RDS endpoint you copied from AWS.
- Database Name
- Enter the name of the database you created in RDS.
- Example:
qloapps
- Database Login
- Enter the master username or the specific database user you created.
- Example:
qloappsuser
- Database Password
- Enter the password for the above database user.
- Tables Prefix
- Keep the default
qlo_unless you want to change it for customization.
- Keep the default
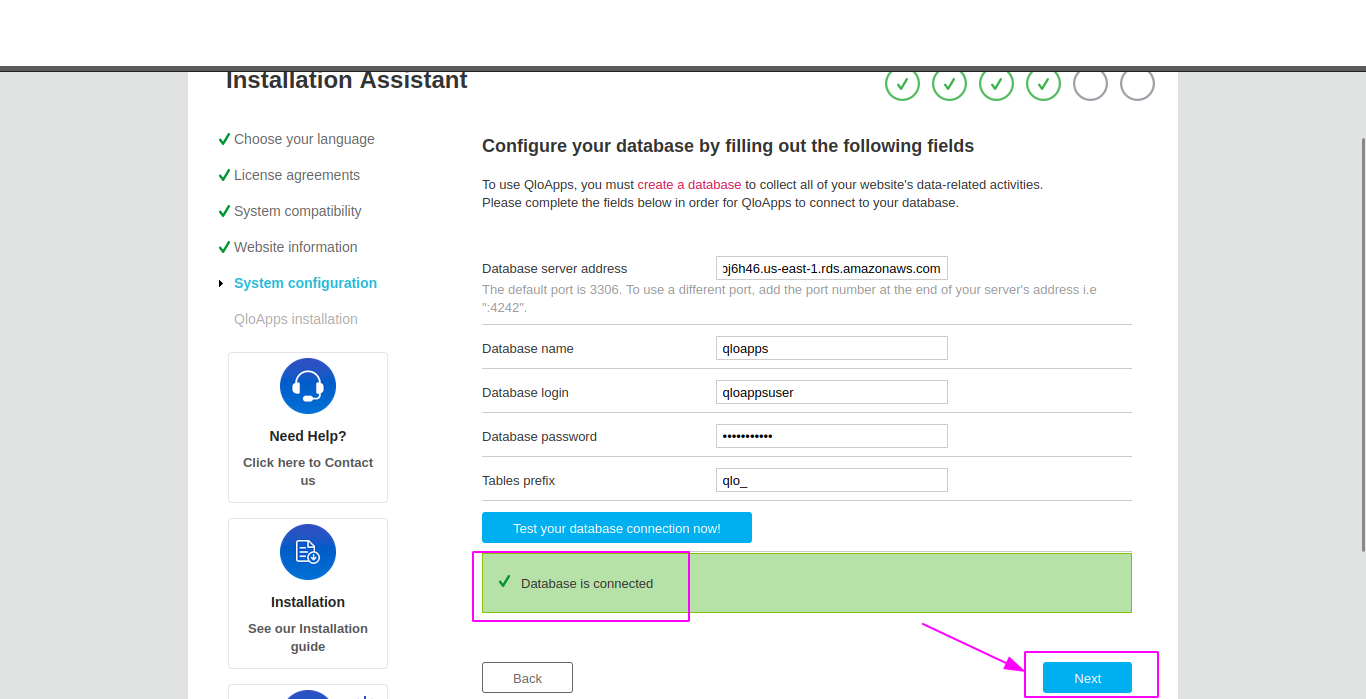
3. Test the Connection
- Click Test your database connection now!
- If the connection is successful, you can proceed to the next installation step.
- If it fails, double-check:
- Correct database name, username, and password.
- After this click on next button.
Once the QloApps installation is complete, you will see a message asking you to delete the “install” folder for security purposes.
Here, you will have one of these cases:
Case 1 – Your EC2 Instance is in a Private Subnet
If your QloApps EC2 instance is in a private subnet, you cannot connect directly from your local machine. In this case, you must create a Bastion Host in a public subnet to act as a bridge.
Steps to Create a Bastion Host and Connect to Your Private EC2 Instance:
- Launch a Bastion Host EC2 Instance
- In AWS Console, go to EC2 → Launch Instances.
- Select an Amazon Linux 2 or Ubuntu AMI.
- Place it in the public subnet of the same VPC as your private EC2.
- Assign a public IP.
- Allow SSH (Port 22) Access to the Bastion Host
- Go to EC2 → Security Groups.
- Edit inbound rules and allow:
- Port: 22 (SSH)
- Source: Private IP of your bastion host (e.g., 172.31.22.163)
- Connect to Bastion Host
- From your local machine, SSH into the bastion host:
|
1 |
ssh -i your-key.pem ec2-user@<BastionHostPublicIP> |
- SSH from Bastion Host to Private EC2
- From the bastion host, connect to your private EC2 instance:
|
1 |
ssh -i your-key.pem ec2-user@<PrivateEC2PrivateIP> |
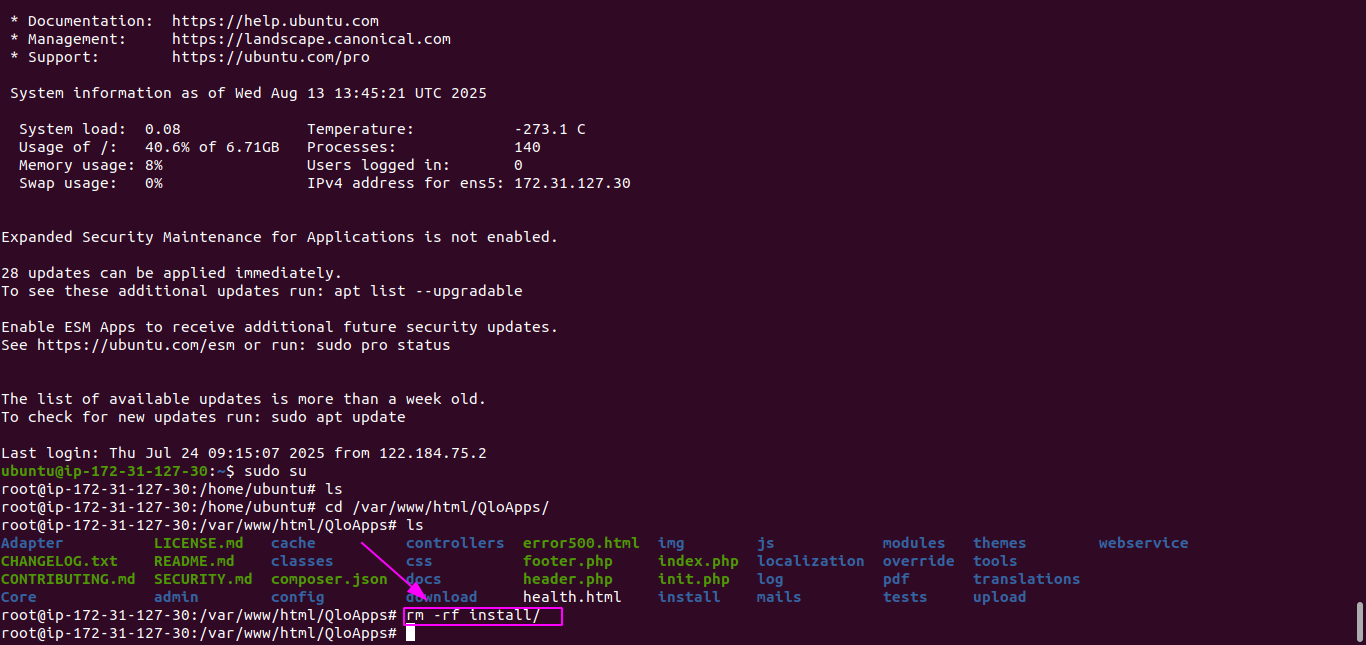
- Delete the Install Folder on Private EC2
- Once you are inside your private EC2, then run:
|
1 2 |
cd /var/www/html/QloApps sudo rm -rf install/ |
Previously, we used a Bastion Host to access private EC2 instances. However, AWS provides another, more secure and preferred option — Session Manager.
Steps to Use Session Manager and Connect to Your Private EC2 Instance
- Go to EC2 console → Select the private EC2 instance.
- Click Connect (top right).
- In the pop-up, choose Session Manager tab.
- Click Connect → You’ll get a terminal session directly in your browser.
Case 2 – Your EC2 Instance is in a Public Subnet
- If your EC2 instance is in a public subnet with port 22 already open to your IP, you can directly SSH into it from your local machine and delete the
installfolder using the above command.
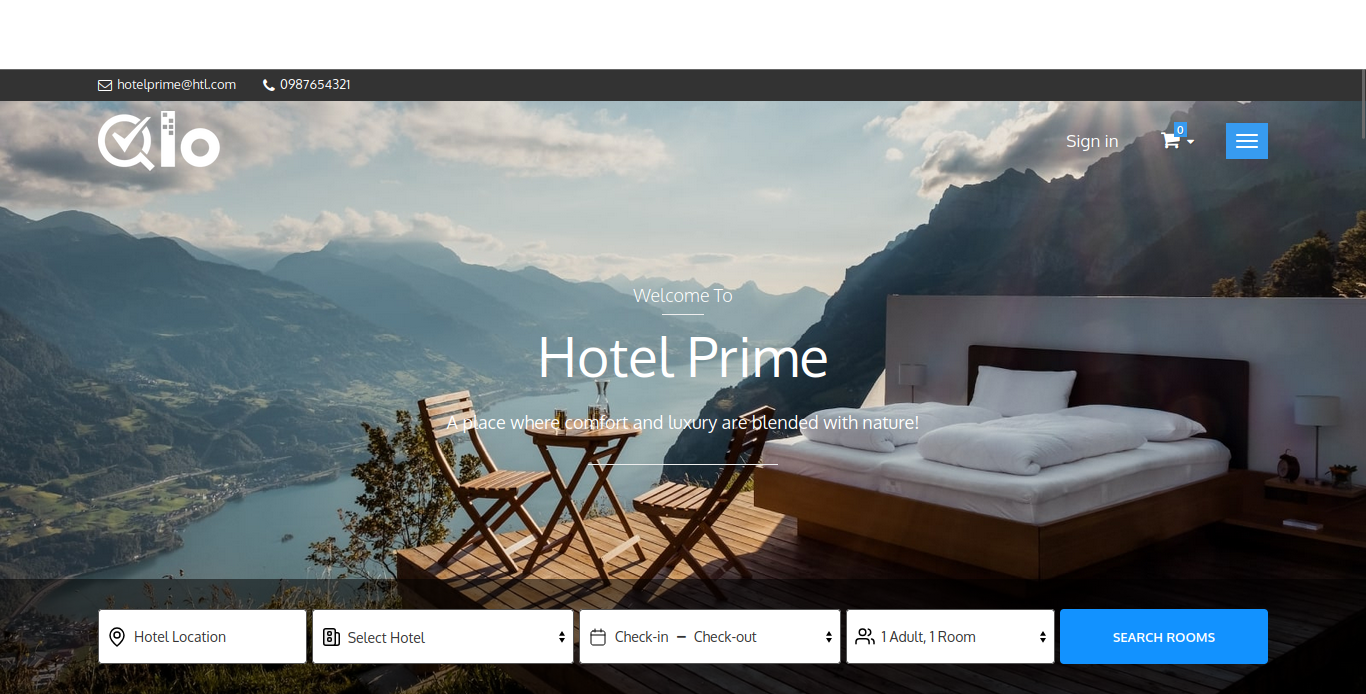
After deleting the install folder, QloApps setup is complete. You can now use, customize, and export your hotel booking platform data as needed.
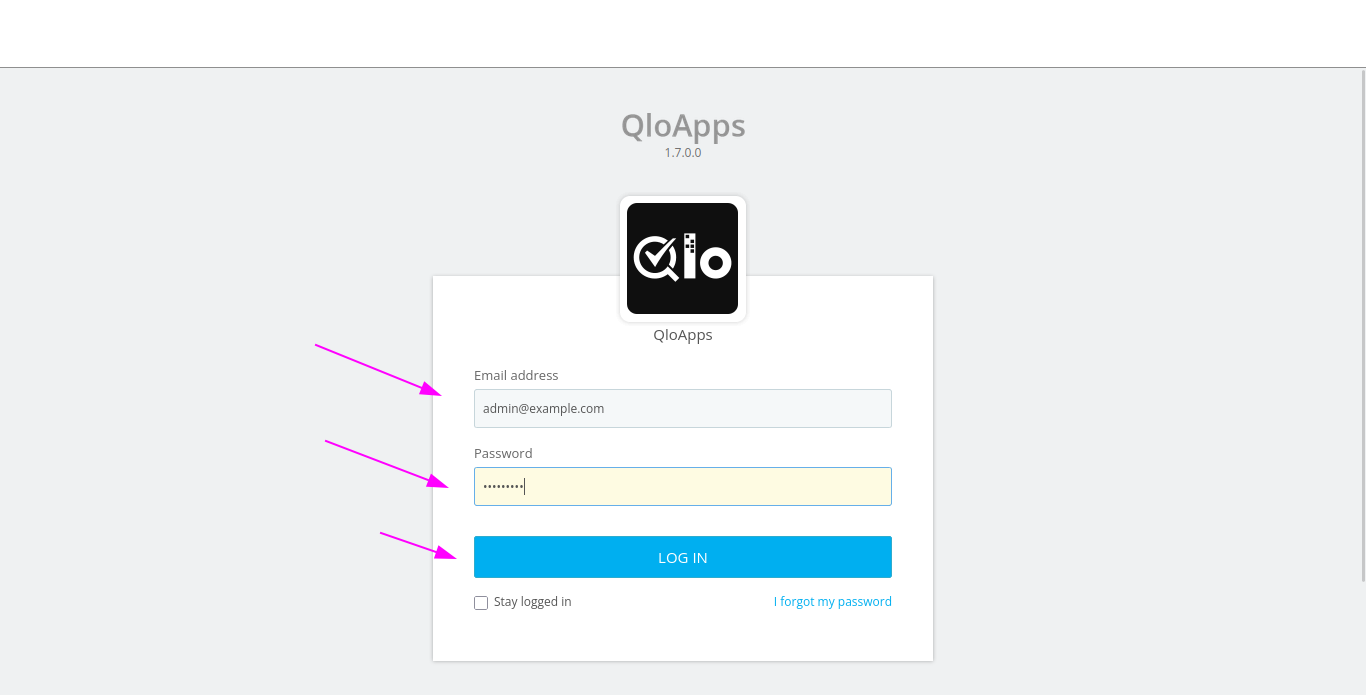
After completing the installation and deleting the install folder, you can now access the QloApps back office (admin panel) using the credentials you created during setup.
To access the admin panel:
- Open your web browser.
- Then, navigate to the following URL:
|
1 |
http://Your-Domain-or-Public-IP/admin |
- (Replace
<Your-Domain-or-Public-IP>with your actual domain name or server’s public IP address.) - Next, enter the email and password you set during the installation process.
After you log in, you will therefore have full access to manage your QloApps store from the back office.
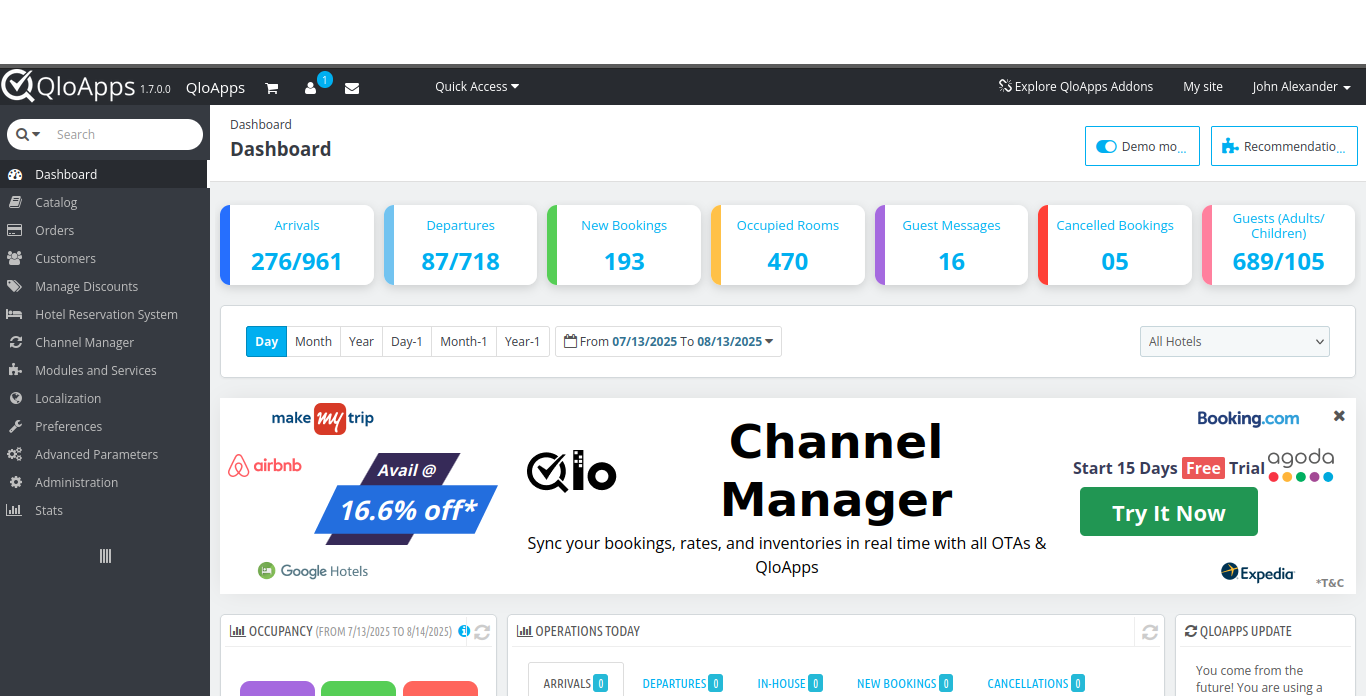
🎉 Congratulations! Your QloApps setup is complete. Explore the front office for your booking site and manage hotels, bookings, and settings from the back office in a secure, scalable environment.
Need Help? Contact Unopim Support
If you need assistance, please reach out to the QloApps provider’s support team for expert guidance and troubleshooting.