In our previous blog, we talked about why we need to migrate our database to AWS cloud and how Amazon Aurora fits in our environment where we need to handle multiple magento sites. If you haven’t read the blog yet, please follow the link :- http://cloudkul.com/blog/amazon-aurora-scaling-magento-sites-aws/
Today, Let’s focus on some practical aspects of Amazon Aurora including how to create an Amazon Aurora cluster and how you can access your database. Here we go !!
Creating an Amazon Aurora DB Cluster :-
Before we go ahead, there are some important points we should focus on :
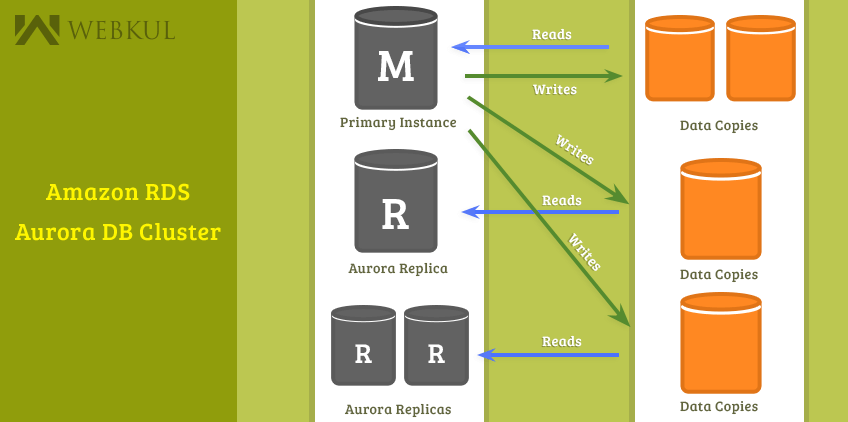
An Amazon Aurora database cluster is the combination of instances that are mysql compatible and a cluster volume which represents that the data are copied across three availability zones as a single,virtual volume.Hence, there are two types of instances :-
- Primary instance – Supports read-write workloads, and performs all of the data modifications to the cluster volume. Each Aurora DB cluster has one primary instance.
- Aurora Replica – Supports only read operations. Each DB cluster can have up to 15 Aurora Replicas in addition to the primary instance.Therefore, it supports only read workloads.
An Amazon Aurora DB cluster can only be created in an Amazon Virtual Private Cloud (VPC) with at least two subnets in at least two Availability Zones. Since your cluster instances are now distributed across two availability zones, you can ensure that instances in your database cluster is unlikely to have availability zone failure. There are two ways provided for this :-
- We can use our existing VPC or create a new VPC for Aurora DB cluster.
- If we are using Amazon RDS console for Aurora DB cluster,then we can have Amazon RDS automatically create a VPC for us.
To launch an Aurora DB cluster using the console, follow the steps :-
- Open the Amazon RDS for Aurora console.In the left navigation pane, click DB instances.
- Click Launch DB Instance, the wizard opens on the select engine page.
- Select Amazon Aurora as your database engine.
- Specify DB details as mentioned. You can modify DB instance class and the other settings accordingly.
- On the next step, you need to configure some advanced settings. You can either use existing VPC, if any, or choose create a new VPC option directly provided on RDS console.Since i have chosen the latter one, a VPC along with a subnet group will be created automatically before creation of DB instance proceeds. You can modify database details accordingly.
- Proceed to the next step & view your DB instance after it is being created.
- You can see that one aurora instance with writer role and another with a reader role is created. As i have mentioned earlier that we can attach upto 15 aurora replicas to the primary instance, you can create some more replicas in order to support read workloads.
- To create an Aurora Replica, click Instances on RDS console.Click Instance Actions, and then click Create Aurora Replica.You must see something like this :
- Specify the details and click on Create Aurora Replica.
- Now you can see that your DB instance with writer role has two read replicas.
After successfully creating Aurora instances, you need to know how to connect to your DB instances.
To connect an Aurora DB cluster using the console, follow the steps :-
The basic approach to access the database of Aurora cluster is to run the following command :
|
1 |
mysql -h <endpoint> -P 3306 -u <masteruser> -p |
NOTE : While copying endpoints of DB instance, make sure that you don’t copy the port appended to it.
Therefore, in our scenario we need to run the following command :
|
1 |
mysql -h webkultest.cluster-cqgmgnd8vfpz.us-west-2.rds.amazonaws.com -P 3306 -u webkul -p |
where “webkultest.cluster-cqgmgnd8vfpz.us-west-2.rds.amazonaws.com” is our cluster endpoint and “webkul” is our master DB user. After hitting this command,we need to enter password assigned at the time of DB cluster creation.
This was all about creating Amazon Aurora DB cluster and accessing database. To know more about migrating data to an Amazon Aurora DB cluster, please refer our next blog !!
IN CASE OF ANY QUERIES, PLEASE CONTACT US
