Bagisto is a free and open-source e-commerce platform. It is built on various open-source technologies such as Laravel (PHP framework) and Vue.js.
With several customizable features, Bagisto enables retailers to establish their shopping cart system.
However, Its features include a multistore inventory system, order management, customer care, product review, wishlist, theme, responsive CMS pages, numerous currencies, and many more.
In this tutorial, we learn how to install Bagisto saas on WHM/Cpanel as well as how to create saas tenants.
Requirements to install Bagisto:
- Ubuntu 20.04 or 18.04 server with a user with sudo access
- Webserver: Apache2 or Nginx
- Recommended RAM 3GB+
- PHP: 7.4+ with extensions:
- MYSQL 5.7+ or MariaDB 10.2+
- Node.js: 8.11+
- Composer 2.2.12+
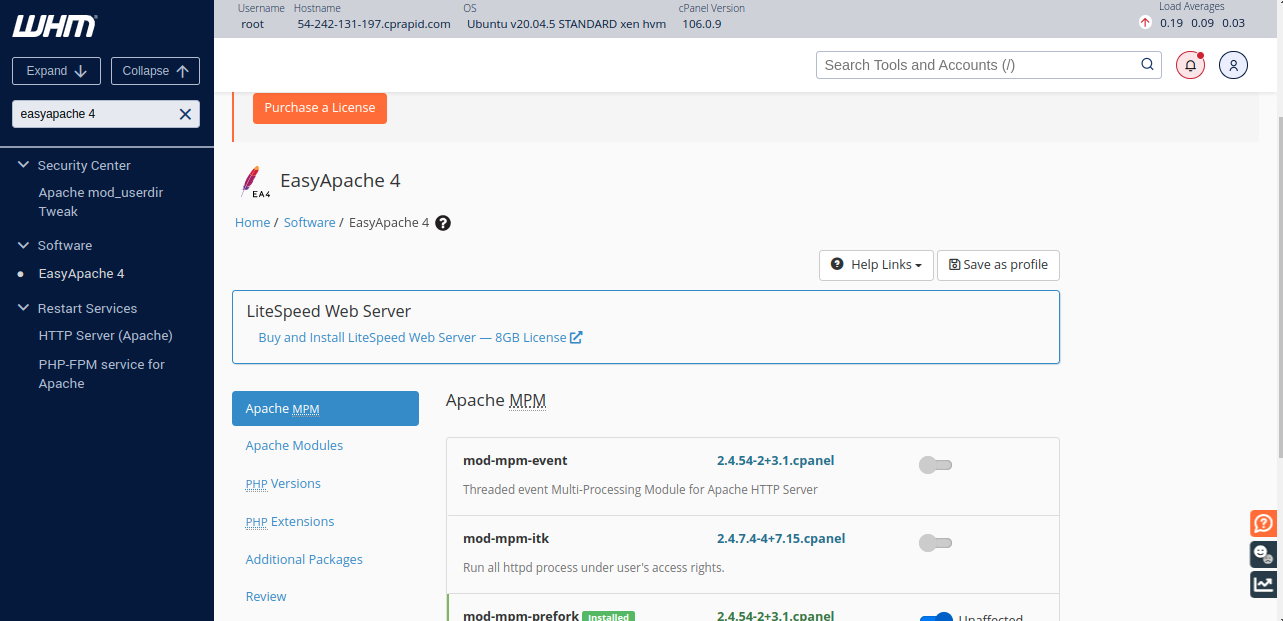
Step 1: Install an Apache module, PHP Version, and PHP Extensions in WHM
1. Log into WHM.
2. Then Navigate to EasyApache 4.
3. Then, Click Customize under Currently Installed Packages.
4. Click Apache Modules, PHP Versions, and PHP Extensions.

Further, you can see and select the required PHP versions, PHP Extensions, and Additional Packages.
(i) Below are the required PHP extensions for the installation.
php, php-common, php-gmp, php-curl, php-soap, php-bcmath, php-intl, php-mbstring, php-xmlrpc, php-mysql, php-gd, php-xml, php-cli, php-zip, libapache2-mod-php
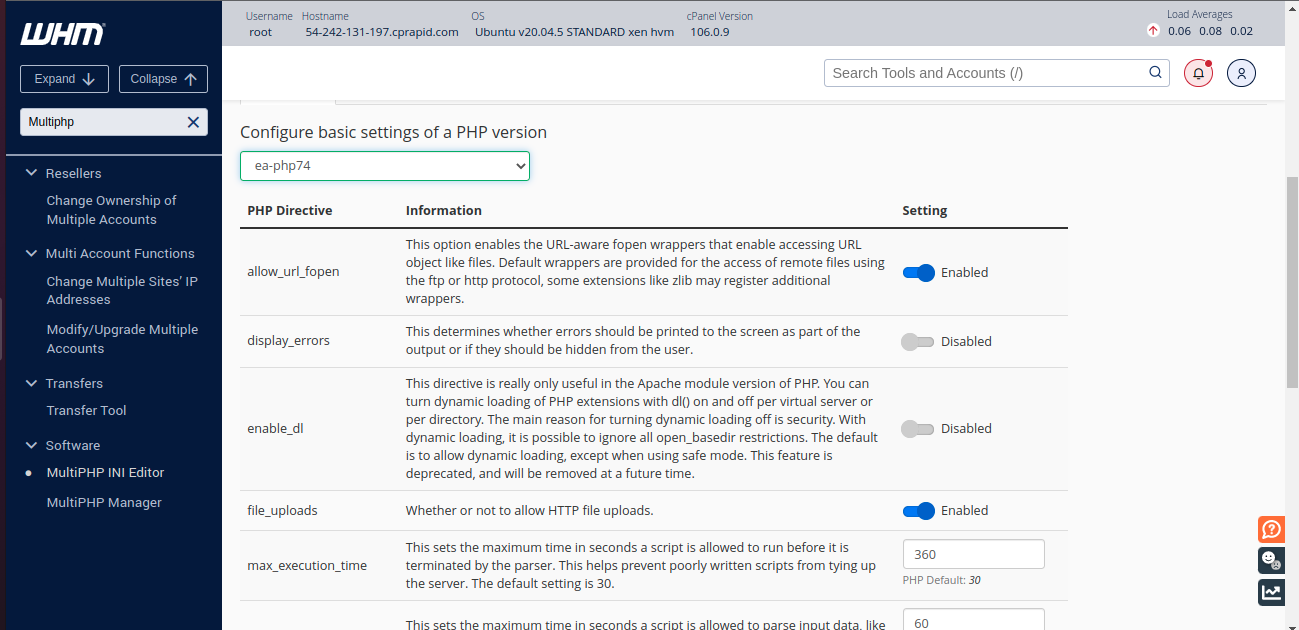
(ii)Make the following changes to the php.ini file for the best performance.
to search MultiPHP INI Editor in the search bar of WHM
file_uploads = On
allow_url_fopen = On
short_open_tag = On
memory_limit = 256M
upload_max_filesize = 100M
max_execution_time = 360
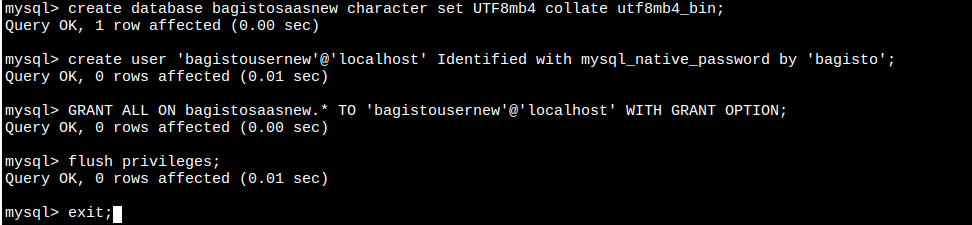
(iii) Now login to MySQL to create a database, create a user, and further grant the required permissions for the user to access the database.
sudo mysql -u root -p
Step 2: Update your Ubuntu system
Open your terminal, and then run the update command to keep the Ubuntu system in sync with the repositories.
sudo apt-get update
Step 3: Install Node.js and composer
Ubuntu 20.04 comes with Node.js in its default repository. You can simply run the following command to install the stable version of Node.js
sudo apt install nodejs
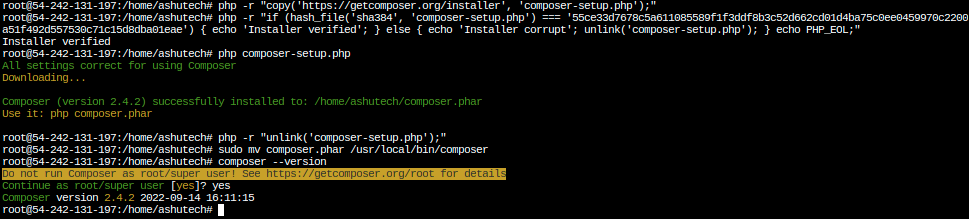
Install composer on Ubuntu and run the following command:
To quickly install Composer in the current directory, run topen-source e-commercehe following script in your terminal.
To automate the installation, use the guide on installing Composer programmatically.
|
1 2 3 4 5 6 7 8 |
php -r "copy('https://getcomposer.org/installer', 'composer-setup.php');" php -r "if (hash_file('sha384', 'composer-setup.php') === '55ce33d7678c5a611085589f1f3ddf8b3c52d662cd01d4ba75c0ee0459970c2200a51f492d557530c71c15d8dba01eae') { echo 'Installer verified'; } else { echo 'Installer corrupt'; unlink('composer-setup.php'); } echo PHP_EOL;" php composer-setup.php php -r "unlink('composer-setup.php');" |
Most likely, you want to put the composer.phar into a directory on your PATH, so for that you can simply call composer from any directory (Global install), using for example:
|
1 |
mv composer.phar /usr/local/bin/composer |
Step 4: Download the Bagisto
Use composer to download and then create a bagisto project into the user home directory.
|
1 |
composer create-project bagisto/bagisto |
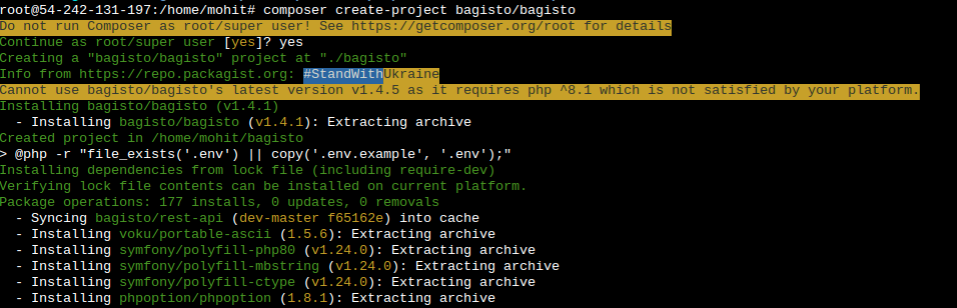
This will create a directory named ‘bagisto’ in the /home/bagisto directory.
After that, you can navigate to the following directory to confirm the index.php file.
|
1 |
cd bagisto/public |
|
1 |
ls |

Step 5: Apache configuration for Bagisto
# vi /etc/apache2/conf/httpd.conf

Find “Define default vhosts for shared IPs“
Now, you need to change the DocumentRoot Path here, like below
Document root path till public in bagisto

Now you need to change DocumentRoot Path also for HTTPS
Then, Find the “BEGIN: HTTPS vhosts list“

After that, Put your SSL certificate here

Now your configuration is set to proceed further
Step 6:Change Primary Domain Document Root in cPanel/WHM:
# vim /var/cpanel/userdata/username/domain.com
in our case vi /var/cpanel/userdata/ashutech/ashutech.ml

change the document root path also

Step 7: Bagisto Configuration
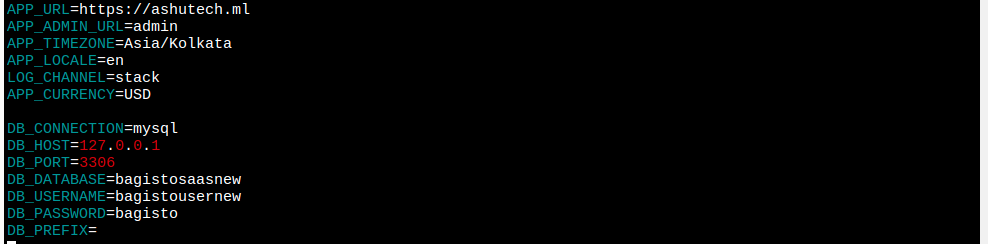
Let’s first create the bagisto configuration file.
For that use the existing sample (.env.example) file. and after that create a file named ‘.env’ in the Bagisto root directory ( /home/ashutech/public_html/bagisto/).
# sudo cp .env.example .env
# sudo nano .env

The .env file contains the Bagisto version, defined in the variable APP_VERSION.
Now provide the MySQL database information and APP_URL also in the .env filename as follows:
APP_URL=https://ashutech.ml
DB_DATABASE=bagistosaasnew
DB_USERNAME=bagistousernew
DB_PASSWORD=bagisto
Laravel eCommerce Multi-Tenant SaaS Module :
Laravel Multi-Tenant E-commerce SaaS Module is an eCommerce virtual mall, where multiple vendors can sign up and create their e-commerce store with their domain name.
Bagisto is an online e-commerce platform that helps anyone start their e-commerce store within a few minutes even without any technical requirements.
Therefore the merchant doesn’t need to add any plugin to create their store, it is the full end-to-end integration. You have to just sign up then you can start your business.
Feature of Laravel eCommerce Multi-tenant SaaS Module:
- It supports all product types of Bagisto Framework including Simple, Downloadable, Grouped, Bundle, Configurable, Virtual, and Booking.
- Every merchant will also receive the mail whenever a customer orders from his store
- High security in a session
- Easy Customisation
- Also, Easy Updates of Laravel Multi-Tenant SaaS
- The admin can create all types of products (Simple, Configurable, Downloadable, Grouped, Bundle, and Booking products).
- Also, the sellers can create Simple and Configurable products.
- ACL system for the Super admin users
- CMS pages support at super ad http://staging.solumstore.ch/min
- It adds an option to register a tenant account from the super admin end
Note:-
- Do not install bagisto till you configure this extension.
- Do not seed your database at any point using ‘php artisan db: seed‘ (seeding is done automatically when the seller is registered)
- Then run the command from the root in the terminal ‘composer create-project’
- Find the ‘.env’ file in the root directory then change the APP_URL parameter to your application’s domain name.
- Add your database credentials in.env where params DB_DATABASE, DB_USERNAME, and DB_PASSWORD should be added as your database credentials.
- DB_DATABASE is the name of your database where all the tables will be created.
Step: 8 Installation of Laravel eCommerce Multi-Tenant SaaS Module:-
Customers will get a zip folder after purchasing the extension. After that, Unzip the respective extension zip and then merge the “package” folder into the project root directory.
Access the super admin panel using: http://saas.com/super/login
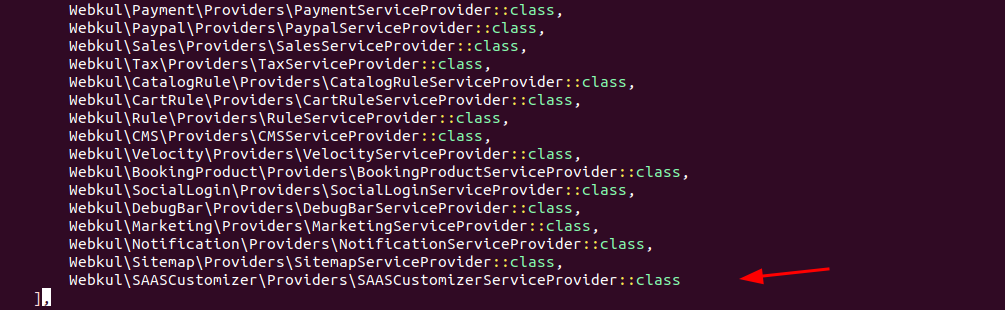
- Now, Goto config/app.php file then add the following line under ‘providers’ like below
Webkul\SAASCustomizer\Providers\SAASCustomizerServiceProvider::class
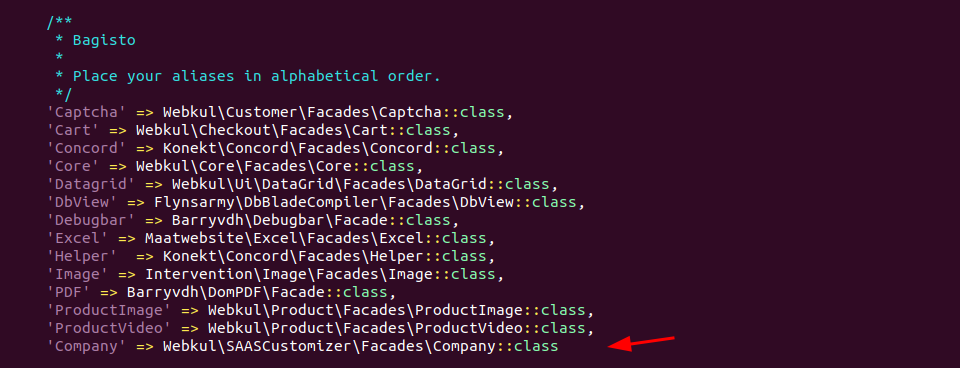
2. After that make the below entry in config/app.php “aliases“
‘Company’ => Webkul\SAASCustomizer\Facades\Company::class
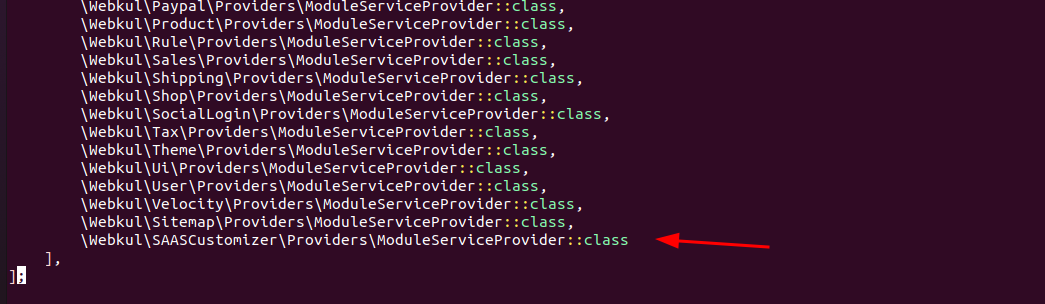
3. Now, go to config/concord.php and packages/Webkul/Core/src/Config/concord.php files and add the following line under the ‘modules’ index in both files:
\Webkul\SAASCustomizer\Providers\ModuleServiceProvider::class
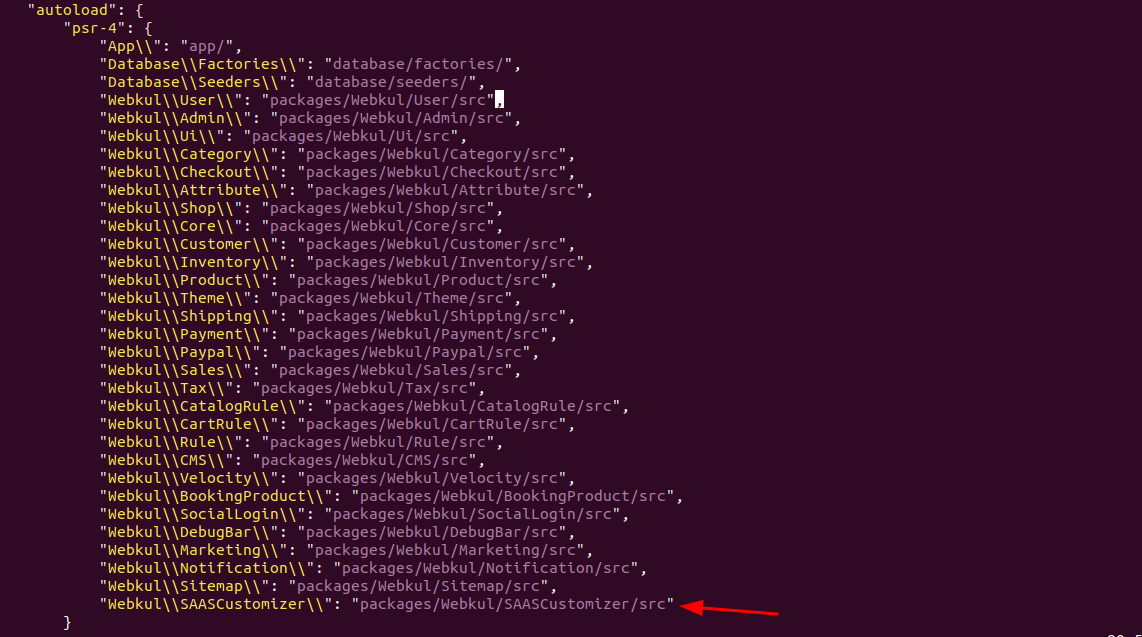
4. After that go to the composer.json file inside the Bagisto root directory and add the following line under ‘psr-4’
“Webkul\\SAASCustomizer\\”:”packages/Webkul/SAASCustomizer/src”
5. Another entry inside the file(‘app/Http/Kernel.php’,):
In this file, you can find an array of ’middleware groups’ inside it, and there is a key named ‘web’ inside it and then does an entry:
\Webkul\SAASCustomizer\Http\Middleware\ValidatesDomain::class

remove the code in the ‘middleware’ array.
\Webkul\Core\Http\Middleware\CheckForMaintenanceMode::class,
add the code in the ‘middleware’ array.
\Webkul\SAASCustomizer\Http\Middleware\SaasCheckForMaintenanceMode::class,

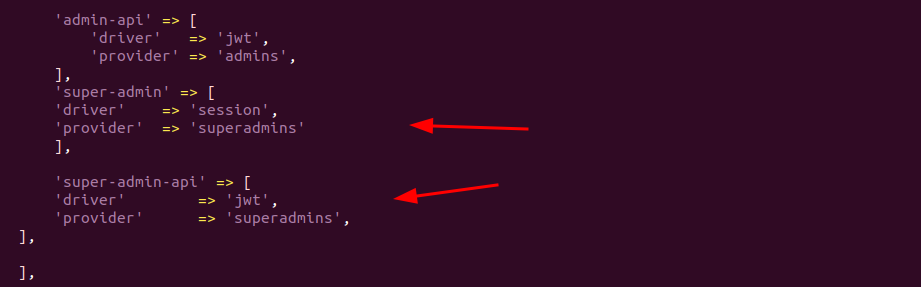
6. Find a file auth.php present inside the config folder from the root and do the following entries:
Insert the below in guards array
‘super-admin’ => [
‘driver’ => ‘session’,
‘provider’ => ‘superadmins’
],
‘super-admin-api’ => [
‘driver’ => ‘jwt’,
‘provider’ => ‘superadmins’,
],
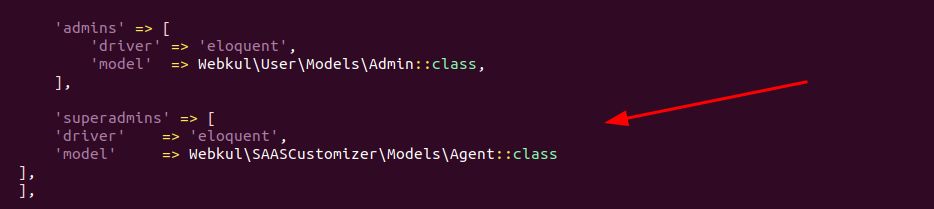
7. Then insert the below code in the provider array
‘superadmins’ => [
‘driver’ => ‘eloquent’,
‘model’ => Webkul\SAASCustomizer\Models\Agent::class
],
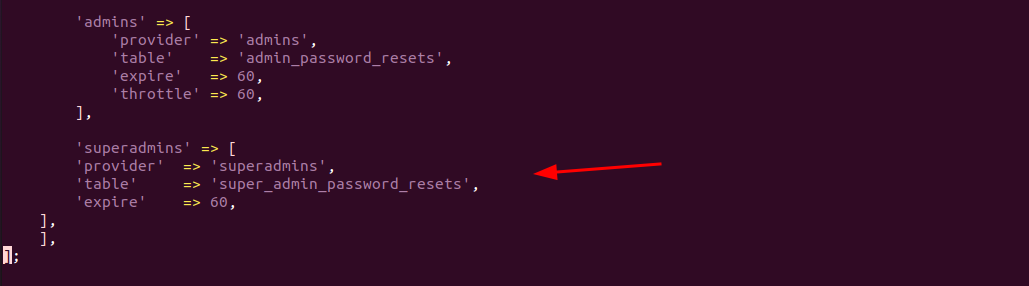
8. Now, insert the below code in the ‘passwords‘ array
‘superadmins’ => [
‘provider’ => ‘superadmins’,
‘table’ => ‘super_admin_password_resets’,
‘expire’ => 60,
],
Now open the terminal and run the below command on the Bagisto root directory.
composer dump-autoload
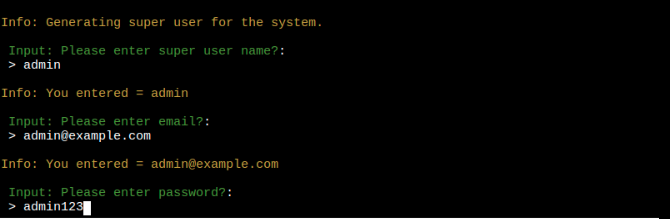
php artisan SAAS:install
Once you run the command “php artisan SAAS:install” then you have to enter your super admin credentials like email ID and password
Let’s discuss the DNS Record
Wildcard:- With the help of the Wildcard DNS record, we can match the request for the non-existent domain name. A Wildcard DNS record is identified by an “*” asterisk.
In my case, I am using Cloudflare as a DNS manager,

Access the dashboard after that by going to https://ashutech.ml/company/register
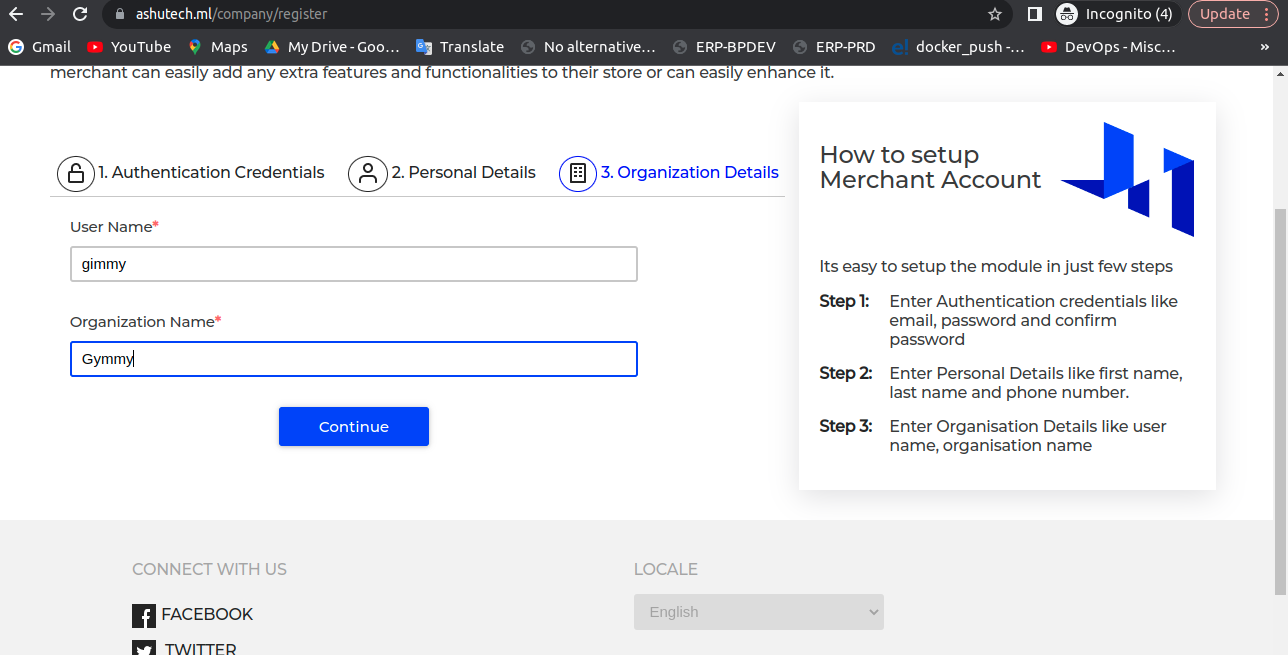
Merchant Registration
There are three-steps to register on the SaaS module.

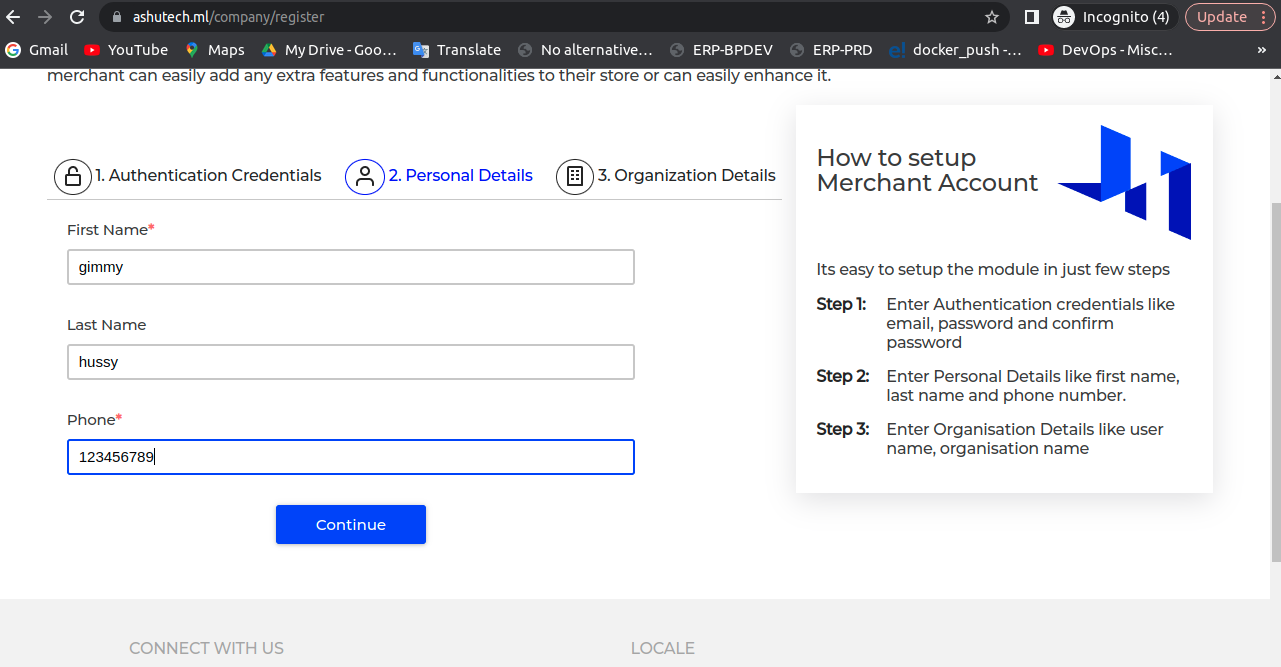
Merchant has to enter the Organization details like user name and Organization name as well.
Merchant Front End
Therefore after registration, the seller’s front will look like
Super-Admin Panel:-
Enter the example.com/super/login). Then the next page will open like below and then you have to enter your credentials then click on Sign in.

After successfully sign-in, the super admin dashboard will be open like below. Therefore the super-admin can view all the company which is registered on their SaaS Panel.

The tenant has been created successfully, so by following the same procedure you can create multiple tenants on your website.
Need Support?
Thank You for reading this Blog!
For further more interesting blogs, keep in touch with us. If you need any kind of support, simply raise a ticket at https://webkul.uvdesk.com/en/.
For further help or queries, please contact us or raise a ticket.