In Continuous Integration and Continuous Deployment environment, there are many steps involved while deploying codes to the production server. Some of these steps are as follows-:
- Developers push their latest codes to the repository
- Code is fetched from the repository and built is made
- The built code is deployed to the staging server
- In staging server, some test cases are run
- After passing the test cases, code is deployed to the production server
Jenkins is a great tool which can be used to setup continuous integration and continuous deployment environment for Magento2.
In this tutorial, I will show you how to setup a continuous integration and deployment environment for magento2 using magedeploy2. If you want to know more about the magedeployer2 visit this link https://github.com/mwr/magedeploy2-base.git
I am using 4 servers in this setup
- Git server
- Jenkins server
- Staging server
- Production server
Below is the architecture of my continuous integration and deployment environment
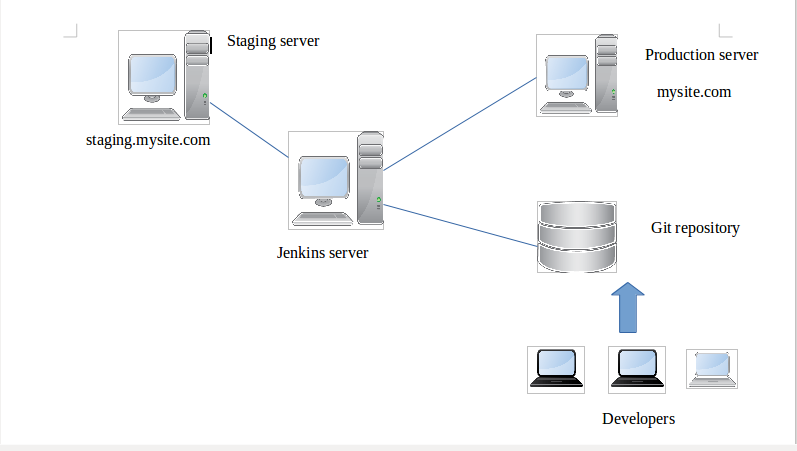
- When code is pushed to the git repository job trigger is generated at Jenkins through web hooks.
- At first step Jenkins will setup build environment for magento2.
- In second step it will fetch latest code from the git repository and build the code.
- In third step the built code is deployed to the staging server.
- In last step the built code is deployed to the production server.
Setting up your production server
Install apache and php dependencies
|
1 2 3 4 |
sudo add-apt-repository ppa:ondrej/php sudo apt-get update sudo apt-get install apache2 php7.0 php7.0-{curl,gd,mbstring,mcrypt,json,dom,intl,xsl,readline,bcmath,zip,soap} sudo apt-get install git zip realpath |
In production server, user magento is running the apache service. So I need to change the user www-data to magento in the /etc/apache2/envvars file
|
1 2 3 |
export APACHE_RUN_USER=magento export APACHE_RUN_GROUP=magento |
Virtual Host configuration
Create a new file /etc/apache2/sites-enabled/magento.conf and add the following codes
|
1 2 3 4 5 6 7 8 9 10 11 |
<VirtualHost> ServerName mysite.com DocumentRoot /home/magento/www/current CustomLog /var/log/apache2/mysite_access.log combined ErrorLog /var/log/apache2/mysite_error.log <Directory /home/magento/www> Options FollowSymLinks MultiViews Require all granted AllowOverride all </Directory> </VirtualHost> |
Download n98-magerun2
|
1 2 3 |
wget https://files.magerun.net/n98-magerun2.phar chmod +x n98-magerun2.phar sudo cp n98-magerun2.phar /usr/local/bin/ |
Install composer
|
1 2 3 4 5 |
php -r "copy('https://getcomposer.org/installer', 'composer-setup.php');" php -r "if (hash_file('SHA384', 'composer-setup.php') === '669656bab3166a7aff8a7506b8cb2d1c292f042046c5a994c43155c0be6190fa0355160742ab2e1c88d40d5be660b410') { echo 'Installer verified'; } else { echo 'Installer corrupt'; unlink('composer-setup.php'); } echo PHP_EOL;" php composer-setup.php chmod +x composer.phar mv composer.phar /usr/local/bin/composer |
Restart apache service
|
1 2 3 4 5 |
phpenmod mcrypt phpenmod mbstring a2enmod rewrite a2enmod php7.0 service apache2 restart |
Install mysql server
|
1 |
sudo apt-get install mysql-server-5.6 |
create database and user for magento
Login to your root mysql user and create user and database
|
1 2 3 4 |
mysql -u root -p create database production; create user 'dbuserprod'@'%' ideintified by 'qh3gf4ce'; grant all privileges on production.* to 'dbuserprod'@'%'; |
Setting up your staging server
Follow the same procedure as in the production server. Just make some changes in the virtual host configuration and database setup. In staging server user test is running apache service. Open /etc/apache2/envvars file and change user www-data to test
|
1 2 3 |
export APACHE_RUN_USER=test export APACHE_RUN_GROUP=test |
Virtual Host configuration
create a file /etc/apache2/sites-enabled/magento.conf and add the following content
|
1 2 3 4 5 6 7 8 9 10 11 12 13 |
<VirtualHost> ServerName staging.mysite.com DocumentRoot /home/test/www/current CustomLog /var/log/apache2/mysite_access.log combined ErrorLog /var/log/apache2/mysite_error.log <Directory /home/test/www> Options FollowSymLinks MultiViews Require all granted AllowOverride all </Directory> </VirtualHost> |
create database and user for magento
Login to your root mysql user and create user and database
|
1 2 3 4 5 |
mysql -u root -p create database staging; create user 'dbuserstage'@'%' ideintified by 'msdjo335s'; grant all privileges on staging.* to 'dbuserstage'@'%'; |
Setting up your Jenkins server
create database and user for magento
|
1 2 3 4 5 6 |
mysql -u root -p create database build; create user 'dbuserbuild'@'%' ideintified by 'p0jhser847'; grant all privileges on build.* to 'dbuserbuild'@'%'; |
Download and setup composer as given in the production server setup.
create and login as non-root user
|
1 2 |
adduser jenkins su - jenkins |
Download magedeploy2-base
|
1 |
composer create-project mwltr/magedeploy2-base magento2 |
create .config/composer/auth.json file and add your magento2 credential for repo.magento.com
|
1 2 3 4 5 6 7 8 9 |
{ "http-basic": { "repo.magento.com": { "username": "<Enter your key here>", "password": "<Enter your key here>" } } } |
create your default magedeploy2.php, staging.php and production.php
|
1 2 3 4 5 6 |
mkdir site touch site/magedeploy2.php touch site/staging.php touch site/production.php touch site/config cp -rv magento2/vendor/n98/n98-deployer/src/Deployer/Task site/ |
change the content of the files according to your need. Every time you run the Jenkins job the defaults php files inside site folder will be used for the build and deployment tasks.
magedeploy2.php
|
1 2 3 4 5 6 7 8 9 10 11 12 13 14 15 16 17 18 19 20 21 22 23 24 25 26 27 28 29 30 31 32 33 34 35 36 37 38 39 40 41 42 43 44 45 46 47 48 49 50 51 52 53 54 |
<?php return [ 'env' => [ 'git_bin' => getenv('GIT_BIN') ?: '/usr/bin/git', 'php_bin' => getenv('PHP_BIN') ?: '/usr/bin/php', 'tar_bin' => getenv('TAR_BIN') ?: '/bin/tar', 'mysql_bin' => getenv('MYSQL_BIN') ?: '/usr/bin/mysql', 'composer_bin' => getenv('COMPOSER_BIN') ?: '/usr/local/bin/composer', 'deployer_bin' => getenv('DEPLOYER_BIN') ?: '/home/jenkins/magento2/vendor/bin/dep', ], 'deploy' => [ 'git_dir' => 'shop', 'app_dir' => 'shop', 'artifacts_dir' => 'artifacts', 'themes' => [ ['code' => 'Magento/backend','languages' => ['en_US','de_DE']], ['code' => 'Magento/luma','languages' => ['de_DE']], ['code' => 'Magento/luma','languages' => ['en_US']], ], 'artifacts' => [ 'shop.tar.gz' => ['dir' => '.','options' => ['--exclude-vcs','--checkpoint=5000']], ], 'clean_dirs' => [ 'var/cache', 'var/di', 'var/generation', ], ], 'build' => [ 'db' => [ 'db-host' => getenv('DB_HOST') ?: '127.0.0.1', 'db-name' => getenv('DB_NAME') ?: 'build', 'db-user' => getenv('DB_USER') ?: 'dbuserbuild', 'db-password' => getenv('DB_PASSWORD') ?: 'p0jser847', 'admin-firstname' => 'Suranjan', 'admin-lastname' => 'Horrow', 'admin-password' => 'dswe234532r', 'admin-user' => 'admin', 'backend-frontname' => 'admin', 'base-url' => 'http://mysite.com', 'base-url-secure' => 'https://mysite.com', 'currency' => 'EUR', 'language' => 'en_US', 'session-save' => 'files', 'timezone' => 'Asia/Kolkata', 'use-rewrites' => '1', 'use-secure' => '0', 'use-secure-admin' => '0', ], ], ]; |
I am using https://username:[email protected]/repo1/magedeploy.git in git url because I do not want prompt for username and password while cloning from git. We are providing the username and password in the url. So it will be easy for the automation process.
Here, https://mygitrepo.com/repo1/magedeploy.git is your actual git url for your repo.
staging.php
|
1 2 3 4 5 6 7 8 9 10 11 12 13 14 15 16 17 18 19 20 21 22 |
<?php /** * @copyright Copyright (c) 2017 Matthias Walter * @copyright Copyright (c) 2017 netz98 GmbH (http://www.netz98.de) * * @see LICENSE */ namespace Deployer; use N98\Deployer\RoleManager; $deployPath = '/home/test/www'; $staging = host('192.168.1.67'); // IP of the staging server $staging->set('bin/n98_magerun2', 'n98-magerun2.phar'); $staging->user('test'); // user of the staging server $staging->configFile('.ssh/config'); $staging->set('deploy_path', $deployPath); $staging->stage('staging'); $staging->set('config_store_env', 'staging'); $staging->roles('web','db','staging'); |
production.php
|
1 2 3 4 5 6 7 8 9 10 11 12 13 14 15 16 17 18 19 20 21 22 23 24 |
<?php /** * @copyright Copyright (c) 2017 Matthias Walter * @copyright Copyright (c) 2017 netz98 GmbH (http://www.netz98.de) * * @see LICENSE */ namespace Deployer; use N98\Deployer\RoleManager; $deployPath = '/home/magento/www'; $sshConfigFile = '.ssh/config'; $production = host('192.168.1.113'); // IP of the production server $production->set('bin/n98_magerun2', 'n98-magerun2.phar'); $production->user('magento'); // user of the production server $production->configFile($sshConfigFile); $production->set('deploy_path', $deployPath); $production->stage('production'); $production->set('config_store_env', 'production'); $production->roles('web','db','production'); |
config
|
1 2 3 4 |
StrictHostKeyChecking no ControlMaster auto ControlPath ~/tmp/ssh-mux-%h-%p-%r |
The files inside /home/testuser/site/Task are
- BuildTasks.php
- CleanupTasks.php
- DeployTasks.php
- MagentoTasks.php
- SystemTasks.php
- TaskAbstract.php
Some of the tasks required sudo access. So it will be difficult for us to automate the process because it will ask for password when sudo access is needed. We will remove sudo related tasks in these files.
In BuildTasks.php comment these lines
|
1 2 3 |
#\Deployer\run("sudo chown -RH $owner $dir"); #\Deployer\run("sudo chmod -R $mode $dir"); |
In CleanupTasks.php remove sudo
|
1 2 |
\Deployer\run("rm -rf {{deploy_path}}/releases/$release"); |
In SystemTasks.php comment these lines
|
1 2 3 |
#\Deployer\run("sudo service $service restart"); #\Deployer\run("sudo service $service restart"); |
If your user in staging and production server has sudo access you do not need to edit these files.
Create password less authentication from Jenkins server to staging and production server
Go to home directory of user jenkins
|
1 2 |
ssh-copy-id test@192.168.1.67 # staging server ssh-copy-id magento@192.168.1.113 # production server |
Now, you can execute command on remote server without password
Create scripts for running deploy tasks
I have created 4 scripts for deploying Magento
- setup.sh
- build.sh
- stage.sh
- prod.sh
setup.sh
|
1 2 3 4 5 6 7 8 |
#!/bin/bash set -ex if [ -d /home/jenkins/magento2 ] then rm -rf magento2 fi composer create-project mwltr/magedeploy2-base magento2 |
build.sh
|
1 2 3 4 5 6 7 8 |
#!/bin/bash set -ex cp site/magedeploy2.php magento2/ cd /home/jenkins/magento2 ./vendor/bin/robo validate ./vendor/bin/robo deploy:magento-setup master ./vendor/bin/robo deploy:artifacts-generate |
stage.sh
|
1 2 3 4 5 6 7 8 9 10 11 12 |
#!/bin/bash set -ex cd /home/jenkins/magento2 cp ../site/staging.php config/ cp ../site/config .ssh/ cp -rv ../site/Task vendor/n98/n98-deployer/src/Deployer/ ./vendor/bin/dep deploy:prepare staging ./vendor/bin/dep server:setup staging ssh test@192.168.1.67 php /home/test/www/current/bin/magento setup:install --db-host="127.0.0.1" --db-name="staging" --db-user="dbuserstage" --admin-email="[email protected]" --db-password="msdjo335s" --admin-firstname="Suranjan" --admin-lastname="Horrow" --admin-password="webkul123" --admin-user="admin" --backend-frontname="admin" --base-url="http://staging.mysite.com/" --base-url-secure="https://staging.mysite.com/" --language="en_US" --use-rewrites=1 cd /home/jenkins/magento2 ./vendor/bin/dep deploy staging |
prod.sh
|
1 2 3 4 5 6 7 8 9 10 11 12 |
#!/bin/bash set -ex cd /home/jenkins/magento2 cp ../site/production.php config/ cp ../site/config .ssh/ cp -rv ../site/Task vendor/n98/n98-deployer/src/Deployer/ ./vendor/bin/dep deploy:prepare production ./vendor/bin/dep server:setup production ssh magento@192.168.1.113 php /home/magento/www/current/bin/magento setup:install --db-host="192.168.1.113" --db-name="production" --db-user="dbuserprod" --admin-email="[email protected]" --db-password="qh3gf4ce" --admin-firstname="Suranjan" --admin-lastname="Horrow" --admin-password="webkul123" --admin-user="admin" --backend-frontname="admin" --base-url="http://mysite.com/" --base-url-secure="https://mysite.com/" --language="en_US" --use-rewrites=1 cd /home/jenkins/magento2 ./vendor/bin/dep deploy production |
Now we need to execute these shell scripts through Jenkins pipeline.
Create pipeline jobs in Jenkins
Login to your admin panel in Jenkins.
Go to New Item -> Pipeline
Create a name for your pipeline and your job will be created.
Then got to Build Triggers and select Trigger builds remotely. Give your Authentication Token. The Authentication Token will be used in git webhook.
In Pipeline script copy the following codes.
|
1 2 3 4 5 6 7 8 9 10 11 |
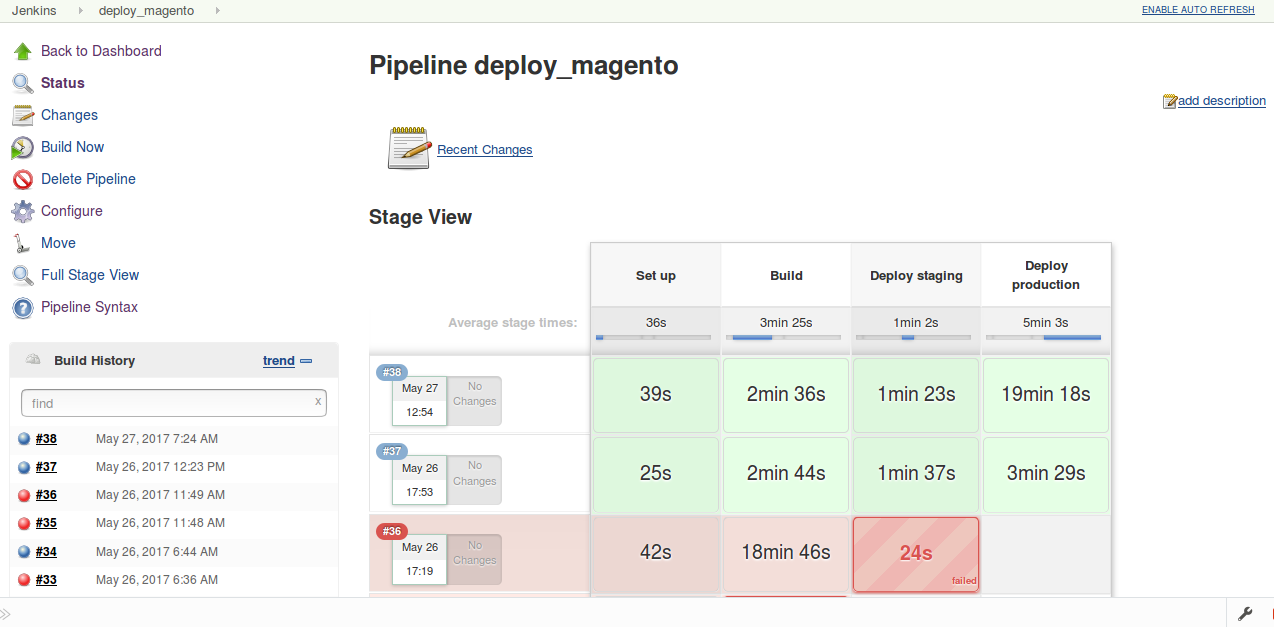
node('master') { stage('Set up') sh 'su - jenkins -c "bash setup.sh"' stage('Build') sh 'su - jenkins -c "bash build.sh"' stage('Deploy staging') sh 'su - jenkins -c "bash stage.sh"' stage('Deploy production') sh 'su - jenkins -c "bash prod.sh"' } |
In this pipeline script we are defining 4 stages. If one of the stage is failed, the Jenkins job will be stopped.
Now, save your Jenkins pipeline job.
Setting up your git repository
Create a repository for magento2. We will upload our files in this repository.
Now go to Settings of this repo and select Web hooks. Write the url you want to trigger when someone pushes the code into git.
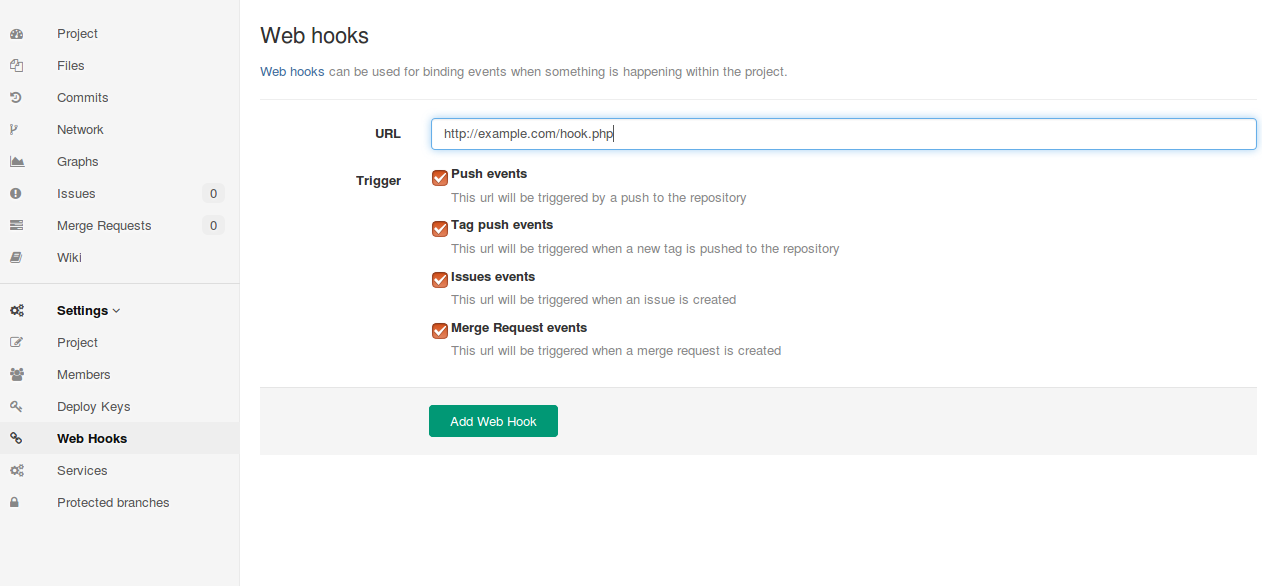
When someone pushes the code http://example.com/hook.php will be called. In hook.php I am executing a curl command which will trigger the Jenkins job we have previously defined.
hook.php
|
1 2 3 4 |
<?php shell_exec('curl http://user:[email protected]:8080/jenkins/job/deploy_magento/build?token=sgfed35e3d2'); ?> |
In this code user and pass is the username and password of Jenkins admin user. The job name is deploy_magento and sgfed35e3d2 is the Authentication Token we defined at the creation of the Jenkins Job.
Now, we have completed setting up our server. For installing magento2 upload magento2 setup files in the git repository. This will trigger the job defined in Jenkins. Job will start automatically and start executing the scripts. When the job is completed you can visit your staging server and production server in the browser. If you want to install modules in magento2, just push your module codes to the git repository and it will be automatically tested and deployed to the production server.
If your job failed for some reason, you can check the build logs. This is all about setting up Continuous Integration and Continuous Deployment environment for magento2. If you have any query regarding the setup procedure, you can ask me in the comment.
IN CASE OF ANY QUERY, CONTACT US