In my previous blog, i talked about the brief introduction of memcached and how does it help us to make database access faster in most of the web applications. If you have’nt read the blog yet, you can follow the link:- http://cloudkul.com/blog/memcached-a-distributed-memory-object-caching-system
Today, let us focus on some practical aspects of memcached. I will start with the basic memcached installation on Ubuntu 14.04 followed by a practical approach to cache data from MySQL using Memcached and PHP script.
Here we go !!
PREREQUISITES:
Before we get started, you must have a ubuntu machine with the basic LAMP server configured on it.
INSTALL MEMCACHED ON UBUNTU 14.04 :
Run the following commands to install memcached and it’s component :-
|
1 2 |
sudo apt-get update sudo apt-get install memcached php5-memcached |
Restart Memcached service using the following command :-
|
1 |
service memcached restart |
CHECK THE INSTALLATION :
In order to verify the installation, create a info.php file in apache’s default document root i.e /var/www/html :-
|
1 |
sudo nano /var/www/html/info.php |
To call a php function that collects and prints information about our server into web browser, write out the following in this file :-
|
1 2 3 4 5 |
<?php phpinfo(); ?> |
Hit the URL :-
|
1 |
http://server_domain_name_or_IP/info.php |
If you scroll down or search for the “memcached” section header, you should find something that looks like this:
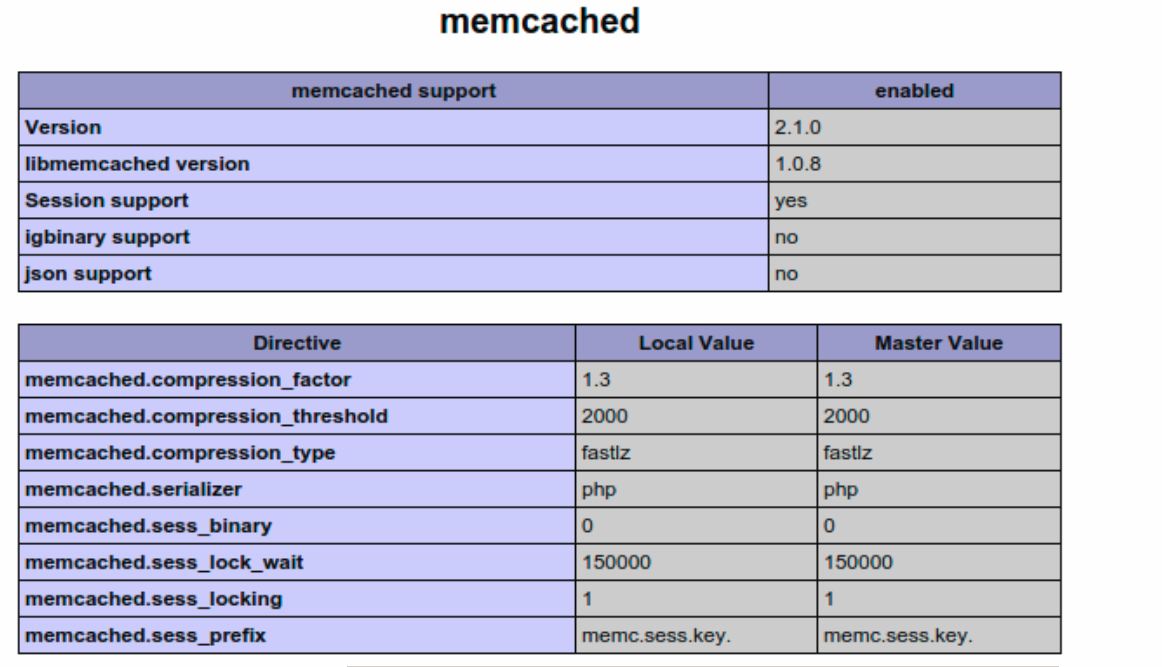
This means that the memcached extension is enabled and being found by the web server.
Also check whether memcached service is running by typing the following command :-
|
1 |
ps aux | grep memcached |
CREATE SAMPLE DATA IN MYSQL :
Login into mysql :-
|
1 |
mysql -u root -p |
Create a database, give it a name of your choice and select it for further use.Here, we have named it as ‘memcached_test’.Run the following commands on MySQL prompt :-
|
1 2 3 |
CREATE DATABASE memcached_test; USE memcached_test; |
Create a user ‘test’ with a password ‘mytesting123’ that has access to the database we created :-
|
1 |
GRANT ALL ON memcached_test.* TO test@localhost IDENTIFIED BY ‘mytesting123’; |
Create a table in database and insert some sample data using the following commands :-
|
1 2 3 |
CREATE TABLE sample_data (id int, name varchar(20)); INSERT INTO sample_data VALUES (100, “Joe Phillips”); |
Exit MySQL by simply typing exit command.
CREATE A PHP SCRIPT TO CACHE MYSQL DATA :
Create a php script named ‘database_test.php’ in our document root as :-
|
1 |
sudo nano /var/www/html/database_test.php |
Now,we’re going to create a PHP memcached instance and then tell it where the memcached service running on our server is located. Memcached runs on 11211 port by default.Write out the following lines in database_test.php :-
|
1 2 3 4 5 6 7 |
<?php $mem = new Memcached(); $mem->addServer(“127.0.0.1”, 11211); ?> |
Next, we have to define how PHP can connect to our MySQL database.We need to specify the login credentials for the user we created and then we’ll need to tell it which database to use :-
|
1 2 3 4 5 6 7 8 9 10 11 |
<?php $mem = new Memcached(); $mem->addServer(“127.0.0.1”, 11211); mysql_connect(“localhost”, “test”, “mytesting123”) or die(mysql_error()); mysql_select_db(“memcached_test”) or die(mysql_error()); ?> |
In order to fetch the data we have inserted into database, we have to create a query and store it in a $query variable.Also,create a $querykey variable to store the key that memcached will use to reference our information.
|
1 2 3 4 5 6 7 8 9 10 11 12 13 14 15 |
<?php $mem = new Memcached(); $mem->addServer(“127.0.0.1”, 11211); mysql_connect(“localhost”, “test”, “mytesting123”) or die(mysql_error()); mysql_select_db(“memcached_test”) or die(mysql_error()); $query = “SELECT name FROM sample_data WHERE id = 100”; $querykey = “KEY” . md5($query); ?> |
Next, we’ll create a $result variable that will hold the result from our memcached query.We are now ready to implement the actual testing logic that will determine what will happen when the result is found in memcached. If the results are found, we want to print the data that we pulled out and tell the user that we were able to retrieve it from memcached directly:
|
1 2 3 4 5 6 7 8 9 10 11 12 13 14 15 16 17 18 19 20 21 22 23 24 25 |
<?php $mem = new Memcached(); $mem->addServer(“127.0.0.1”, 11211); mysql_connect(“localhost”, “test”, “mytesting123”) or die(mysql_error()); mysql_select_db(“memcached_test”) or die(mysql_error()); $query = “SELECT name FROM sample_data WHERE id = 100”; $querykey = “KEY” . md5($query); $result = $mem->get($querykey); if ($result) { print “<p>Data was: ” . $result[0] . “</p>”; print “<p>Caching success!</p><p>Retrieved data from memcached!</p>”; } ?> |
If the results are not found, we want to use the query that we crafted to ask MySQL for the data. We will store this into the $result variable we made.After we have the result of the query, we need to add that result to memcached so that the data will be there the next time.
In order to accomplish this, we have to supply the key $querykey variable to reference the data, the data itself as stored in $result variable and the time to cache the data in seconds.
|
1 2 3 4 5 6 7 8 9 10 11 12 13 14 15 16 17 18 19 20 21 22 23 24 25 26 27 28 29 30 31 32 33 34 35 36 37 |
<?php $mem = new Memcached(); $mem->addServer(“127.0.0.1”, 11211); mysql_connect(“localhost”, “test”, “testing123”) or die(mysql_error()); mysql_select_db(“mem_test”) or die(mysql_error()); $query = “SELECT name FROM sample_data WHERE id = 1”; $querykey = “KEY” . md5($query); $result = $mem->get($querykey); if ($result) { print “<p>Data was: ” . $result[0] . “</p>”; print “<p>Caching success!</p><p>Retrieved data from memcached!</p>”; } else { $result = mysql_fetch_array(mysql_query($query)) or die(mysql_error()); $mem->set($querykey, $result, 20); print “<p>Data was: ” . $result[0] . “</p>”; print “<p>Data not found in memcached.</p><p>Data retrieved from MySQL and stored in memcached for next time.</p>”; } ?> |
This is our completed script. First,it will attempt to get data from memcached and print it on the screen. If the data could not be found in memcached, it will query from MySQL directly and cache the results for 20 seconds.
TEST THE SCRIPT :
Hit the URL :-
|
1 |
http://server_domain_name_or_IP/database_test.php |
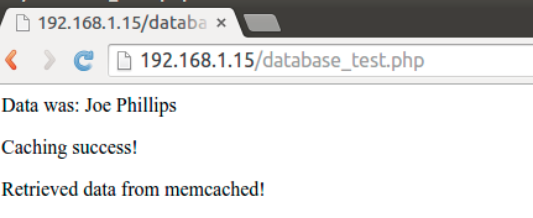
The first time we visit the page, we should see output :-

If we refresh this within 20 seconds,the page should now display the different message :-
After waiting for a while, the cache content will expire and will be removed from memcached again. If we refresh at this point, it will display the first message again since the server must go back to the database to retrieve the data values.
By now, you might have an idea of how memcached works and how you can utilize it to keep your web server from hitting the database repeatedly for the same content.